


How to choose a network camera
Before getting to the heart of this guide, I suggest you read a couple of tutorials that I have dedicated in the past to network cameras: if you have not yet purchased a camera for your home and you want some advice about it, do not hesitate to read the my buying guide dedicated to IP cameras, in which I explained how to evaluate the characteristics of this type of product and I recommended some of the best cameras available on the market. If, on the other hand, you want to learn more about the operation of IP cameras after their installation (which I will tell you about in this tutorial), I invite you to read my guide on how IP cameras work.
How to connect cameras to the network
Now let's see how to connect a camera to the network. There are various ways to do this, both wirelessly and via cable - here are all the details.
WPS
First, after locating the optimal location for your camera and making sure it is fixed in a stable position, locate the button dedicated to the connection on it, press it and keep it pressed for a few seconds. This button is usually recognizable, as it shows the writing WPS or an icon of two arrows arranged around a circumference.
Once this is done, move to the room where the Wi-Fi router of your home network and locate, on it, the same button that I indicated before, which has the same wording or the same icon and could be located along one of the two side panels of the device. Entering the wireless network password is not required for connection.
You must know, in fact, that, during this operation, you are taking advantage of the technology WPS, Short for Wi-Fi Protected Setup, ie “secure Wi-Fi configuration”. This function, available for several years now on most network devices on the market, allows you to "launch" the WPS request on both devices (therefore both on the router and on the device that must connect), within a window of about 120 seconds, from each other. Within moments of pressing both WPS buttons, the camera will be connected to your Wi-Fi network.
In case of problems, I invite you to consult the user manual of the camera you purchased: it is possible that there are some minor differences, relating to the number of seconds for which the WPS button must be kept pressed or other small discrepancies.
Manual Wi-Fi connection
Although the use of WPS technology is certainly the easiest and fastest way to establish the connection, you should know that there are other alternative ways, such as manual connection in Wi-Fi.
If your router does not support WPS connection, you can decide to connect your camera manually. You can do this using the wizards that are proposed by the official mobile applications, which I explained to you in the chapter dedicated to apps for connecting cameras on the network.
The steps may vary considerably from manufacturer to manufacturer but, in general, after opening the application and starting the guided configuration procedure, it will be possible to select, on the smartphone or tablet display, the item Manual, instead of the WPS entry.
As a result, the camera will start broadcasting its wireless network and will ask you to connect from the device you are using - however, follow the on-screen instructions. If in doubt, I invite you to consult this guide of mine, in which I explain how to connect a mobile phone to the Wi-Fi network.
POE
If you prefer a wired connection over the wireless connection, you should know that some network cameras are compatible with the technology POE - Power over Ethernet, which allows to carry the incoming power supply on the same network cable that connects the camera to the router.
In this case, the connection is very simple: all you have to do is connect the two connectors RJ45 of your cable to one of the ports LAN of the router and the appropriate input port of the camera. There are no access credentials to enter: the camera automatically attests to the network, just like all devices on the wired LAN do.
How to remotely access network cameras
Once the connection is complete, the simplest way to access your camera is to use its web panel: some configuration operations are required to access it not only in the local network, but also remotely.
To begin with, open the configuration page of your home router, typing theIP address in the address bar of your favorite browser. Usually, the modem's IP address is 192.168.1.1 or 192.168.0.1. Initially, you can do, without any kind of problem, these two attempts: if in neither case the router configuration page should open, please follow all the alternative strategies that I have given you in my guide dedicated to how to find the IP address of the router.
Now that you have reached the page dedicated to your router, enter your login credentials: if you have not changed them, the most common combinations are admin/admin e admin / password. In case they don't work, I invite you to refer to the router manual or to my guide where I tell you how to find the router's username and password.
Inside the configuration panel, you need to find the item that allows you to check the list of devices connected to the router: look for the items Connected devices e Wi-Fi devices or, if they are not present, take a look at my tutorial in which I explain how to view the list of devices connected to the router.
At this point, identify, within the list, the camera that you have just connected: it should be identified with a generic term which, in In your languagen or English, is synonymous with camera, or with an acronym that identifies the brand or model.
Once you've found the camera, you just have to make a note of hers IP address, i.e. the address that identifies the position of the device within the local sub-network, and type it in the address bar of the browser: in this way, you will be able to view the web management panel of the camera.
In most cases, the browser displays a dialog box that prompts you to enter your login credentials for the camera's web server. Generally, the same are shown on a sticker physically placed on the camera, or on a small card included in the package.
As soon as you are logged in, you will be able to use the camera panel, not only to view the images broadcast live from the camera, but also to make all the advanced configurations you want.
The most important thing to do is to ensure remote access to the camera. To do this, you can take advantage of the port forwarding on your router, in order to open an access gate that, from the outside, leads inside the local network and, in particular, redirects to a specific IP address, which represents the device. Trust me, it's easier done than said.
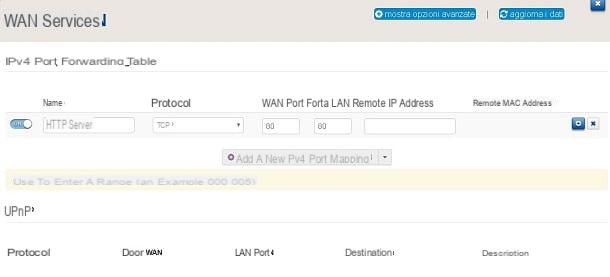
Then go back to the router configuration page and look for the settings Port forwarding or Port mapping, then select the item Add New and enter these parameters.
- Your name: at your choice.
- Protocol: TCP.
- WAN port: your choice (recommended: 80).
- LAN port: 80.
- Remote IP address: the IP address of the camera, which you identified earlier.
From this moment on, when you are away from home, type, in the address bar of your browser, thepublic IP address of your router followed by colon and the number of the WAN port, which you assigned in the previous step, for example PM12.34.567.890:80. You can find out your router's public IP address through its configuration page by looking for entries Internet access or Connection.
By doing so, you will be redirected to the camera server you connected to earlier, as the WAN port you entered points to the camera's local IP address, the same one you entered when you were connected to your home network. Login with credentials will be required, as seen above. To prevent the router from reassigning a new local address to the camera, I recommend that you take a look at my guide to static IP addresses.
Unfortunately, the public IP address of the router is dynamic, i.e. it is changed after a certain time interval, which depends on your telephone operator and the type of subscription you have subscribed to. To overcome this problem, there are two possible ways: you can ask your ISP to activate a static IP address, a paid service and often dedicated to companies, or rely on Dynamic DNS, solutions that allow you to associate, with a free plan, a third level domain through which you can always reach the router.
To start, go to the home page of a site that offers the service Dynamic DNS, for example dynDNS.com, and click on the green button Activate new dynamic DNS, then fill out the form that is proposed to you, entering the data relating to yours Operator / Device, choosing a Host Name, a Username it's a Password and placing a check mark next to the two items I declare to accept the Terms and Conditions of the service and to have read the privacy policy e I expressly accept the following clauses. When you have finished entering all the required data, confirm by clicking on the button Continue, bottom right.
Once you have registered your account, in the menu at the top right, select the items Customer Area> Login, enter your credentials, then click the button Login. Scroll to the bottom of the web page you are viewing and click on the button Host detail, at the bottom right, then, in the middle position, click on the button Host configuration. Now, go back to the router configuration page and look for the entries WAN Services> DynDNS. At this point, enter i Configuration data of the host, as shown on the page Host configuration, which you opened earlier, and click on any button Attiva, which may be present.
Very well, from now on you are free to type the configured domain in place of the public IP address. The example I gave you earlier becomes, therefore, hostname: 80: the hostname is the full domain you chose during registration. The domain will be automatically updated to point to any new public IP addresses your router will connect to. The only concern, reserved for your free plan, will be to confirm the host once every 30 days: you will receive an email on the mailbox indicated during registration, which will remind you of this step and will show you the methods with the which ones to carry it out.
App to connect cameras on the network
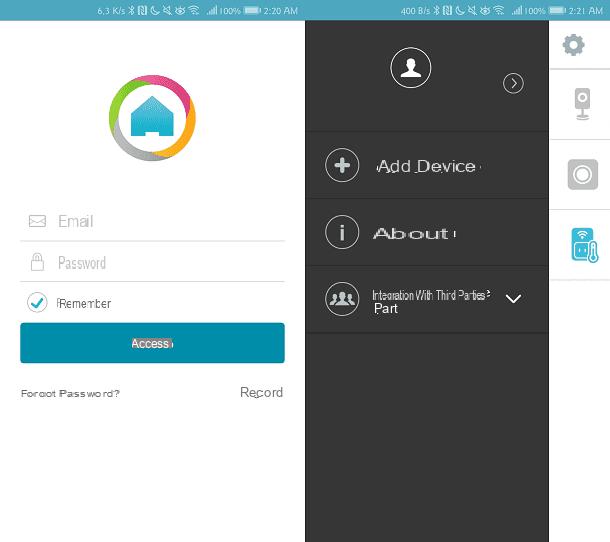
If you find access via a web browser inconvenient and prefer to use aapplication for your smartphone or tablet, to see through the eye of your camera, I can recommend some apps suitable for the purpose. I remind you, however, that although most of them are useful because they guide the user during configuration, they are not universal, but compatible only with the cameras produced by the application developer itself.
- mydlink Home (Android / iOS) - allows you to manage all the devices in the branded connected home dlink: not only cameras, but also motion sensors and smart sockets, for example. It is also possible to set different interaction rules, to make certain actions take place as a consequence under certain conditions. You can consult the compatible devices from the appropriate list, published in the description of the application, on the store page.
- Arlo (Android / iOS) - application dedicated to the cameras of the homonymous series, produced by Netgear. Connect to indoor cameras (Arlo) and from outside (Arlo Q) and to configure the settings related to the detection of sound and motion.
- Visidom by Somfy (Android / iOS) - application for the management of range cameras Somfy Visidom. It allows you to view and “listen” in live and record some passages in the memory, internal or external, if available, of your device. Finally, it includes the wizards for installing the cameras, via cable or wireless.


