


Although not as powerful as Excel, Word can handle tables. You can not only create them directly in your documents, but also modify them, sort and calculate or even change the borders.
There are several ways to create tables in Word: by copying and pasting from Excel with or without linking (linking allows you to synchronize the data in the Word document with that of the Excel document), or by drawing the table directly in Word. You can also create an Excel table in your Word document, while temporarily having all the tools of Excel!
You should choose Word to create a table if it contains complex graphical formatting: bulleted lists, custom tabs, numbered lists, first line indents, different formatting on different cells, or diagonal splitting of cells. Word also offers a web layout.
However, you should choose Excel if you plan to insert complex calculations, statistical analyzes or diagrams into your table. Excel also provides advanced sorting and search functions.
If you insert a table in Word, it will initially be "standard", that is, with the same number of cells per row and per column. To transform it into an asymmetric table, you will then have to merge or split certain cells. Even if your board is quite unusual, this might be the easiest way to go if you are just starting out.
You also have the possibility to draw "with the mouse" all the rows of the table. In this case, it will be a good idea to prepare the model on paper.
How to create a table in Word?
Here is the procedure to follow to create an initially symmetrical table.
- Click in the document where you want to create a table.
- First method: on the ribbon Insertion, click on Table then drag the mouse pointer to select the desired number of rows and columns.
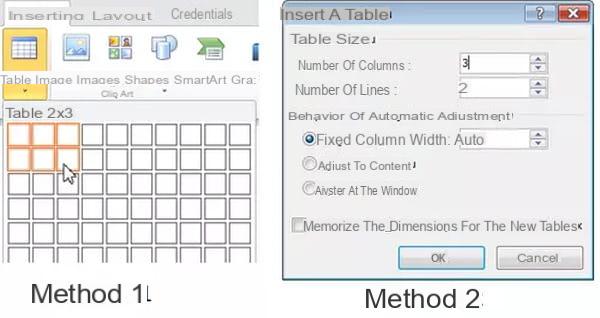
- Second method: on the ribbon Insertion, click on Table, Insert table then enter the appropriate values in the dialog box Insert table.
-
Get in the habit of displaying hidden elements in order to view all the elements that make up the table (by clicking on ¶ on the ribbon Home), and preferably choose the Page display mode.
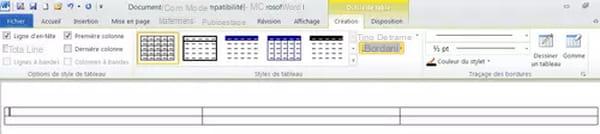
- An empty table appears in the document, and in Word 2010, the ribbons Creation et Disposal Table Tools appear. They disappear as soon as you click outside the table.
-
The names of these contextual ribbons / tabs vary depending on your version of Word. In recent versions of Word such as Word 365 for Windows and macOS, they appear in blue and to the right of the screen, only when the pointer is in an array. These ribbons are called Table design et Layout. Be careful, this is not the black tab Layout located between the tab Design and the tab References, but of the blue tab Formatted far right (illustration below).

-
As always with the graphic elements, the gallery of styles in the center of the ribbon Creation (see above) offers predefined table formats. Click on the triangle on the right to display all the available models and click on one of them if it meets your need.
How to handle a Word table?
Once the table is displayed, it behaves like a graphical element. To resize it, move it, delete it, etc., you need to know where to click and how. Let's start with the "strategic points" of the table.
| Masked character | Role |
|---|---|
 |
Table selection and movement handle (appears on the upper left corner in Page display mode when the pointer is near). |
 |
End of cell or line mark. |
 |
Table resize handle (in the lower left corner in Page view mode when the pointer is near). |
Since the table is a graphic element, it is important to know how to interpret the shape of the mouse pointer and to know where to position it for certain operations:
| pointer | Where to point? | Action |
|---|---|---|
 |
On a vertical line | Click and drag to widen or reduce the width of a column. |
 |
On a horizontal line | Click and drag to widen or reduce the height of a row. |
 |
On the table selection handle (upper left corner) | Click to select the entire table. Click and drag on this handle to move the entire table in the document. Right click to obtain the commands linked to the table (see below) |
 |
On the top row of a column | Click to select the column. Right click to get the commands linked to the table. |
 |
In the left margin, in front of a line | Click to select the row. Right click to get the commands linked to the table. |
 |
On the resize handle | Click and drag to resize the table. |
Almost all of these operations done directly with the mouse can be done in some other way if you are not very skilled with it, or if you are working in Draft poster mode.
To get started, you have the Select menu, to the left of the Layout ribbon, to select the cell you clicked in, the column of the active cell, the row of the active cell, or the entire table:
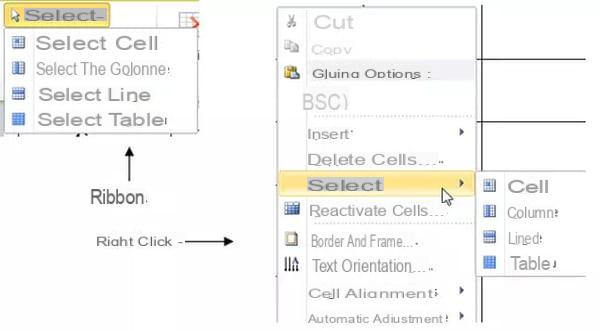
You also have the right click which offers the same selection operations (see above).
How to align and split Word table?
The table has a few characteristics in common with other Word graphics elements, such as the page alignment options.
- Click on Properties to the left of the ribbon Arrangement/blue tab Layout, and then click an alignment option in the Table Properties dialog box:
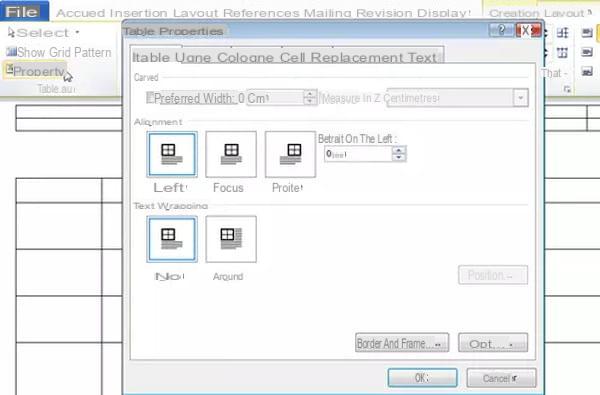
- Note that the Text wrapping section of the tab Table offers the option Around to frame the table with text (as for the pictures).
- Splitting occurs naturally when the table must continue on the next page, but you can impose this separation by clicking in the first row of the second table then on Split the array on the ribbon Arrangement/blue tab Layout.
- If the table "overflows" on one or more pages, you can copy the header row at the start of each page ...
- Click in the header row of the table.
- Click on Property on the ribbon Arrangement/blue tab Layout (or right click, Table properties) then on the Line tab of the dialog box.
- Check the box Repeat at the top of every page as a header row.
-
Of course, you will only be able to see the effect of this property in display mode. Page.
How to draw a table "by hand" in Word?
There is another way to draw a table, designed to get more complex tables, with cells of different height or varying number of columns per row, for example.
- On the ribbon Insertion, click on Table, And then Draw a table.
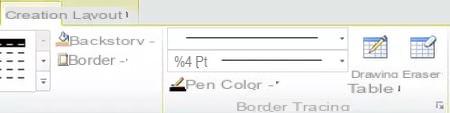
- The mouse pointer changes to a pencil. Click and drag the mouse pointer diagonally to draw the outline of the table. The Table Tool Design and Layout ribbons appear. The tools for drawing the table are located to the right of the ribbon Creation ( Table design).
-
Then draw the lines and columns inside the rectangle by clicking and dragging with the pencil.
-
To delete a row or a set of rows, click on the Service in the ribbon then on the line to be erased.
-
Three lists allow you to change the line style, change its thickness or change color. The change made will only affect the following tracks.
-
Hint: if you lost the pencil, just click again Draw a table on the ribbon Creation (or blue tab Layout in Word 365).
-
A drawn table behaves exactly like an inserted table, so you can apply any techniques to fill and format it.
How to format cells in Word table?
To fill a table, just click in the cells and enter your text. When it comes to character formatting, you have all the tools on the ribbon Home, such as when you enter text in the document. Here are the table-specific formatting options.
- Positioning of the text in the cell: select the cells to format then click on one of the tools in the group Alignment on the ribbon Disposal (or blue tab Layout). In Word 2010, you can also right click, choose Cell alignment. Observe the shape of the icon, the drawing is quite explicit and represents the position of the text in the cell.
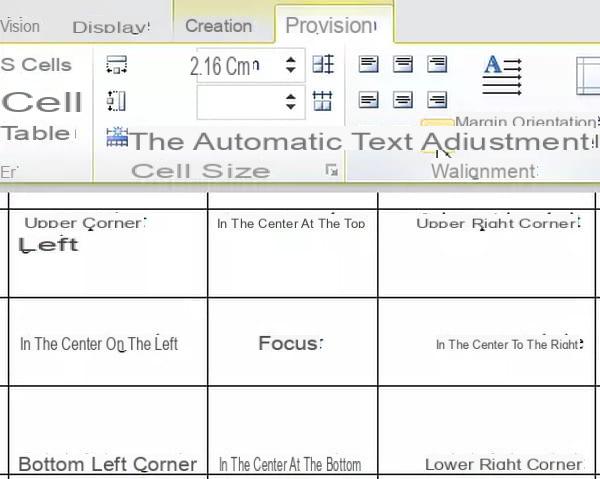
- Text orientation in the cell: select the cell (s) concerned then click on Text orientation in the ribbon Arrangement/blue tab Layout (or right click, Text orientation). Click multiple times to switch from one orientation to the other. With each click, the left alignment icons change to reflect the new orientation.

- Cell margin: select the cell (s) concerned then click on Cell margin on the ribbon Arrangement/blue tab Layout. Enter the size of the margins in the dialog box that appears.
-
To know : the style of text in your cells has before and after spacing properties that already impose a "spacing" between lines of text and the top and bottom edges of the cell. If you specify top and bottom margins, you increase the initial spread.
- Split or merge cells: it is sometimes necessary to unite two cells into one or, on the contrary, to create several cells in one. First select the relevant cell (s). Then click on Merge cells or Split cells on the ribbon Arrangement/blue tab Layout. You also have these commands directly from the right click.
How to change the borders and shades of a Word table?
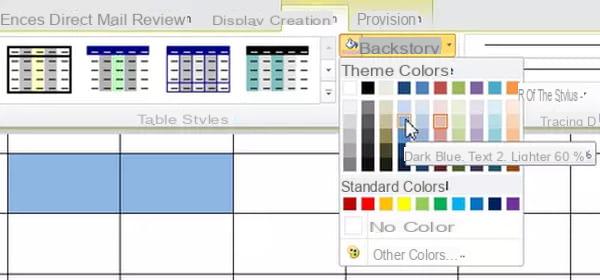
If none of the styles in the Design ribbon gallery meet your need, you can easily change the background color or frame for each cell.
- To color the cells, select the relevant cell (s).
- Click on Shading in the ribbon Creation / Creation of the table then on the chosen color. Note that these screens are available in a solid color version only (no gradient or texture).
How to modify the rows and columns of a table?
The group Lines and columns ribbon Disposal or the blue tab Layout in Word 365 includes all the tools related to manipulating the rows and columns of the table.
- Click on Insert above to insert a row above that of the active cell.
- Click on Insert below to insert a row below that of the active cell. To add a line at the end of the table, all you have to do is position yourself in the last cell then press the tabulation key.

- Click on Insert left to insert a column to the left of that of the active cell.
- Click on Insert right to insert a column to the right of that of the active cell.
-
All these commands are also available with the right click, Insert.
How to do sorts and formulas in a Word table?
Some simple functions are available with Word tables: sorting, calculating a sum, an average or a number of elements.
- To sort a table according to one or more of its columns (text or numeric), click in the table.
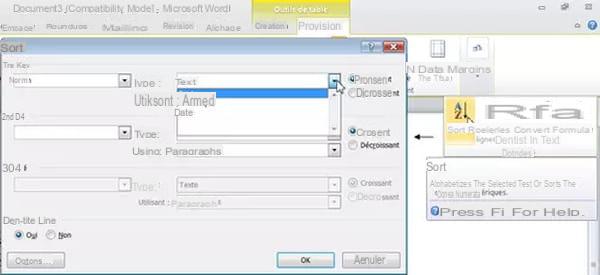
- On the ribbon Creation/blue tab Layout, click on Data on the right then on Trier. The Sort dialog box appears:
-
In the field 1st key, choose the column on which to sort (the list contains the column headers). Optionally select another column for the second level of sorting in the field 2nd key.
-
In the field Typechoose Text, Numeric ou Date according to the content of the sort column.
-
Check the option Croissant ou Descending on the right to specify the sort order.
-
Finally, do not forget to tick the box Yes in the lower left corner if the first row contains headers (otherwise this first row will be sorted with the others).
-
To perform a simple calculation, click in the calculation cell.
-
On the ribbon Disposal/ blue tab Layout, click on Data then Formulas. The dialog box with the same name appears:
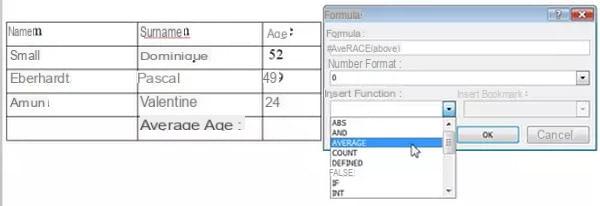
- The formulas in Excel have been translated into French but this is not yet the case with Word, so add your dictionaries! If the selected cell is at the bottom of a column of numbers, Word provides the formula = SUM (ABOVE) which calculates the sum of the numbers above it. Click on OK if the proposal suits you.
- If the selected cell is at the right end of a row of numbers, Word provides the formula = SUM (LEFT) which calculates the sum of the digits to the left. Click on OK if the proposal suits you.
-
Otherwise, delete the proposed formula (keeping the equal sign), and choose another from the list Insert function (see previous figure).
-
You must then specify in parentheses which cells the calculation relates to. If it's not Above (values above) or Left (values to the left), specify the cell references as if you were in Excel. The columns are named A, B, C ... and the rows are numbered starting from 1. To calculate the average in the previous table, for example, we could have written = AVERAGE (C2: C4) which means average of cells C2 to C4.
-
In the Format box, type the format of the numbers. For example, to display numbers without a decimal point choose 0, and to display them as a decimal percentage, click 0,00%.
-
Warning ! You are not in Excel. If you change the values in the referenced cells, the calculation is not updated. To update it, select the field and press the key. F9.
-
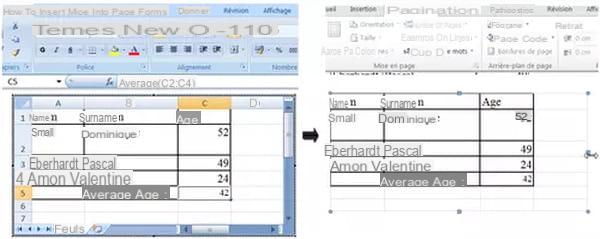
How to copy paste a table from Excel to Word?
In recent versions, Word is full of options for formatting tables. However, if some of your tables have calculated data that requires formulas, it is best to make the table in Excel, which is much more agile for performing calculations. You will then integrate this table into your Word document by copy and paste. In addition, you will have a choice. Or ask Word to keep a link with the original table in Excel: any modification in Excel will then be carried over to Word. Or break the link between Excel and Word and keep an independent copy of the table in the Word document.
Launch your two Microsoft Office software and follow our advice.
- Open the Microsoft Word document as well as the Microsoft Excel spreadsheet that contains the data from which you want to create a linked or embedded object (these two concepts are explained later).
- Switch to Microsoft Excel, then select the cells in the table.
- Right click and choose Copier (or press Ctrl + C).
- Switch to the Microsoft Word document, and then click where you want to insert the table.
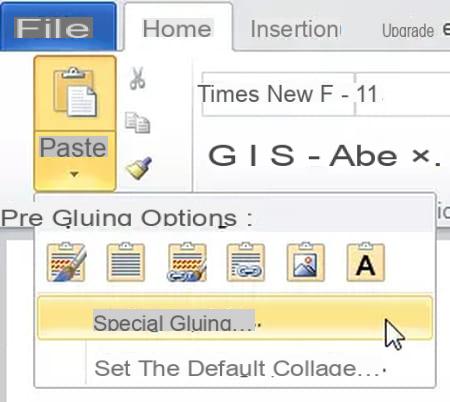
- In the ribbon Home, click on Paste> Special paste.
-
In the Paste Special dialog box, click Paste with binding to link the pasted table to the one saved in Excel. In this case, any changes made to the source Excel table will be automatically reflected in the Word document. Otherwise, click Coller to simply insert the array (which thus becomes independent of the source array).
-
Read carefully the information provided in the Result section of the dialog box, in order to choose the correct option in the section As.
How to create an Excel table in Word?
If the table to be inserted in Word must contain formulas and it does not already exist on an Excel worksheet, you can work in your Word document while benefiting from the tools and functions of Excel.
- On the ribbon Insertion, click on Object (to the right).
- In the dialog box Insert objectchoose Microsoft Excel Spreadsheet (or equivalent) in the Object type list then click on OK.
- An Excel spreadsheet appears in your document, and the ribbons in Excel replace those in Word. Create your table as if you were in Excel, optionally resizing the sheet from the usual handles if it is too big or too small.
- When you are finished, double-click in Word and the table resumes the form of a Word table.
- To work again in the cells of the table, double-click on them and you switch back to the Excel world.
- If you don't want to see empty cells around the table, resize it when displayed in Excel view to align the borders of the sheet with those of the table. Once you double click in the document, the table behaves like an image and if you resize it by dragging its handles, it will just be distorted.
How to delete a whole part of a Word table?
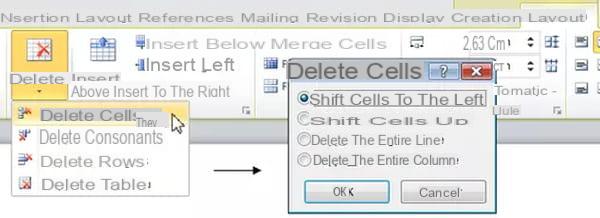
Clicking on Remove in the ribbon Arrangement/blue tab Layout, you get very self-explanatory commands.
- Remove columns deletes the column from the active cell or the selected columns.
- Delete lines deletes the row from the active cell or the selected rows.
- Delete table deletes the entire table.
-
The first option, Delete cells, displays a dialog box in which you must specify how Word should rearrange the rest of the table:
-
Shift cells to the left: the cells located to the right of the deleted cells will shift to the left to "fill" the void created by the deletion.
-
Shift cells up: the cells below the deleted cells will shift upwards to "fill" the gap created by the deletion.
-
Delete the entire row or column: the deletion extends to all cells in the same column or row.
-
- The original text of this practical sheet is taken from "Everything to use Word 2010 well" (Christine EBERHARDT, Collection Idroid.com, Dunod, 2010). Some passages and screenshots have been added to reflect the peculiarities of newer versions of Word.


