


How to connect the LEDs to the mains
The procedure for connect the LEDs the current varies according to the LED strip in your possession: if you have purchased one equipped with power pack, all you have to do is connect the supplied power cable to an electrical socket at home and you're done; if, on the other hand, you have an LED strip without a power supply, you must use a transformer. Find everything explained in detail right below.
How to connect LEDs with power supply
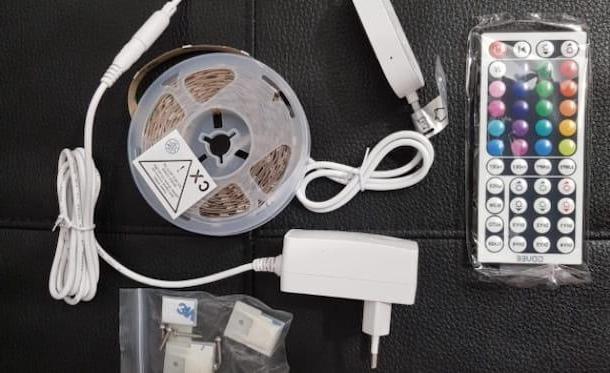
As mentioned in the initial lines of this guide, "ready to use" LED strips are commercially available, ie sold with the appropriate power pack and the relative electric cable, to be connected directly to a traditional socket.
Usually this type of LED strip is purchased by those who do not have the need to illuminate entire rooms but to use LEDs as ambient or decorative light (eg to be installed behind the TV). In fact, since they are connected directly to a power outlet, they cannot be controlled via a switch but only via the supplied remote control or, if the LED strip is equipped with Wi-Fi connectivity, via a specific application and / or via voice commands. .
To connect such an LED strip to the power, first connect the power supply to the LED strip using the appropriate connector (this is not necessary if the LED strip in your possession is connected directly to the electric cable) and then insert the power cord into the electrical outlet of the room in which you want to place the LED strip.
Once this is done, you can turn the lights on and off using the special remote control supplied. Also, if your LED strip has connectivity Wi-Fi, you can proceed to its configuration through a special application to download on your phone.
How to connect the LEDs to the transformer

If you have purchased an LED strip without a power supply, to connect it to the mains you must have a transformer, that is a device that allows to transform an alternating voltage (the 220V one of the electrical systems of the house) into a constant voltage necessary to power the LED strips.
There are various types of transformers, which differ in power (expressed in Watts), electric voltage (expressed in Volts), typology (e.g. transformers for indoor and outdoor) and for the connection to the electrical network (some transformers are not grounded).
Having clarified this, to power an LED strip it is sufficient an indoor transformer (cheaper than outdoor ones) that responds to the characteristics of the LED strip to be powered. Therefore, if the strip purchased is 12V or 24V, it is necessary to make sure that the voltage of the transformer is the same.
Furthermore, it is essential to make sure that the transformer is able to supply all the power absorbed by the LED strip: for example, if a power of 18W is indicated in the specifications of the latter, it is necessary to use a transformer greater than 18W (e.g. 60W, 75W, 120W etc.). Keep in mind that multiple LED strips or even other devices can be connected to one transformer, and as a result, the transformer must be able to supply the required power from all connected devices.
After choosing and purchasing the transformer suitable to correctly power the LED strip in your possession, you are ready to connect everything to the current. First of all, disconnects the power from the main house generator and then proceed to loosen the clamps present on the transformer using a screwdriver.
Once this is done, take the electrical cable you previously obtained from the home system and connect the cables related to the incoming phase (usually the brown or red colored cable) and al neutral (usually the blue wire) into the inputs L e N of the transformer. Connect, therefore, the cable related to the grounding (usually the yellow and green cable) into the appropriate input of the transformer indicated by thethree horizontal lines and one vertical line icon and proceed to tighten all the terminals of the cables you just connected.
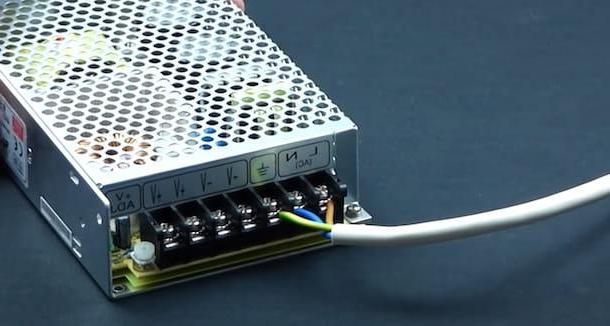
At this point, take your LED strip, connect the positive cable (that red) in the hall V+ of the transformer and the negative cable (that black) in the hall V-, re-tighten the relative clamps and that's it.
Keep in mind that the indications I have just given you may vary depending on how the cables are connected in your electrical system or the type of connection you intend to make (eg put a switch or connect a Sonoff Mini to make the strip "intelligent" LED). For this reason, I invite you to carefully follow the connection diagrams available in the instruction manual supplied with the LED strip or to rely on a person expert in the field.
How to connect the cut LEDs
If you are wondering if it is possible connect the cut LEDs, you will be glad to know that the affirmative answer. In fact, all LED strips have cutting points (indicated by the symbol of scissors) placed at regular intervals that indicate exactly the points where the strip can be cut, according to what are your needs.
To connect the part of the cut strip equipped with output wires to the current, all you have to do is follow the instructions I gave you in the previous paragraphs of this guide to connect the LEDs with power supply or transformer.
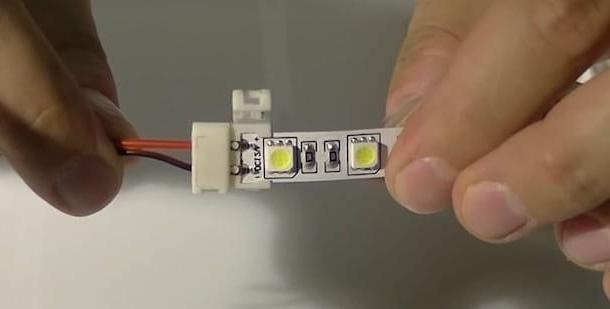
For the parts of the strip not equipped with output wires, on the other hand, you can use special connectors that allow both to connect more cut strips together and to connect the strip in question to the current (in the latter case, you can also solder the copper part of the strip cut with the two electrical cables that you will then have to connect to the transformer): for example, if your intention is to connect two LED strips at an angle, you need a "L" connector, while to connect a cut LED strip to the power you need a connector with electrical cables in output. On the market there are connector kits for all needs.
See offer on AmazonAfter you have obtained the connector of your interest, all you have to do is open it and insert the end of the cut LED strip into it, making sure that the copper part of the LED strip is correctly connected with the connector terminals. If your intention is to connect two cut LED strips, repeat the procedure for the end of the second strip as well.
Once this is done, make sure you have properly closed all the connectors used and proceed to connect the LED strip to the power, as I indicated in the previous lines of this guide.
How to connect the LEDs to the phone
As you well know, there are LED strips with connectivity Wi-Fi, that is able to connect to the home Wi-Fi network, which can also be controlled via a special application to be installed on your phone, thus allowing you to turn on and off the lights remotely and take advantage of other interesting features, such as changing color and brightness of the LEDs, programming their lighting and much more. If, therefore, you have purchased a LED strip of this kind and, now, you are wondering how to connect the LEDs to the phone, all you have to do is follow the directions you find right below.
How to connect the LEDs to the app
To take advantage of the "intelligent" features of the LED strip in your possession, you must connect it to the home Wi-Fi network and, after downloading a specific application on your phone, follow the instructions shown on the screen to complete the configuration.
Before explaining how to proceed, you must know that each LED strip has its own proprietary application, which is indicated in the sales package or in the instruction manual of the LED strip itself (e.g. the LED strips of Goove, which at the time of writing this guide are among the most popular and sold, use the app Govee Home for Android and iPhone / iPad devices).
In some cases, however, it is possible to use universal applications for the remote control of intelligent devices: for example, the LED strips produced by Teckin can be configured and controlled via the app Smart Life for Android and iOS / iPadOS.
In general, regardless of the LED strip you have purchased, all you have to do is download the relevant app from the store of your smartphone and, after starting it, press on the option to create an account. Once this is done, click on the button for add a new device, select the typology (Eg. Lighting o LED strips) And the model of the device in your possession and follow the instructions shown on the screen to start the configuration.
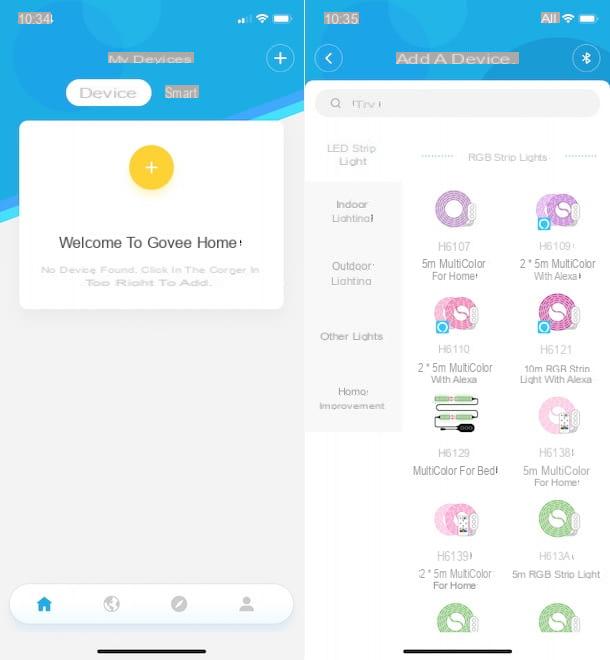
Alternatively, if the app you downloaded allows it, you can also activate Bluetooth on your phone and press on the option for start scanning for devices nearby: as soon as your LED strip is detected, tap its name to start its configuration.
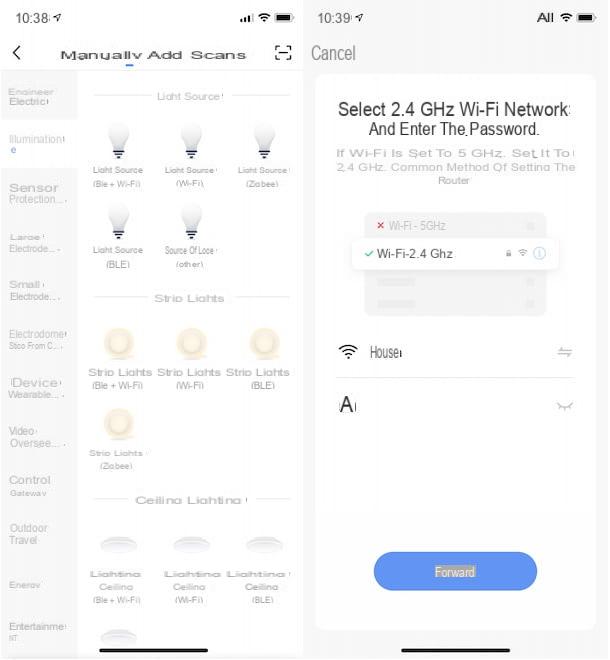
Now, select the WIFI network to connect the LED strip to (please note that most LED strips only support a 2.4 GHz: I therefore advise you to see the GHz of the Wi-Fi you are connected to and, if necessary, activate the 2.4 GHz network from the router's management panel), enter the Password in the appropriate field and press on button to connect and complete the setup.
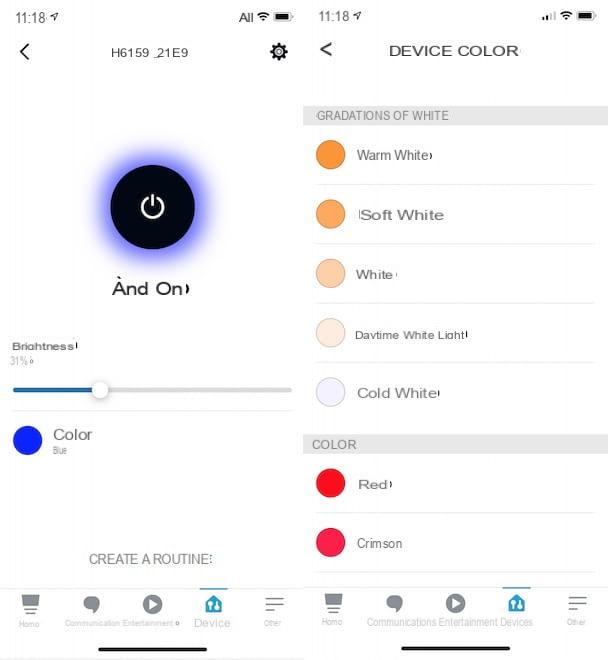
At this point, if everything went well, by accessing both the main screen of the app in question and in the section relating to connected devices, you should view your LED strip and, by pressing on the on / off button, you can turn it on and off even remotely.
Also, by tapping on the name of the LED strip, you will be able to access the main screen of the device and take advantage of all the additional features, such as the ability to program it on and off, set its brightness and color (if you have an RGB LED strip) and much more.
For example, if your LED strip is equipped with a microphone and you want connect the LEDs to the music, that is to synchronize the lights with the surrounding sounds, access the main screen of the LED strip and press on the option to activate the music mode.
How to connect LEDs to Alexa
Be your intention è connect the LEDs to Alexa, take your smartphone, start theAmazon Alexa app for Android devices (also available on alternative stores, for devices without Google services) and iOS / iPadOS and, if you haven't already done so, log in with your Amazon account: then enter your data in the fields Email (phone for mobile account) e Amazon password and press pulsating Log in.
Now, tap on the item devices present in the menu at the bottom, click on the button + located at the top right and choose the option Add device from the menu that opens. In the new screen that appears, in the section All devices, scegli l'opzione Lamp and, in section What brand is this device - lamp?, select the brand of your interest by choosing one of the available options (eg. Govee, Philips, Teckin etc.).
Fatto ciò, first prize Find devices, wait for your LED strip to be detected, tap the button Configure device and, if you want to keep your devices organized by group, choose the option Select group. Then choose the group of your interest (Lounge, bedroom, Kitchen, Lunchroom etc.) and press the buttons Add to group, Continue e Done, to complete the configuration.
At this point, select the option devices located in the menu below, access the section Bulbs and first on / off button related to your LED strip, to turn it on and off remotely. Also, by tapping on the name associated with the LED strip, you can also set its brightness, colore e create a routine.
By pressing, instead, on the icon of the rotella d'ingranaggio, you can change the name associated with the LED strip: keep in mind that the name associated with the device will be useful for controlling it with voice commands. To find out more, I leave you to my guide on how to connect Alexa to the lights.
How to connect LEDs to Google Home
connect the LEDs to Google Home and command its turning on and off both via voice commands and using the Google Home application for Android and iOS / iPadOS, all you have to do is start the app in question and press on the option to add a new device.
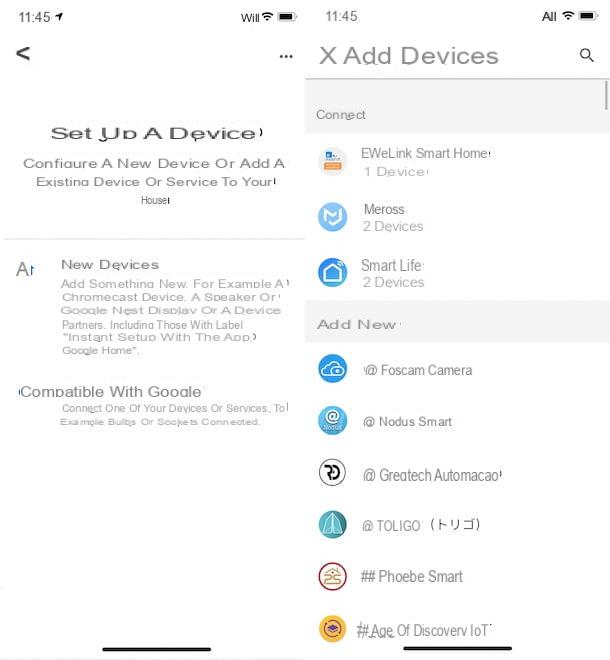
To proceed, therefore, take your smartphone or tablet, start the Google Home app and, if you have not already done so, log in with your Google account. Now, tap the button + located at the top left, select the option Configure device and press on the item Compatible with Google.
In the new screen that appears, select the brand of the LED strip in your possession or the name of the app you previously downloaded and used to configure the device (eg. Govee Home, Smart Life etc.), enter the data of the account you created previously in the appropriate fields (usually Email e Password) and press the button to link the account in question to Google Home.
By doing so, all the devices associated with the account you just connected will be automatically added to Google Home and visible on its main screen: then press on the option Turn on / off related to your LED strip, to turn it on and off remotely. By pressing on name associated with the device, you can also control its brightness, change its color and manage all the other features.
If, on the other hand, you have a Google Home and you want to control the LED strip via voice commands, all you have to do is say the commands "Hey Google, turn on the LEDs" o "OK Google, turn off the lights in the kitchen" depending on the name you have associated with the device and the room in which you have placed it (and added in the Google Home app). To learn more, my guide on how to connect Google Home may be useful.
How to connect the LEDs


