


Preliminary information

Before getting to the heart of this guide and explain yourself how to connect a router to the modem (such as those provided by telephone operators, which in the vast majority of cases also have router functionality), let me give you some preliminary information on how this can happen.
Let's start with the definitions: starting from this moment, I will call main modem the network device connected to the Internet (the one that, presumably, was provided to you by your service provider), while I will call secondary router the one to connect to the main modem. In order for everything to go smoothly, it is good configure the secondary router by connecting it directly to the PC, via Ethernet cable or Wi-Fi, it doesn't matter.
Secondly, you must know that there are different systems to be able to connect a router to the modem, which differ from each other both in the type of configuration required and in the characteristics of the internal network that is created. The most common connection methods are three: in parallel (LAN-LAN), cascade (LAN-WAN) and repeater / extender mode.
The connection mode in parallel it is mainly used to expand the local network, combining the functions of the network devices involved (which must be connected to each other via an Ethernet cable): in this configuration, the local network created by the secondary router is, in fact, a sort of "extension "Of the main one. This means, in practice, that the devices connected to both networks are able to surf with the same Internet connection, to see each other and to exploit any shared files or devices, exactly as if they belonged to a single local network.
The link cascade, on the other hand, it is used to create a secondary network within the main one, which is independent from the first (a kind of "network within the network", so to speak): the devices connected to both routers are able to navigate using the same Internet connection, but they cannot see each other unless they are connected to the same device. Again, the network devices must be connected via Ethernet cable.
Finally, the connection in mode relay it mainly serves to expand the range of the network, and is usually used to amplify the Wi-Fi signal generated by the main modem. In practice, the secondary router behaves as if it were a range extender, the two network devices are connected in Wi-Fi mode and the generated LAN network is unique. For best results, the secondary router should be placed where the range of the “original” wireless signal is equal to or greater than 50%.
However, it should be noted that not all routers are equipped with support for repeater mode (or transparent mode). If yours isn't, you can get a pretty similar result by following the LAN-LAN approach: I told you about a similar approach in my guide on how to turn the Vodafone Station into a Wi-Fi repeater.
Having made this necessary clarification, choose the connection that best suits your needs and follow the instructions that I am going to illustrate below; in this regard, I will refer to FASTGate modem as the main device and to the router FRITZ! 7530 as a secondary router. However, the procedures can also be easily adapted to other models of network devices.
How to connect a router to the modem in parallel
The first chapter of this guide is about the parallel connection (LAN-LAN): as I explained earlier, the devices connected to both routers can see each other and share files, printers and other network devices without any problem. The router and modem will be connected to each other via Ethernet cable. Let's see together how to configure the main modem and, subsequently, the secondary one.
Main modem
First of all, connects your computer to the network generated by the main modem via Ethernet or Wi-Fi, open the browser, type the IP address of the router (usually 192.168.1.1, 192.168.0.1 or 192.168.1.254) in the appropriate bar and Submit: when the login screen appears, enter the username and password to be used to access the device management panel (typically admin / admin o admin / password). If you do not know how to access the router and / or no longer remember the password to enter it, take a look at the thematic tutorials on my site.
After logging in to the modem, go to the section dedicated to Advanced Settings (in my case, you have to click on the item Advanced located at the top), access the area related to LAN settings (in my case, it is on the side) and locate, on the next screen, the box relating to the system DHCP, dedicated to the automatic assignment of private IPs to connected devices.
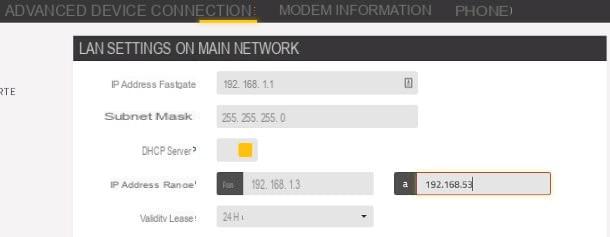
Now, write down theIP address of the main modem (e.g. 192.168.1.1) and its netmask (e.g. 255.255.255.0), because you'll need it later, so find the section dedicated to changing the pool (o interval) of IP addresses and set it as follows.
- Starting address: increases the last triplet of the modem IP by two units. For example, if the latter is 192.168.1.1, you must set the starting IP to 192.168.1.3; use the same value even if the modem IP is 192.168.1.254.
- Final address: increases the last triplet of the initial IP by about fifty units (based on the number of devices you intend to connect to the network). So, if you have chosen to use the value 192.168.1.3, set the final IP to 192.168.1.53.
Now save changes using the appropriate button and then access the section dedicated to Wi-Fi channel of the main modem (in my case, Connection> Wi-Fi Channel) and write down the channel number: to avoid interference, you will need to use a different one in the secondary router.
Secondary router
Once this step has been passed, the time has come to act on the second network device: therefore disconnect the computer from the main modem and connect it to the secondary router via Ethernet cable or Wi-Fi. Once this is done, access its configuration page by typing in your browser your IP address (eg 192.168.1.1) and, when prompted, enter your login credentials in the appropriate fields.
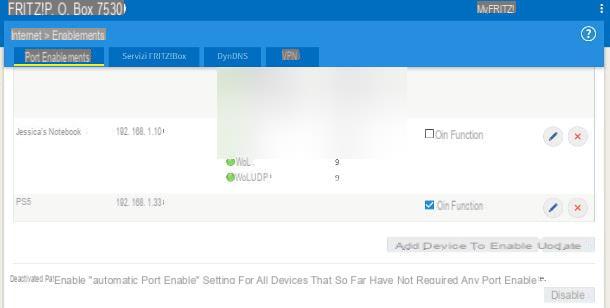
Once logged in, first disable the option UPnP: this is a system that allows some programs to automatically open the ports of the router, which, however, could create conflicts with the main modem (which manages it).
In my case, the UPnP system can be disabled by going to the menu Internet>> Port Sharing> Port Sharing e clicking on your button disable Corresponding to the dicitura You can disable the "Automatic port enabling for all devices that have not required any port enabling", located at the bottom of the page. Generally, the option to disable UPnP altogether is also available in the settings tab Advanced of the router, under the section NAT Forwarding / Port forwarding.
Next, set up a Wi-Fi channel different from that of the primary modem, in order to avoid that the devices interfere with each other: therefore reach the sections Wi-Fi> Radio channel and use the menus proposed to change the channel of the wireless networks present in the router, according to your needs. Always remember to click on the button Apply, to make the changes made effective.
Remember, if you have not already done so, to use a different Wi-Fi name from the one in use on the main modem, in order to avoid connection problems: you can do this by going to the panel Wi-Fi> Wireless network of the secondary router.
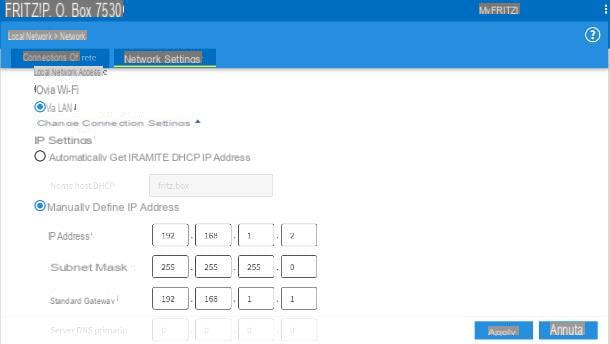
Now, set your device to mode LAN IP router / client only, as the Internet connection is always managed by the main modem: to do this, go to the sections Local network> Network> Network settings of the router, put the check mark next to the item IP client and, if necessary, indicate that you want to log in to the local network via LAN.
Successively click on your voice Change connection settings, put the check mark next to the wording Manually define the IP address and set everything up as follows.
- IP address: uses the address 192.168.1.2, that is the IP of the main modem plus one unit only, in the last three values.
- Subnet mask: the same one used in the main modem (e.g. 255.255.255.0).
- Standard Gateway, Primary DNS Server e Secondary DNS server: the IP address of the main modem (e.g. 192.168.1.1).
Now, press the button for apply the changes in the router and, as a final step, restart it: if everything went well, you should receive, after a few seconds, a browser error relating to the unavailability of the address. Everything is perfectly normal and it is a sign that the IP of the secondary router has been successfully changed.
Finally we are there: now, disconnect the secondary router from the computer, turn it off, place it in the appropriate place and connect it to the main modem via the Ethernet cable: insert the first end of the cable into one of the LAN ports available in the primary modem, connect the second to the same port on the secondary router and turn on the latter.
How to connect a router to the modem: cascade
Let's move on to the connection now cascade (LAN-WAN) which, as I explained earlier, allows you to create a "secondary" network within the main one. Although all devices are able to use the same Internet connection, devices on the main network cannot see those connected to the secondary network, and vice versa, nor share files, printers or anything else. Again, the network devices will be connected to each other via an Ethernet cable.
To proceed, configure the main modem as I indicated in one of the previous sections of this guide and, also in this case, take note of the following information: IP address, subnet mask e wireless channel.
Once this is done, disconnect the computer from the primary modem, connect it to the secondary router via Ethernet or Wi-Fi, type theIP address of the router page (e.g. 192.168.1.1) in the appropriate browser bar and, when prompted, enter the access credentials to the management panel.
Now, set up a different Wi-Fi channel from the one in use on the main modem: then go to the sections Wi-Fi> Radio channel secondary router and use the buttons and drop-down menus available to apply the necessary change. If necessary, use the panel Wi-Fi> Wireless network to change the name of the wireless network generated by the secondary router, which should be different from the one in use on the primary modem.
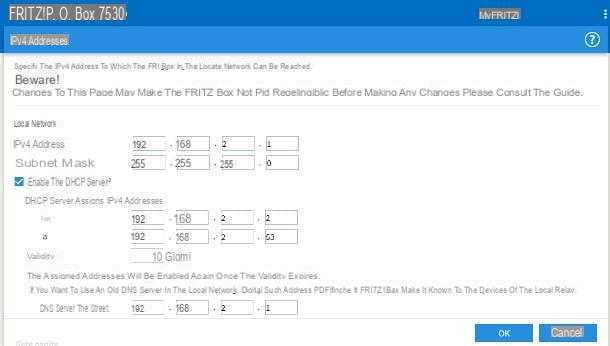
After this step too, reach the menu Local network> Network> Network settings, award your bottone IPv4 configuration site at the bottom of the page and change the addresses as follows.
- IPv4 address: uses the address 192.168.2.1, that is the IP of the main modem plus one unit, in the penultimate set of three values.
- Subnet mask: set the same address as the main modem (usually 255.255.255.0).
- DHCP server: active.
- Starting IPv4 address (from): the IP of the secondary router, with the last triad of numbers increased by one (e.g. 192.168.2.2).
- Final IPv4 address (a): the value of the starting IP, increased by about fifty units in the last triad of numbers (eg 192.168.2.53).
- Local DNS server: the same IP address as the secondary router (e.g. 192.168.2.1).
In reality, the starting and ending IP addresses can be configured at will, based on the size of the network you want to create; in any case, the first three triplets of the IPs in question must always be identical to those of the router (eg 192.168.2.x).
After making the necessary changes, check that the values have been set correctly e save the changes made: generally, the router should now restart by itself but, if this does not happen, do it manually.
Following the saving, you may see an error message from the browser, concerning the unavailability of the router address: all this is perfectly normal and is due, in fact, to the change of the device IP.
Finally, turn off the secondary router, place it where you prefer and connect it to the main modem via Ethernet cable: Insert the first end into the door LAN of the main modem and the second in the port WAN / Internet of the secondary router. Finally, turn on the latter, connect some devices to the network generated by the same and check that they are surfing the Internet correctly.
How to connect a router to the modem: repeater
Finally, if your only goal is to use the secondary router as if it were a Wi-Fi amplifier (or range extender), first check that the network device includes this operating mode: you can easily find the information by consulting the technical data sheet of the device.
If so, proceeding is a breeze - first make sure the secondary router is in the coverage range of the Wi-Fi signal to be amplified, turn it on and connect it to the PC you intend to act on, preferably through the Ethernet cable.
Now, type in the browser the IP address of the router login page (e.g. 192.168.1.1), enter the access credentials in the appropriate fields and enter Submit.
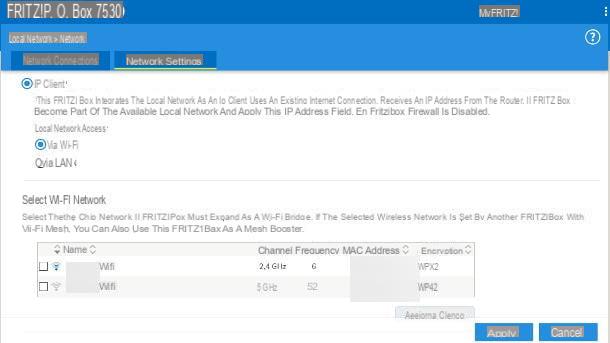
Once the login is complete, go to the section dedicated to the mode repeater / access point: in my case, you have to go to the menu Local network> Network of the administration panel and click on the tab Network settings, placed at the top.
At this point, put the check mark next to the words IP client e Via Wi-Fi, choose the Wi-Fi network to connect to from the list below the wording Select Wi-Fi network and set the key of the Wi-Fi network to be extended, in the appropriate field. To finish, click on the button Apply to save the settings, turn off the router and place it where you prefer: keep in mind that, for the quality of the extended network to be appreciable, you should prefer a place where the intensity of the signal generated by the main modem is equal to or greater than 50% of the maximum power.
If the secondary router does not have Wi-Fi repeater / access point functionality, you can remedy this by opting for a parallel configuration, of the LAN-LAN type: however, keep in mind that, in this case, the two network devices must be necessarily connected via Ethernet cable.
How to connect a router to the modem


