


Are you looking for a solution to the problem of disk that is not displayed and recognized by Windows? In this guide we wanted to address the problem in a comprehensive way. After reading the post, you will have more than 10 possible solutions to fix the Hard Drive Not Appearing problem Computer resources.
- Part 1. Check hard disk status
- Part 2. Resolve disk problem not appearing in Windows 10/8/7 PC resource
Part 1. Check hard disk status
I hard drives They can be extraordinarily useful for transferring and storing important data, but there are many causes that could cause the external hard drive to no longer be detected and displayed on Windows. This problem is encountered every day by many users, perhaps even after the purchase of a new external hard drive. There are several reasons that can cause a drive not to be detected by Windows. Some reasons are improper connection between components, bad sectors on the hard drive, and an outdated disk driver.
Before proceeding to the analysis of the possible solutions to repair the external or internal hard drive that is not displayed in My Computer, we should first check the status of the disk, so that we can then take the appropriate countermeasures.
- Verify connection:Make sure the drive is fully connected via working cables and that the connection is not loose on either side.
- Check My Computer Status
- Press “Windows + E” to open My Computer
- In the left column, check the presence of the desired unit.
- Press “Windows + E” to open My Computer
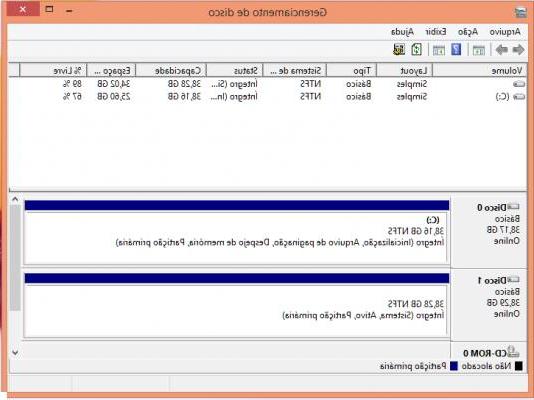
- Check Disk Management Status
- Press “Windows + X” keys and then click on “Disk Management
- Select the disk management and search for the desired drive.
- Check the status of your unit.
- Press “Windows + X” keys and then click on “Disk Management
- Check BIOS status
- Restart your PC and press “F2” during startup
- Look for the system status in “configuration status”.
- Check if your device appears in the column
After a hard drive health check, you may be able to locate the defect you need to fix. Your hard drive may be detected in some cases while not in others. In any case, you don't need to worry as we have detailed solutions for the hard drive not recognized and not shown in problem Explore Resources and not even in Disk Management.
Part 2. Resolve disk problem not appearing in Windows 10/8/7 PC resource
# 1: Reconnect hard drive
If there is a bad connection between the computer and the disk, you will need to review the connection so that the drive appears on the computer.
For external hard drives:
Try reconnecting the drive using another USB port.
Check the disk by connecting it to another computer.
Change the current cable and try connecting the drive via another cable.
For internal hard drives:
Replace the USB cable with a SATA cable.
Disconnect and reconnect the device via the SATA cable and power cable with a short break.
Test the drive on another computer to check for any errors in the drive.
# 2: Format Hard Drive
Sometimes the drive may get damaged due to irregular data transfer or some virus infection, which can be a compelling reason why the drive is not showing up. In such a case, the drive may be displayed as “RAW” and therefore must be formatted to ensure proper use in the future. Here's how to do it:
a) Press the Window + R keys simultaneously and enter diskmgmt.msc in the box.
b) From the popup, select “Disk Management”.
c) Right click on the damaged device and select “format”.
NOTE: Formatting the hard drive will cause data loss. If there was important data you can try to recover deleted data from the hard disk using a program such as Data Recovery.
# 3. Change disk letter
This solution works when the drive appears in Disk Management, but is not available in Windows Explorer. When two drives have the same drive letters, the explorer will display them as a new volume rather than as separate disks. To solve the problem you need to change the drive letter:
a) Open the disk management and search for “new volume”.
b) Right click and choose “change driver letter and path”.
# 4. Allocate a new partition
Improper partitioning or no partitioning can lead to the device not being detected in File Explorer, so to fix the problem, you need to allocate a new partition on the disk.
a) Open Device Manager on your PC.
b) Right click on the unassigned disk and select “new simple volume”.
On the next screen, click "Next". Then set the disk formatting according to your needs. Finally, format the drive and that's it.
# 5: Initialize the disk
Initializing a disk consists of rebuilding an MBR on it so that it can retain data and protect it from erasing. An uninitialized disk will not be recognized in File Explorer until it is initialized. Below are the steps to initialize the disk.
a) Open "Disk Management".
b) Right click on the uninitialized disk and select “initialize”.
c) Choose GBT or MBR as the partition type and click “OK”.
# 6. Activate Hard Disk in the BIOS
Enabling the hard drive in the BIOS is another effective way to fix the disk not showing up in Windows Explorer. When the hard drive is disabled in the BIOS, the Windows system cannot detect it. Here is the procedure to enable the hard drive in the BIOS:
a) Restart your computer and press the F2 key until you enter the BIOS.
b) From the BIOS utility, select “Integrated peripherals” and press the “Enter” button.
c) From the integrated peripheral settings, check if the “USB controller” is enabled or not. If it's disabled, enable it.
# 7. Update Driver in Disk Management
Sometimes, outdated drivers are the real culprits of external hard drive not being detected problem. Therefore, also check and update your PC drivers it is an effective way to solve the problem. Follow the steps to update the drivers from disk management
a) Right click on “This PC” and select Manage.
b) When "Computer Management Tool" starts, click "Device Manager" and then expand "Universal Serial Bus controllers".
c) Right click on the unrecognized disk drive and select “Update Driver”.
# 8. Run Windows "Troubleshooter"
Windows Hardware and Device Troubleshooter is a built-in tool for solving common problems. Here is the procedure you need to follow to use this function.
a) Go to Settings> Update & Security> Troubleshoot and click on “Hardware and Devices” to start “Windows Hardware Troubleshooter”.
b) Select "Next" to run the troubleshooter.
c) When the scan is finished, it will present you with a report. Click "Next" to fix the problem.
# 9. Disable USB selective suspend setting
If all of the above methods don't work, the only option left is to try disabling the USB selective suspend setting. Here's how to do it:
Launch the control panel.
Go to Hardware and Sound> Power Options> Change Plan Settings.
Click on "Change advanced power options".
Expand the category USB settings, click USB Selective Suspend Setting and set it to Disabled.
Hard Disk Does Not Appear in My Computer and Disk Management (Windows) -


