


| There are, in computer science, many manipulations considered as simple as possible by the informed user. However, one day it was necessary to learn how to perform them! In the form of practical sheets, we offer those who are just starting out today a synthetic document to carry out one or other of these basic tasks. The most seasoned of our readers will also be able to take advantage of this new service to redirect requests for assistance addressed to them. |

Practical sheet: Configure a webcam in Windows Live Messenger
Many people find it difficult to configure their webcam on Microsoft software. This sheet therefore groups together the steps to be followed scrupulously to achieve your goals, as well as some tips that may come to the aid of those whose problems are not trivial.Step 1: The "Tools" menu of Windows Live Messenger
 1. Recover Windows Live Messenger in our software library if you do not already have it.
2. Launch l'installation software.
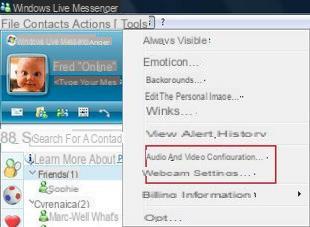
3. Once this is done, go to the "Tools" menu software.
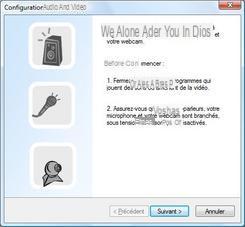
In this menu, two links are important in order to correctly configure your camera: “Audio and video configuration” and “Webcam settings”. It is the first that we are going to discuss above all, the second serving mainly to adjust the parameters of the image, a secondary step for the purpose at hand. So start the configuration wizard and click on "Next".
Step 2: Adjusting the speakers
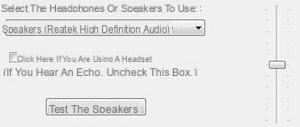 1. Select your material in the drop-down menu.
2. Check the corresponding box if you are using a helmet.
3. Finally test your sound output to adjust the volume.
You may find more than one choice in the drop-down menu. This means that you have several elements in your computer capable of emitting sound, a dedicated card and your motherboard, for example. In this case, be sure to select the correct input, which you will quickly verify by testing the speakers.
Step 3: Around the microphone
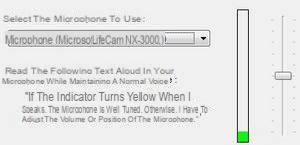 1. Select your sound source.
2. Start to speak in front of your microphone.
3. Observe the cursor ; if it moves, your microphone is working.
Two remarks on this configuration step. On the one hand, if your webcam does not have a microphone, you will need to go through an ancillary device that you will have to plug into the pink socket of your sound card. On the other hand, if your slider is not working, you may have selected the wrong sound input device. Pay special attention to this setting and do not exit this page until the cursor moves, indicating that your voice is recognized by the software.
Step 4: Let's finally move on to the image
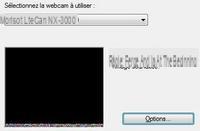 1. Specify this time the source of the video.
2. Observe the return window: if your setting is satisfactory, your image should appear.
3. Adjust rendering of the image using the "Option" button.
As with the sound source, you may have several possible entries in this drop-down menu. This can happen if a capture card or a second webcam, for example, is connected to your computer. But most of the time, this choice will be very quick since your camera will be the one and only source of video feed.
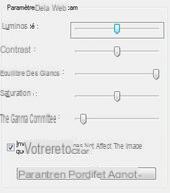 "Options" button and "Parameters" menu
If you click on the "Options" button, you will have access to the functions specific to your webcam, those offered by its driver. If your equipment has advanced features that you want to adjust, this link will give you access to it. On the other hand, the entry "Webcam parameters" of the "Tools" menu of Windows Live Messenger opens a window whose settings, quite basic, are this time independent of your hardware. Here you can therefore adjust the brightness, contrast, white balance (depending on the light environment around you), color saturation and gamma correction. If you are not sure of your settings, choose the default settings by clicking on the appropriate button at the end of the window. If you prefer to adjust the image to your tastes, take into account any changes in the light in your room (turn the lights on and do not turn them off) and know that it is better to modify the parameters one after the other rather than to change all values simultaneously.
To learn more
Here are some articles that you can read will help you progress in the field:- Tools to improve Windows Live Messenger
- Windows Live Messenger: the tour of alternatives


