


How to install Chrome OS on PC and run from USB stick

Chrome OS, thanks to its particular structure and low hardware requirements, it can represent a more than valid solution to “bring back to life” an old PC and use it to surf the Internet, read emails, watch videos, make video conferences and much more. Obviously, no one prevents you from installing it even on a computer that is still "strong", even if in that case it may not be the ideal choice to take advantage of the hardware performance of the machine.
Going into more detail, I will explain to you in the following bars of this chapter how to install Chrome OS on PC talking to you about CloudReady, an operating system based on Chromium OS (which is based on an open source project, so it can be legally "cloned" and, indeed, in its best known form, Google's "Chrome OS", remains an exclusive of Chromebooks) .
To get started, you will need one USB stick of at least 8 GB, on which there is no data (it will be formatted during construction) and, if you want to work on a computer that is not able to boot from USB, even a Blank CD. To create the necessary media, you can use a different PC than the one you want to work on, preferably with an operating system Windows 10.
How to install Chrome OS on an old PC

I would say we are ready to start; But first let me make an important recommendation: following the installation of the new operating system, all files already on the disk will be deleted. So if you have important data on your computer, try to secure it before proceeding.
Another important premise: if your computer cannot boot from a USB stick and you are wondering if it is possible install Chrome OS on PC from CD, I tell you right away that you don't have to worry. In fact, even if the computer's BIOS is not compatible with booting from USB, using a small program suitable for the purpose, called Plop Boot Loader, you can overcome this limit and use a stick to install CloudReady (also because the image files of this operating system are larger than the 4.7 GB supported by common DVDs!).
If you had never heard of it, Plop is a bootloader, that is a small program that manages the boot phase of the computer and that, if installed on CD and run before the operating system, is able to start the computer from a large number of peripherals, including USB. To get it, go to its official website and click on the link plpbt-xx.yy.zz.zip located at the latest version of Plop Boot Manager.
When the download is complete, extract the ZIP package obtained where you prefer, locate the file plpbt.iso in the newly created folder and burn it to a Blank CD, following the steps I gave you in my guide on how to burn an ISO file. Have the CD made this way handy - you'll need it soon!
After this step, it's time to create the USB pendrive through which, subsequently, Chrome OS will be installed. In this regard, as already mentioned, I advise you to opt for the operating system CloudReady: a variant of Chromium OS (i.e. the open source operating system on which Chrome OS is based) re-adapted to install and run on old computers. In fact, it requires no more than 2 GB of RAM and 16 GB of disk space, for a more than decent user experience.
To get it, connected to this website, click on the button Install the home edition and then on the button Download USB Maker, in order to download the automatic utility for creating the CloudReady installation USB key.

Once you have obtained the file (eg. cloudready-usb-maker.exe), start it and, if you haven't done so yet, connect the USB pendrive to use for installation. Now, click on the button Next placed in the new window that opens on the screen, put the check mark next to name of the drive to use and click the button again Next.
Following this operation, the files needed to run Chrome OS will be downloaded from the Internet and then copied to the USB stick indicated above. The file download operation can have a variable time, depending on the speed of the Internet connection, while the writing of the files to the drive can take up to a further 20 minutes (even here the times may vary according to the performance of the drive). At the end of the procedure, click on the button Finish to exit the program.
Once you have finished creating the USB drive, turn on the old PC on which to install Chrome OS, enter the CD in Plop inside and connects the CloudReady USB stick to one of the free ports on the computer.
With a bit of luck, after a few moments, you should see the PLOP start menu: using le directional arrows on the keyboard, select the item for USB and press the button Submit, to have the computer boot from the CloudReady USB stick.
If you do not see the Plop start menu but the operating system already present in the computer (or any other type of error), you must enter the BIOS of PC and set start from CD-ROM, using the items you find in the section Boot. If you don't know how to access the computer's BIOS, follow the steps I indicated in my specific guide on the subject.
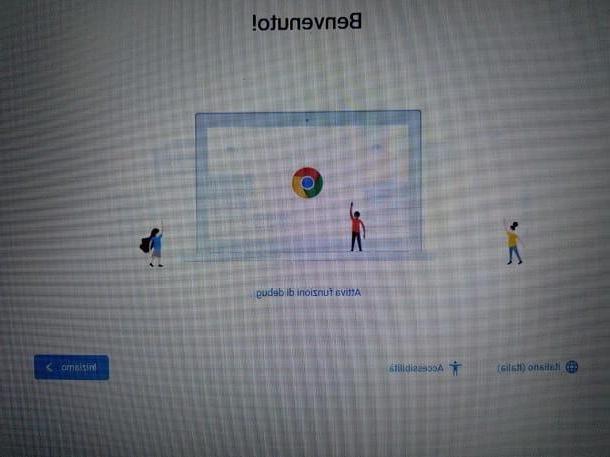
If everything went smoothly, after a few minutes you should see the welcome screen of Cloudready: Please note that the initial loading phase of the operating system may take some time, so don't worry if your PC appears to be frozen, this is completely normal.
First, set the operating system in the language you prefer: to do this, click on the first button on the left, the one dedicated to the language (indicating the wording English), and use the next panel to specify the language and keyboard layout most congenial to you. When you are done, click on the button OK.
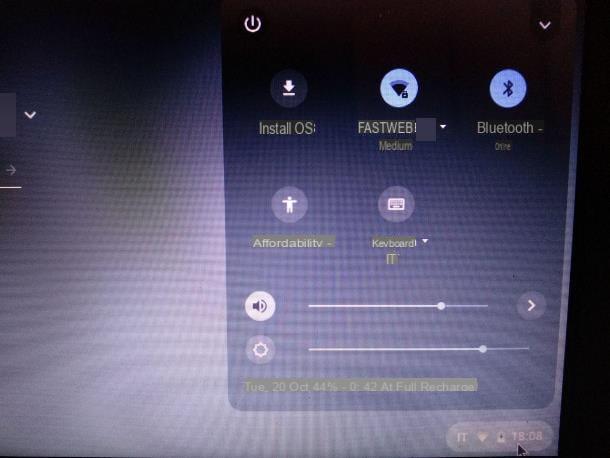
Finally here we are: to proceed with the installation of Cloudready, click on theclock located at the bottom right, then on the button Install OS… and then on the button Install Cloudready…. Finally, well aware that installing the new operating system will result in the erasing all data already on the diskclick on your button Erase hard drive & install Cloudready, per proceeding.
The setup procedure may take a long time, depending on the specifications of the computer and the speed of the disk; at the end of it, the computer will be turned off automatically. When this happens, remove the USB stick from the PC, take out the Plop CD and turn it on again: if everything went smoothly, on the next boot, you should see the Cloudready welcome screen!
All you have to do at this point is choose the language and keyboard layout exactly as I indicated earlier, click on the button let's begin and follow the setup wizard, through which you will be asked to connect to a network and log into your Google account. Once all these steps have been completed, you can finally start using Cloudready / Chrome OS!
Note: During the installation process, your computer screen may turn off automatically. So, even before removing the USB key at the end of the installation, check that the PC has actually been turned off by moving the mouse or the keyboard.
How to run Chrome OS from a USB stick
How do you say? Would you prefer run Chrome OS from USB stick, so that the latter does not affect the data already present? In this case, I'm happy to inform you that CloudReady also offers this possibility!
This mode of action is defined, in jargon, live mode with persistence: after starting the computer from a USB key, the operating system can be completely loaded into memory and run from there; any accesses made, saved files, personal settings and so on will be stored on the USB key and will also be available at subsequent starts.
To use Cloudready in live mode, create a USB pendrive dedicated to the operating system (taking care to use a sufficiently large one, if you plan to download files and / or customize the system in an incisive way), following the instructions I gave you previously, then set the computer forboot from USB via UEFI / BIOS and wait for the Cloudready welcome screen to appear.
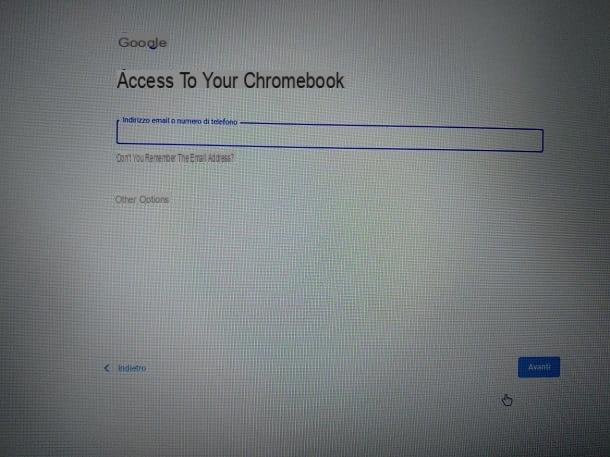
Next, click on your button English to specify the language and keyboard layout to apply, press the button OK and click on Let's start! to start the operating system configuration phase: it therefore indicates the WIFI network to connect to, enter the relevant one Password and accept i terms of use of Cloudready, by checking the appropriate box and clicking on the button Continue.
Finally, log in to the operating system with your Google account and, once the login is complete, press the button How to get started to access the “desk” and view a short first use tutorial. As of now, all changes made to the system, files downloaded, extensions added etc. will be stored on the USB stick.
When you have finished using Cloudready, make sure to shut down the system properly by clicking on theclock and then on the button Switch off; when the PC is turned off, all you have to do is remove the USB key to start it again with its “original” operating system.
For completeness of information, I would like to point out that Cloudready provides a series of images, in OVA format, ready for use with VMWare, the famous manager of virtual machines: by doing so, you can try Chrome OS inside any other operating system, configuring a virtual environment, without affecting what is already stored on the PC. However, the files made available may not work correctly on VMWare Workstation (the free version of the manager).
Note: If your computer has UEFI, you may need to disable the feature Secure Boototherwise Cloudready will not start.
How to install Chromium OS on USB

If you have a recent PC or, for some reason, you prefer Chromium OS (the open source operating system on which Chrome OS is based) to CloudReady, know that you can test it in live mode from a USB stick without problems following the instructions I am about to give you (even if the setup process is slightly more complex than that of CloudReady); the resident installation, on the other hand, is quite complex, so I advise you to rely on CoudReady anyway if you want to install the operating system "on a permanent basis" on the PC.
To get started, therefore, connected to the download page of the weekly Chromium OS builds and download the latest version of Camd64OS, if yours is a 64-bit PC, or CARMOS, if the computer is 32-bit. When the download is complete, extract the package .7z previously obtained with the software you prefer (if you do not know how to do it, I refer you to reading this guide, entirely dedicated to .7z files): as a result, you will have an .img file.
At this point, proceed to create one bootable USB stick containing the image just extracted, using software such as Rufus: connected, therefore, to the program website, locate the section Download and click on its link Rufus xy Portable, which resides within it, in order to download the application.
Once the download is complete, after connecting the USB pendrive to the computer, start the file obtained and choose whether or not to proceed with the automatic installation of updates; arrived at the main screen of the program, choose the USB drive to use, using the drop-down menu Choose device / driveclick on your button Select to choose the file .img extracted previously and, aware that the key will be fully formatted e the data already present on the same destroyed, click on the buttons starts e OK, to create the installation drive.
Once the disk has been created, connect it to the PC on which you intend to act, turn it on and set it, if necessary, forboot from USB (by accessing the BIOS): if you do not know how to do it, you can follow the instructions I have given you in this guide.
After a few moments, you should see the Chromium OS bootloader screen; if necessary, select the item Local image A and wait for the operating system to start automatically. Once at the Chromium OS home screen, you can start using the operating system right away, in live with persistence: all the changes made will be stored on the USB key and will always be available on it.
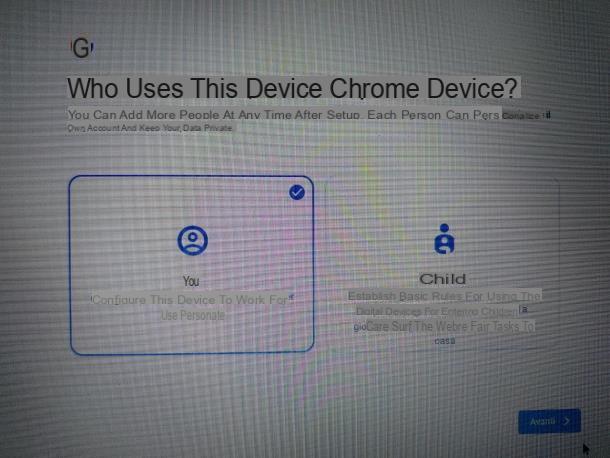
So, for starters, set the language to use, by clicking on the button located at the bottom left, then click on the button let's begin and select the item Tu, to indicate that you are the actual user of the computer. Finally, you just have to select the WIFI network (or Ethernet) to use and log in with your Google account, so you can start using Chromium OS right away.
How to install Chrome OS on PC


