


Preliminary information
To determine the best way of connect a condenser microphone to the PC we must inevitably take a step back. In this chapter I will show you how this device works to capture audio and what are the differences with other types of microphone, in order to make the procedures described in the following steps clearer.
To pick up audio signals, the condenser microphone uses the so-called capacitive variation, that is the propensity to perceive the pressure alterations in the air (caused by a voice or an instrument) through a special metal membrane. The rapid oscillations of this membrane are in turn transformed (or rather transduced) in electrical signals. The particular construction technique of these devices makes them particularly sensitive to external stresses, and this leads to a greater frequency response and a better predisposition to capture the dynamics of sounds.
The signal that is generated by this process is, however, characterized by a very high impedance, which must necessarily be limited and clean in order to be managed externally. For this reason, condensation microphones are integrated with a preamplifier, which, however, must be powered in order to function: this is one of the main differences with the dynamic microphones and with ribbon microphones.
Condenser microphones are, therefore, extremely sensitive, and give greater expressiveness to the audio, which is why they are widely used in recording studios. The downside, due to their extreme receptive capacity, lies in the acquisition and amplification of a whole series of unwanted acoustic signals, such as ambient noises and breaths. It is therefore essential that they are positioned on cushioned (or anti-shock) supports, and equipped with windproof filters in the case of outdoor recordings (to avoid hissing), and of anti-pop filters, for the recording of the voice (to avoid the "shot" effect given by the pronunciation of some consonants, such as the "p").
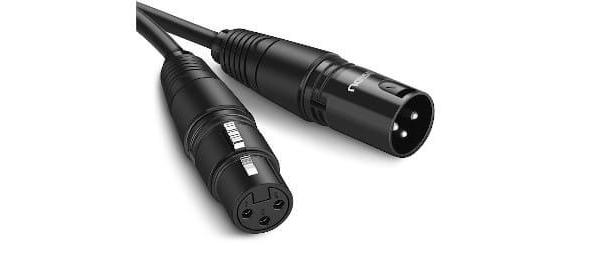
The connection is made via a balanced XLR (or cannon) analog cable (for noise cancellation), characterized by a female XLR connector which is inserted into the microphone itself and, at the other end, a male XLR connector for connection to the interface (sound card and mixer for example). In recent years, several models of USB condenser microphones which, in addition to simplifying life in terms of connectivity, represent a valid alternative for certain activities, such as recording podcasts. I'll tell you more about it later.
How to connect a condenser microphone to your computer
We got to the point. In the next paragraphs I will offer you several solutions to get a complete picture of how to connect a condenser microphone to your computer. Now that you have acquired all the essential notions, you will see that the reading will be very smooth and, in a short time, you will be able to make the most correct choice and best suited to your needs.
External sound card
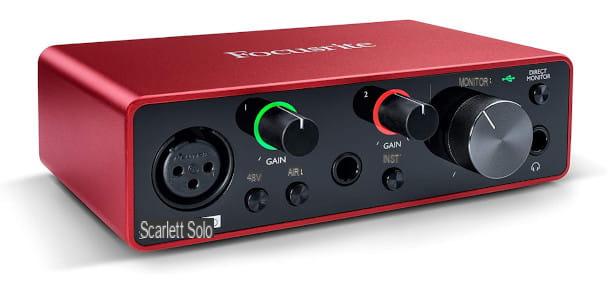
Connecting via external sound card it is certainly the best choice for obtaining high quality audio and for professional use of the condenser microphone. A good result, in this sense, cannot be separated from the use of a reliable external sound card. Therefore, I suggest you read my guide on the best sound cards carefully. You will see that it will be very useful if you have doubts about this topic as well.
The sound card is a key element in the audio recording chain, as it performs the signal digitization, that is the transformation from analog audio signal into digital. The more the interface has evolved, the more the processing will be able to restore characteristics of dynamics, expressiveness, depth and naturalness to the final result: it is therefore fundamental for home recording and recording studios, for example.
The external sound card, to enable the passage of the audio signal from a condenser microphone, must have XLR inputs and a 48 volt power supply called Phantom, which can be activated by means of a special switch or selector on the board itself. Care must be taken not to use this power supply with other types of microphones, as it could cause damage and impair correct operation. The correct order of the operations to be followed is therefore as follows.
- Connect the female XLR connector to the microphone.
- Connect the other male XLR end to the sound card.
- Turn on phantom power on the sound card.
mixer
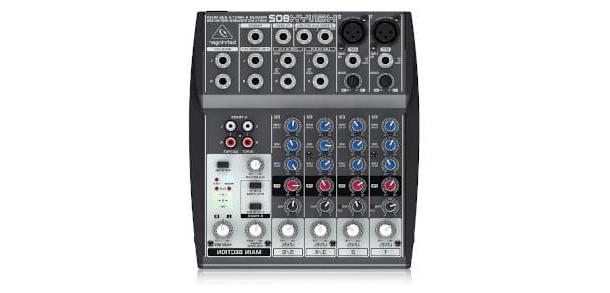
How do you say? You don't have an external sound card, but you do have a mix? Don't worry, below you will find the solution for this particular configuration as well. You must know, however, that the mixer has a different function from that of an external sound card. Basically, it is an electronic device with which it is possible to mix multiple input audio signals, individually modifying the frequency and timbre characteristics, to produce a main one at the output (Master or Main) balanced and harmonious.
It can be a suitable solution, for example, in any case where the simultaneous recording of several sound sources or the production of a podcast. By the way, if you are interested in learning more I suggest you read my guide on how to create a podcast.
In order to connect a condenser microphone to a mixer it is essential that the mixer has power 48 volt phantom, as seen above for sound cards. I highly recommend, before proceeding to connection via mixer, to previously lower all the input and output volumes, to avoid jolts that could damage the sound card of the PC.
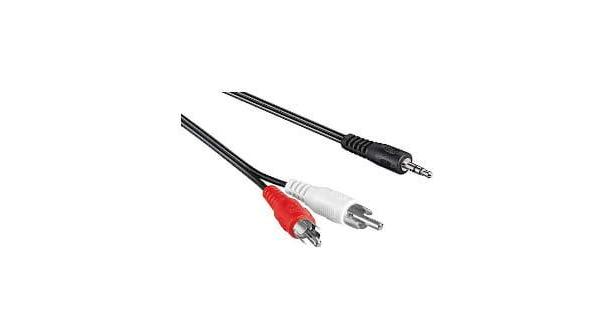
First you need to get a cable that can connect the stereo output of the mixer to the mono input of the integrated sound card of your PC. There are basically two ways. The first involves the use of a cable equipped at one end with two male RCA connectors, to be included in stereo out of the mixer (those marked by the colors white and red), and on the other of a 3,5 mm jack connector to be included inPC microphone input (Note that many computers only have a single headphone and microphone jack).
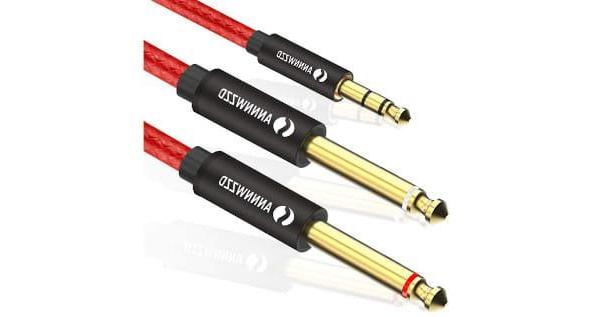
The alternative is to use a special cable equipped with an adapter with two TRS Jacks at one end, to be connected to theMain Out input of the mixer, and of a 3,5 mm jack connector the other, to be inserted into the microphone socket of the computer. Then connect the mixer to the mains and then turn it on.
Now you can connect the condenser microphone by inserting the male XLR connector in the appropriate entrance. Finally, activate the 48 volt phantom pressing the appropriate button or selector on the mixer. To monitor the audio signal you will then need some headphones, to be included in the Phones socket of the mixer.
Phantom amplifier
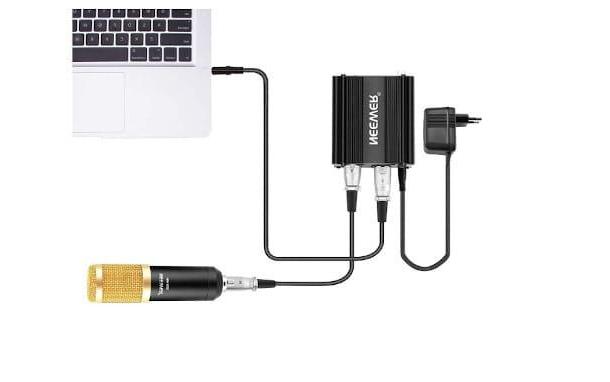
The market offers more and more interesting solutions to meet everyone's needs. That of the connection with Phantom amplifier it is undoubtedly a comfortable solution, simple to implement and with a low cost, even if not suitable for professional use. Often, in fact, these devices can generate annoying noises that cannot be controlled at the source. It will therefore be necessary to intervene through the audio recording software to limit its presence.
The Phantom amplifier does nothing but produce the energy necessary for the operation of the condenser microphone through the connection to the mains, then it transfers the audio signal to the computer through a special connector.
The amplifier has, in fact, two XLR sockets, an entrance, to which the male XLR connector coming from the microphone must be connected, and the other out. The female XLR connector of a special cable must be inserted into the latter, with a 3,5 mm jack connector at the other end to be connected to the input of the PC sound card.
USB condenser microphone
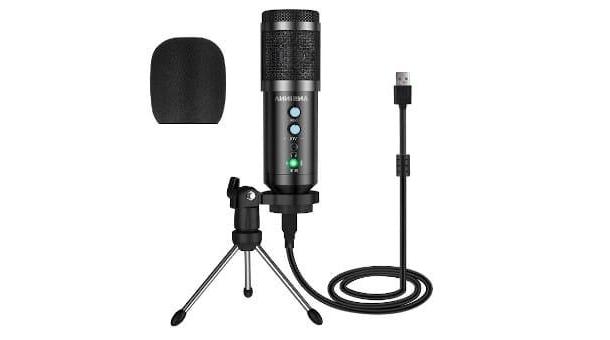
Another possibility is to purchase a USB condenser microphone. This type of microphones is equipped with capsules that take advantage of this technology, and a USB output instead of the traditional XLR. The consequence is, of course, a strong loss of quality and thickness in the audio, so it is not a product suitable for a home recording studio, or in general for the recording of acoustic instruments.
If, on the other hand, your need is to acquire audio for such applications voice over, podcast o live on Twitch, to give some examples, we are on the right track. We can consider it, in fact, as a hybrid able to guarantee a good sensitivity and frequency response, typical of this type of microphones, to a certain cleanliness of the final audio, obtained thanks to its immediate digital conversion.
The connection is extremely simple, as it is sufficient to connect the supplied USB cable to the microphone on one side and to the computer socket on the other, without using the inconvenient intermediaries seen in the previous paragraphs, used to obtain phantom power. The microphone is usually recognized immediately by the operating system, in mode plug & play, allowing you to use it immediately without difficult configurations.
See offer on AmazonCheck the connection on the computer
Have you followed all the instructions to connect your condenser microphone to your computer, but you still don't hear anything, or are you hearing too softly? Now I'll show you how check the connection on the computer via the audio settings, both for the operating system Windows and MacOS.
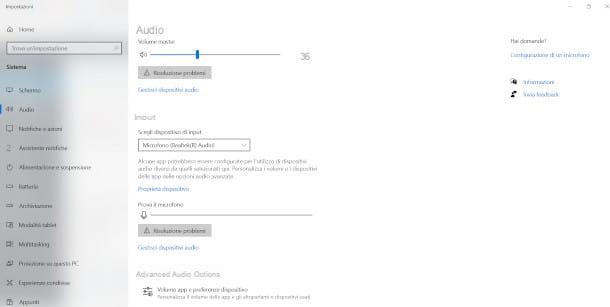
It was used Windows 10click on your button Home (the flag icon located in the lower left corner of the screen), then select thegear icon, to access the Settings operating system. So go on System> Audio.
From the screen that appears, you can manage the audio input and output devices. In the section Input check that the correct output sound card is selected, otherwise click on the arrow at the bottom of the drop-down menu and select the desired one by clicking on it.
From here you can also check the level of the incoming signal, under vocals Test the microphone, below which a dynamic indicator will help you visually in determining the input volume. Check that also in the section output the right sound card is present or select it from the drop-down menu that appears by clicking on the down arrow.
Finally, by clicking on the item Device properties, you access a screen where you can change the microphone volume. To the item Volume you can operate the special selector which, by holding down the left mouse button and dragging the cursor back and forth, allows you to raise or lower the volume.
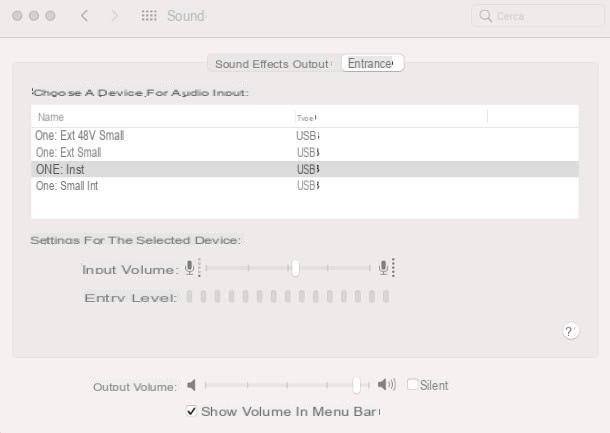
Su MacOS you can get the same results just as easily: click on Apple menu located at the top left, then select the item System preference give the menu check if you press.
Successively, I went his Sound. From here, in the tab Entrance, verify that the correct sound card is selected, or choose from those available. Via the indicator Entry level you can visually check the incoming audio, while via the setting Input volume you can click on the white selector and, holding down the left mouse button, drag the cursor forward or backward, to raise or lower the volume.
How to connect a condenser microphone to the PC


