- In what state I wander
- Bios setting
- Partitioning
- Windows installation
- Avoid spending 3 days re-installing your machine
- Some advice from old monkey
- Install a second operating system
In what state I wander
After having carefully followed all of our advice in the complete guide to mounting your PC, you have in front of you a brand new machine with a nice hard drive of several gigabytes but completely empty and a boot floppy.Bios setting
Even if the Bios setting is not necessarily useful for installing an operating system, it is a sensitive place and it is useful to know some elements on which you can play to boost your machine a little. To access it, all you have to do is press the "suppr" or "del" key when starting the machine (a message such as "press XXXX to enter setup" is generally displayed telling you which key to press and when to do).If there was only one thing to know in bios, it would be the boot sequence. This defines the order of the boot devices according to which your machine will boot. Usually the boot sequence is configured to boot from the floppy drive first. If there is no system floppy in the floppy drive, the bios continues by booting from the hard drive (IDE1). If the hard drive is not bootable, the bios tries to boot from the CD-Rom drive. At this level, if it has not found a boot device, the machine does not start.
 It is possible to modify this sequence in order to optimize the start-up (the method varies according to the bios but the modification of these options is always in the “advanced bios features” menu). For the installation of the machine, choose as the boot sequence "A then C or floopy then HDD-0 in order to start on a boot diskette when it is present in the drive. When the installation is complete and in order to speed up the startup of your machine by starting directly from the hard disk, choose "C then A or HDD-0 then floopy".
If one day you have a boot problem and you want to boot from a boot diskette, you will have to remember to reset this parameter to "A / C" by coming back to the bios.
In order to save a little time at each start, you can modify the following options:
- Désactiver le « boot up floopy seek » (option : disabled)
- Activer l’option « Quick Power On Self Test »
- Désactiver si elles existent les options « Above 1 MB Memory Test », « Memory Parity Check Error » et « Memory Test Tick Sound »
- By default, the auto bios detects new IDE devices (hard disks and CD / DVD drives) at each boot. Since we do not change this type of device every two days, it is wise to save a few seconds at startup to remove this auto detection by manually setting these parameters. Go to Standard CMOS Setup and auto-detect your IDE devices once and for all.
Partitioning
Most machines purchased pre-installed have only one partition which contains both Windows (the system), programs, and documents. In use, we quickly realize that with a single partition, we are quickly blocked when it comes to re-installing Windows or installing a new OS. Indeed, the best way to re-install Windows is to format the hard drive, you have to erase all your documents at the same time as the system.We therefore advise you to create at least two partitions: The first will include Windows and the programs and the second will include all your documents as well as any backups.
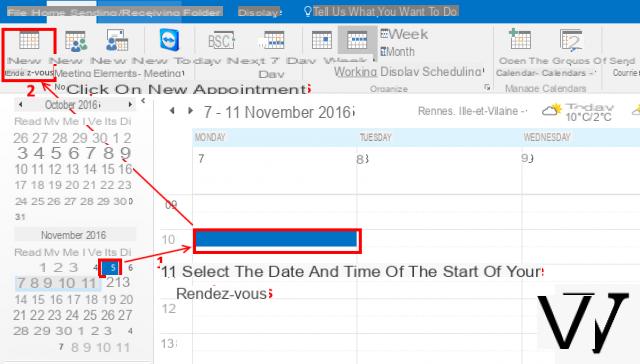
After booting from your floppy disk by choosing the "with CD-Rom drive support" option, you should be at the MD-DOS "a:>" prompt. Start Fdisk with the command of the same name. The big advantage at this stage of the installation is that you can do all the tests you want without risking losing anything (you have nothing to lose!).
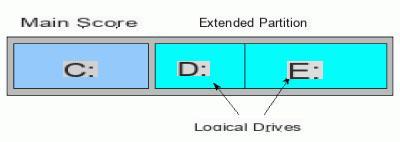
Start by creating a main DOS partition (option 1), which will contain windows and applications. Make this partition at least 2 gigabytes in size. Then create an extended DOS partition (option 2) which will take up all the rest of the available space on your hard drive. Inside this extended partition, create a logical drive (option 3) which will take 100% of the available space of the extended partition. The diagram above shows you a partitioned hard drive with two logical drives (in order to differentiate the logical drives from the secondary partition).
It is possible to create as many logical drives as you want by subdividing the extended DOS partition, but you will notice in practice that a single logical drive is more than sufficient. Indeed, the big disadvantage of creating several logical drives comes from the fact that we do not know too much in advance how much space we will need for each one (example: I create a logical drive "d: /" for the games and a logical "e: /" drive for my documents.
 If I have overestimated the size needed for my documents, there may be a time when I need this space to install games. By creating a single logical drive and two "documents" and "games" directories in that drive, I have all the capacity that I use according to my needs by creating the had (oc) directories.
Exit fdisk and format the drives you just created with the command "format c:" and "format d:". Name each of these drives respectively "system" and "documents" or any other name that will allow you to differentiate them.
Windows installation
Insert the Windows installation CD in the drive and start the installation ("e: install" or "f: install").The installation of windows itself does not present any particular difficulty, it suffices to answer the questions asked to arrive at the end.
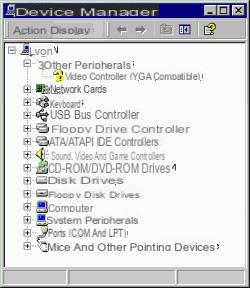
After a few reboots, you once again have your hand in front of a system that is far from being optimized. Go to the control panel and check that in the "device manager" tab of the "system" part, there is no exclamation point on one of the devices. If an exclamation mark appears, the best way to get rid of it is to install the latest drivers for this device (first use the cd-rom supplied with your hardware then download the latest stable drivers from Internet).
Adjust the screen resolution and the number of colors to your liking. The "color (16bits)" display offers the best display comfort / performance ratio for use under Windows. As for the resolution: choose 640x480 or 800x600 for a 14 inch monitor (endangered) choose 800x600 for a 15 inch monitor, 1024x768 for a 17 inch monitor and 1280x1024 for a 19 inch.
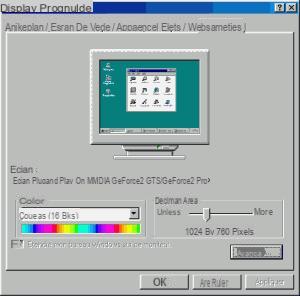 For maximum reading comfort, the image refresh rate should be adjusted. For this, it is necessary that the monitor drivers are not the default drivers (VGA screen) but at worst those of the plug and play screen, at best those of your monitor. To modify your monitor drivers, go to the control / display panel, settings / advanced tab: If the drivers for your graphics card are correct, you can change the refresh rate in the "card" tab. Try all the values starting with the lowest so that the display is as sharp and comfortable as possible.
Then, I advise you to start by installing an decompression software (the installation of many software is done from .zip files). If you are unsure of a software: Powerarchiver (available in the software library) supports many formats and is free.
Change the Explorer options to your preferences once and for all: By default, Windows has the annoying habit of hiding file extensions. This choice, certainly made to prevent beginners from asking too many questions is certainly a mistake: A lot of viruses are spread in this way by being executed by a user not knowing if he was dealing with an image, a file text or a program. It is appropriate (in my humble opinion) to display the extensions and learn to recognize it (you can consult a very complete page on this subject by clicking here: http://pot-pourri.fltr.ucl.ac.be /sujets/ext.htm).
Then install your Internet connection (the use of connection kits does not generally pose any problems) and configure your e-mail account (s).
Avoid spending 3 days re-installing your machine
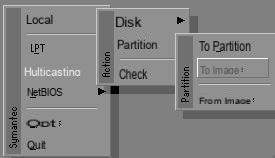
At this stage, if you think you are really using your computer (doing excessive freeware, shareware and gaming installations), I strongly advise you to invest in Symantec Ghost or Powerquest Drive image which allows you to save a file in a file. partition or an entire hard drive. This operation is really simple and allows you to create a file on your "documents" (d: /) partition which will be the image of your freshly installed "system" (c: /) partition. In a few months, when you start to feel that your machine keeps crashing, it will be enough to use one of these two programs to reinstall your system in less than 10 minutes.If you really have a large hard drive, nothing prevents you from creating several images at different stages of installation of your machine (100% healthy partition, partition including your favorite programs, etc.).
Remember, if you use this method to reinstall your machine, to back up any important data contained in your "system" partition:
- Email (just copy the "C: WINDOWSApplication_DataIdentities {serial_number} MicrosoftOutlook Express" directory which contains all Outlook Express messages to your d: / partition just before reformatting.
- Address book: It is located in the "C: WINDOWSApplication_DataMicrosoftAddress Book" directory, it is a .wab file that it will suffice to re-import into outlook express after reinstallation using the "file / import / notebook" menu address ”from Outlook Express.
- Your favorites (or bookmarks), just copy the “C: WINDOWSFavoris” directory to your “documents” partition and do the opposite after reinstallation.
- Look, by going through each directory of the "system" partition, if you have not forgotten an important document (even if a priori all your important documents should be in the "documents" partition

Some advice from old monkey
-Install your programs on the "system" partition in the "program files" directory (the one that is always proposed by default by the installers) but install your games in your "documents" partition. Indeed, in general, the games are installed cleanly and if you reinstall your machine (with the previous method or in a classic way), they will continue to function after the reinstallation without having to reinstall them.- Install the programs that interest you from our folder "the best free software". It's free and it does a lot of service.
Install a second operating system
Warning: This area is rather reserved for advanced use!To install several operating systems without worrying, you need to know a minimum of the architecture of a hard drive. We have already approached the basis with the partitioning sequence, we are now going to push this study a little further.
A hard drive, whatever it is, follows the diagram below. The hard disk begins with a particular sector called MBR (Master boot record), it is this sector that allows you to tell the BIOS on which partition it should boot. Then, one or more primary partitions are linked.
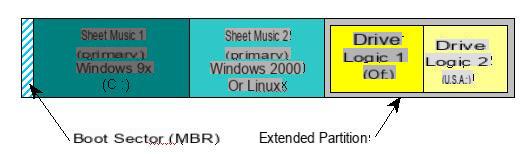
A hard drive can only support a maximum of four primary partitions (this is a limitation of the PC architecture), which is why it is possible to create extended partitions which can themselves contain logical drives (interpreted by Windows like hard drives). When starting the machine, the bios will read the MBR which contains a piece of program (IPL) which indicates to the bios on which partition to start. By default, this piece of program tells the bios to start on the first primary partition. By installing a "boot manager" such as XOSL or lilo (contained in Linux distributions), it is possible to choose on which partition to "boot" at each boot. This is what makes it possible to install several operating systems on the same hard drive (Windows 98, Windows 2000, Linux, a second version of Windows ...) by choosing each time the machine is started which system you want to use. .
 To install several operating systems on a hard disk, it "suffices" during the initial partitioning phase to create a FAT partition that does not occupy all the disk space and to leave unformatted free space on the hard disk. Hard disk. After installing Windows, all you have to do is tell the installer of the operating system you are installing (Linux, Windows 2000, etc.) to create a new partition in the unformatted space.
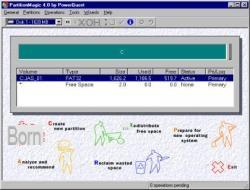
There is also the excellent "Partition Magic" which costs 490F and allows among other things to repartition a disk (even if it contains data) and to create as many FAT primary partitions as you want. If you are thinking of doing several repartitioning, the investment is justified: Partition Magic, in addition to being very powerful is easy to use
The big problem with the installation of several operating systems is that they all want to grant themselves the "master boot record" (MBR) sometimes making it difficult to access other systems. The best solution is to always install the boot manager of each operating system on the boot sector of the partition in question (for lilo for example) and to leave the boot management to specific software (XOSL does very well. business: it is free, user-friendly and easy to install and use). Thus, if one of the operating systems is accidentally corrupted, it does not prevent the other systems from starting. In the worst case, it is sufficient to re-install XOSL using a boot floppy.
If after having done some harsh manipulations, your machine no longer starts because the MBR is corrupted, it is possible to reset the MBR to default which allows you to reboot on the first main partition.
- Boot with a boot floppy containing the "fdisk" program
- Tapez « a :fdisk /mbr »
- restart
![[iPhone] iMessage Doesn't Work: No Messages Are Received | iphonexpertise - Official Site](/images/posts/6b02db17523b3c290f81b739e105ae3c-0.jpg)