Our video
Loading your video "FAQ: Macros - How to create them"How nice it would be to create your own commands ... No longer having to perform a dozen operations each month to create the same report ... Being able to click a button or run a keyboard shortcut for this report to print automatically ... All this is possible with most recent spreadsheets, including Excel and Calc. All you need to do is create a macro: a mini-program that performs a repetitive task. Macros are written in a specific programming language. For Excel, this is Visual Basic for Application (VBA) while OOo macros are generally written in OpenOffice.org Basic but can also be written in JavaScript, Python or BeanShell (Java), in which case we speak more of a script. In the rest of this book, we will only examine the VBA and OOo Basic macros.
Fortunately, you don't have to be a programmer to create a macro, because Excel and Calc, like many other spreadsheets, have a macro recorder. It works much like a tape recorder or VCR, except that instead of recording audio or video, it records key presses and mouse actions. This chapter shows how to create, run, and modify macros.
What is a macro?
A macro is a procedure, that is, a set of instructions that perform a specific task or return a result. There are two types of procedures:
- A subroutine is a procedure that performs a given task. Its code begins with the word Sub and ends with the words End Sub. A macro is a subroutine-type procedure. In this chapter, the terms routines and subroutines are used interchangeably.
- A function is a procedure that returns a result. You probably know what functions in a spreadsheet are, like = SUM () or = AVERAGE (). Programming languages like VBA allow you to create custom functions that can be used as if they were part of the software. A function always begins with the word Function and ends with End Function.
Record a macro
The Excel or Calc macro recorder records all your keyboard or mouse actions in a macro. Launch it, complete the task to automate, and then stop it.
Before you start recording a macro, it is best to make sure that you are familiar with all of the steps in the task. A good practice is to write them down on a sheet of paper, or to perform them “blank” for the first time to avoid any surprises.
The macro recorder records all your actions, including typos or errors. Recording only what is necessary and without error requires knowing the different steps well in advance.
The order of the steps for recording a macro differs depending on the spreadsheet used, but the procedure is always comparable. Before starting, however, it is necessary to take an interest in the parameters linked to a macro.
STORAGE LOCATION: MODULES
As we will see shortly, in object programming everything (or almost) is an object. A workbook is made up of different objects: worksheets, chart sheets (Excel), and modules. If a workbook contains a procedure, then it contains a Module object, containing code. The collection of objects in a workbook is often called a project. The editor displays the projects and the objects associated with them. When you save a workbook, you are actually saving the project that contains all of the objects in the workbook. A module looks and behaves like a word processing document. It contains the instructions that make up the procedures.
In principle, it is possible to store a macro in several different locations:
- in a module of the active workbook;
- in a generic module.
A macro stored in the active workbook can only be run when that workbook is open. You will choose this option for macros strictly linked to a specific workbook, such as a carefully configured graphics creation and print launch macro.
On the other hand, there is a particular generic module: it is for Excel the one located in Custom macros and for Calc in My Macros. In both cases, it is a module whose procedures are always accessible when opening any workbook, whatever it is.
Depending on the spreadsheet considered, the name of the generic module differs. For Calc, it is called Module1 and is stored in the Standard folder of My Macros. For Excel, it is the personal macro workbook, a hidden workbook saved in the XLOpen folder, a subfolder of the Excel folder on the hard drive. This workbook opens automatically when you launch Excel, but since it is hidden you do not notice it. The macros it contains are however accessible from all the other workbooks.
The Excel Personal Macro Workbook is a file named Perso.xls. It is usually located in the C: WindowsApplication DataMicrosoftExcelXLOpen folder. Be careful not to accidentally delete or move it. If you record macros often, or record complex macros, back up its contents from time to time, just in case.
Excel also offers to record a macro in a new workbook. This option is rarely used, and is generally used when creating a new workbook is part of the macro process.
Add a module
As the number of procedures increases, you will probably want to reorganize the procedures and add one or more new modules to a project. You may want to put all the functions in one module and the subroutines in another. This will make it easier to find each of the required procedures in the editor. To add a new module, follow these steps:
With Excel
- From the menu, choose Tools> Macro> Visual Basic Editor or press ALT + F11.
- From the menu, click Insert> Module.
With Calc
- From the menu, choose menu Tools> Macros> Manage Macros> OpenOffice.org Basic (Calc).
- Click on Manage. The OpenOffice.org Basic Macro Management window appears.
- Navigate in the tree structure on the left to the location where you want to create a new module, then click New.
- Enter the name of the new module, then click OK. You can close the other windows.
Rename a module
When a project has several modules (for example because you added some), you may want to change the name of old modules. Here's how to rename a module:
With Excel
- Open the VBA editor.
- Select the module to name in the Project Explorer. It should be in the Modules folder, under the project that contains it.
- Click the property header (Name) or double-click its default name next to the Name property in the Property window.
- Enter the new name and press ENTER.
With Calc
- Choose Tools> Macros> Manage Macros> OpenOffice.org Basic then click Manage or click the Basic IDE module selection icon to open the Manage Macros dialog box.
- Double-click on the module to rename, pausing between the two clicks. Enter the new name.
- In the Basic IDE, right-click the name of the module or dialog box in any of the tabs at the bottom of the screen, choose Rename, and enter the new name.
- Press ENTER to confirm the change.
Delete a module
If you added a module by mistake, or if you want to remove it for any reason, do the following:
With Excel
- Open the VBA editor.
- In the Project Explorer window, right-click on the module to be deleted.
- Choose Remove from the context menu.
- Click No when asked whether to export the module before deleting it.
TO KNOW
The VBA editor allows you to export a module, that is to say to save it with all its code. Doing so, you will be able to import it into another workbook because by importing and exporting you are copying a set of procedures between workbooks.
With Calc
- Choose Tools> Macros> Manage Macros> OpenOffice.org Basic and click Manage or click the Basic IDE module selection icon to open the Manage Macros dialog box.
- Click the Modules or Dialogs tab.
- Select the module or dialog box to remove from the list. If necessary, double-click on an entry to display its sub-entries.
- Click on Remove.
The definitive deletion of a module results in the deletion of all the procedures and functions it contained.
MACRO NAME
A macro name can contain letters, numbers, the underscore character, but never spaces. It must start with a letter and its length must not exceed 64 characters. Try to keep names short and meaningful.
TIP: KEYBOARD SHORTCUT
It is often possible to assign a keyboard shortcut to a macro. Keyboard shortcuts for macros take precedence over those for the program. Usually, most CTRL + letter key combinations are already assigned. Better to keep CTRL + SHIFT + letter to avoid confusion.
ABSOLUTE OR RELATIVE MACRO
A macro can be absolute or relative.
If you select a specific area or cell after starting recording, the macro will run the same and apply your instructions to or from that specific cell or range, with no possible modification: it is an absolute macro. Do this when you absolutely want the macro to affect the same cell, such as placing a date in cell A1.
If you select the cell or range before launching the macro, the selection process will not be recorded in the macro and the macro will run on or from the active area, whatever it is: it is a relative macro. Excel also allows you to create totally relative macros: if you select a range during recording, it is referenced relatively to the initially active cell, unlike in an absolute macro (by default ).
Relative macros are much more versatile.
START RECORDING
To record a macro with Excel, follow these steps:
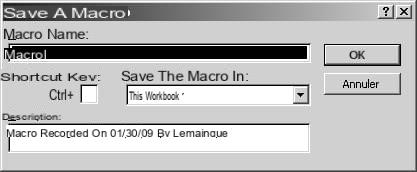
- Choose Tools> Macro> New Macro. This opens the Record Macro dialog box.
- Enter a name in the Macro name box.
- Select the storage location for the macro from the Save macro in drop-down list box (by default, a new macro is stored in the current workbook).
- Optionally, enter a brief description of the action that the macro performs in the Description box.
- You can also assign a keyboard shortcut to the macro, by entering the letter to be used in the Shortcut key box.
- Click OK to close this dialog box.
To record a macro with Calc, do the following:
- Choose Tools> Macro> Record Macro. The steps of choosing the name, storage location, etc., will only be carried out at the end of the recording.
With Excel, the status bar displays the word Recording and the Stop Recording toolbar appears. With Calc, this toolbar is called Recording. 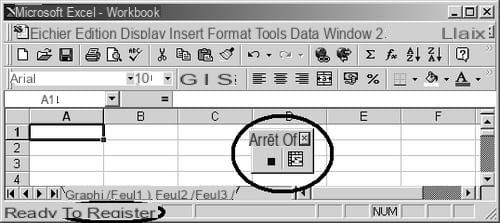
Do not close this toolbar! With Calc this ends the recording and you lose everything. With Excel, recording continues, almost without your knowledge. You will need to choose Tools> Macro> Stop Recording to stop recording.
In Excel, to record the macro relatively, click the Relative Reference button on the Stop Recording toolbar.
Perform each of the tasks that need to be recorded chronologically. When the tasks are completed, click the Stop Recording (Excel) or End Recording (Calc) button.
It's easy to forget that a recording is in progress. As this continues until it is explicitly stopped, it is essential that you stop recording as soon as the tasks to be recorded are. If you forgot to stop recording a macro in time, you don't have to re-record everything - just edit the macro and remove unnecessary actions. We will see how to do this shortly.
With Calc, this is when you will need to specify the location to save the macro (generic standard module or module in the active workbook) and give it a name. It is worth taking a closer look at what a module is.
PRACTICAL EXAMPLE: CREATION OF AN AUTOMATIC ADJUSTMENT MACRO OF A COLUMN
Here you'll create a small macro that automatically adjusts the active column of the active worksheet and then selects cell A1. It will be named AjustCol (or any other name of your choice) and stored in the generic module in order to be accessible from any workbook.
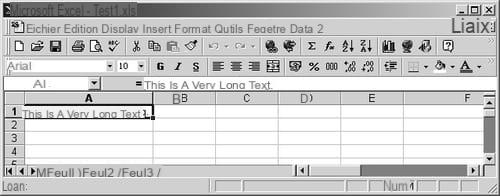
1. Make sure cell A1 is visible on the screen.
2. Start recording a new macro, as described above.
3. Press CTRL + A to select the entire table.
4. Choose Format> Column> AutoFit (Excel) or Format> Column> Optimal Width (Calc).
5. Select cell A1 in the current sheet.
6. Stop recording the macro.
Remember that you name the macro with Excel and choose its storage location before starting the recording, while with Calc it is after stopping the recording.
Always save the workbook that contains a macro before testing it. If it contains errors, you may lose data while it is running. If you see data loss after running, close the workbook without saving it and then reopen it, which will restore the original data.
7. Now test the new macro. Enter any text or number that exceeds its width in any column, then:
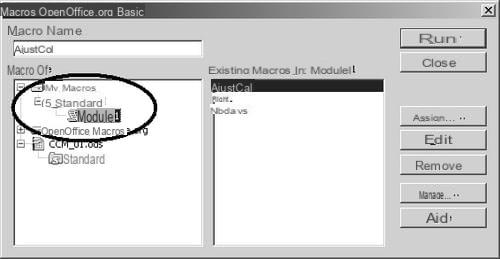
with Calc, select in the menu Tools> Macro> Run macro, then select the macro concerned (you may have to navigate a bit);
with Excel, select in the menu Tools> Macro> Macros, then select the macro concerned in the list.
8. Click Run: all columns will automatically adjust, and the text or number you entered is now displayed in its entirety.