


External hard drives are storage devices used to store digital information, personal and official data such as files, photos, videos, documents and more. These are connected to systems (PC / Mac) via FireWire or USB connection or wirelessly to transfer data from the internal drive to the external drives. If you are switching computers or selling your old computers or laptops, chances are you want to use an external hard drive for backups by erasing and formatting existing data in storage devices. Below we will see just how to format an external hard drive on a Windows PC or Mac.
Part 1: Format External Hard Drive on Windows
Users Windows who want to format the external disk for the first time, can follow the procedure described below.
Step-by-step procedure to format external storage disk via Windows:
- Before formatting an external hard drive on Windows, you need to back up all data such as files, music, photos, videos, etc. (if present on that drive). You could use Aomei Backupper to make this backup.
- To format an external hard drive, connect the device to your computer or to a wall outlet.
- After connecting the hard drive to the system, you will have the option to open Windows Explorer and clicking on the computer section in the sidebar, you will see your hard drive connected to the system.
- Right click on the hard drive icon, and the option "Format".
- Click on Format and choose the file system you want to have on that drive
- Identify the disk with a name in Volume Label and check the Quick Format box.
- To start the formatting process, click the start button and wait for the notification when the process is complete.
- Open your hard drive in Windows Explorer and start dragging documents and files you want into it.
If you don't trust the built-in formatting feature in Windows we recommend using professional software such as Partition Assistant.
Download and install the program from the following link:
After installing and opening the program you will see the following main screen:
Make sure the external hard drive is connected to the computer via USB. Select that disk in Partition Assistant and then click on the left on "Format Partition"
A new window will open where you can click OK to proceed using the default settings (recommended)
When finished, the disc will be as good as new and you can start using it for your own purposes.
Part 2: Format External Hard Drive on Mac
Mac users can use any file system that supports their operating system. To format an external drive on Mac, you can follow the steps below:
- Before starting the device formatting process, back up all data to a separate folder.
- Connect the storage drive to the Mac.
- The unit when connected will be visible (by icon) on the screen.
- Open the finder and check the applications / utilities. Next, double-click DISC UTILITY
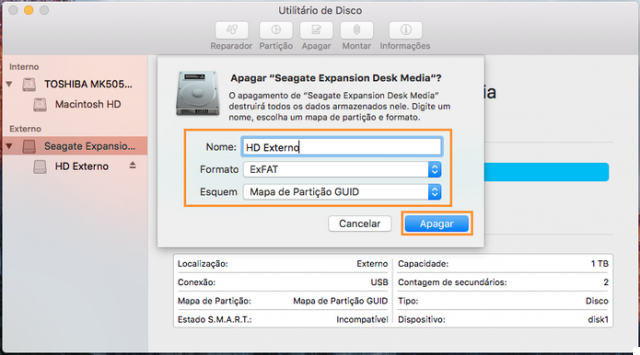
- To format the external hard drive, choose the storage device in the left sidebar and click on the tab Clear.
- Then you will see the menu where you have to select the file system compatible with your operating system.
- Describe or give the drive a specific name and click the Format button.
- The external hard drive will be formatted in seconds.
- When the formatting process is complete, click on the hard drive in the Finder to open it and start transferring the data you want to it
Types of File Systems
As you may have noticed, regardless of whether you use a Windows PC or Mac to format an external hard drive, the thing you will be asked before formatting is to select the file system type.
I file system they are the key parts that allow the operating system to be able to decrypt the data on that disk. Different operating systems like Mac, Windows, Linux and OS X have different file systems for organizing and storing digital information. The most popular file systems are as follows:
- NTFS (New Technology File System): NTFS is developed by Microsoft, started with Windows NT 3.0. It is also known as the Windows default file system. Microsoft has launched five versions of NTFS: v1.0 released with Windows NT 3.1, v1.2 with Windows 3.51, v3.0 with Windows 2000, v3.1 and v5.0 with Windows XP. The latest version includes many features such as disk usage quotas, link tracking distribution, reparse points, file-level encryption, and sparse file support. Windows can write and read to NTFS formatted hard drives while OS X and Linux can only read but cannot write unless supported by third party devices such as NTFS3G. It has a maximum file size of 16TB and a volume size of 256TB.
- FAT 32 (File Allocated Table): It was designed in the year 1977 for floppy disks and the three main variants of file systems are: FAT12, FAT16 and FAT 32. The previous version of FAT was quite simple and robust. FAT32 created more bits used to address clusters. It also helps to reduce the size of each cluster due to which it will have a large storage capacity and will effectively support large disks up to 2TB. It can be written and read by Linux, OS X and Windows. FAT32 offers maximum file size of 4GB and volume size of 2TB.
- exFAT (Extended File Allocated Table): it is quite similar to FAT32 but is less used. ExFAT can store up to 4GB of files and is perfect for flash drives. ExFat formatted drives can be read and written by OS X and Windows.
- HFS Plus (Hierarchical File System): It is developed by Apple Inc. It serves as the primary file system of OS X and also known as Mac OS Extended. For those using Windows on Mac with Boot Camp, they can read HFS disks but cannot write to them. However, third party tools like Paragon HFS + help users write and read on HFS + drives.
How to Format External Hard Drive on Windows and Mac -


