


Getting lined or squared notebooks is not difficult, but it may happen that you need different formats from those in common use such as, for example, dot patterns instead of full squares. In this sense one rather quick and simple solution is to use the functions of Word o Writer of OpenOffice to create sheets with lines or squares or with any other pattern e then print them.
Now let's find out how you can insert lines or squares, of the size you want, inside the sheets Word, underlining that the same thing can also be done on sheets Writer, which are i most used programs in the world, especially for distance learning.
Before proceeding, we remind you that Writer di LibreOffice it is an application exactly the same as Word, but released under a free license Open Source and, therefore, free download.
How to insert a checkered background in Word
To insert a checkered background on Word the following steps must be followed:
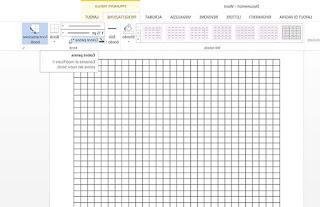
- open Word and create a new blank Document;
- select the Design tab in the ribbon;
- click on the Page Color item located at the top left in the Page Background section;
- click the Fill Effects item in the drop-down menu to create a new dialog box;
- from the Pattern tab select the checkered grid.
To make the grid less noticeable, you can change the foreground color under Fill Effects, choosing a light gray or any other soft color you want.
At this point it is necessary to select the horizontal and vertical resolution, that is the desired size of the sides of the squares; then, on the Layout tab, select the item Align top left e Grid settings from the drop-down menu obtained.
In the window that opens, it is therefore possible to set the horizontal spacing and the vertical spacing between the squares and other properties of the sheet on which you are working on; once the customization is complete, click on the button OK to save the chosen settings.
To disable the display of the squared sheet, go to the View tab of Word and remove the check mark from the item Grid.
Il checkered theme on the bottom of the sheet it does not affect the way you write in the document nor on appearance of the latter being printed: in fact, the squares cannot be printed or displayed in the preview of the document.
If you want to get a sheet instead Word that maintains the grid even during printing, you can proceed using the Insert table function; start, therefore, Word and create a new blank Document.
Inside the Insert tab, click on the button Table at the top left and select Insert table from the drop-down menu. A window will open in which you will have to choose to create a table with 32 columns e 51 lines, reference values for a normal A4 format, and click Ok.
In this way, a squared sheet is obtained that can be modified at any time and visible in print. It will also be possible save it as a template to reuse it later.
The procedures described above are also valid for create lined Word pages, always remembering that, in the first case, the lines will not be visible either in the preview or in the printing phase, while, in the second, the lined page as well as being printed, can be saved as a template to be used every time there is a need .

further customize a Word sheet it is also possible to add headers or footers, for example, with the company logo or a field to be filled in by hand.
You can do this by going to the Insert tab and clicking on Heading e Footer top right. Once the desired result has been achieved, it is possible to save the sheet in Doc, PDF format or print it directly.


