


Preliminary information
The sound card, as you may already know, is a piece of hardware that performs the task of processing signals analog o digital coming from a sound source that can be external (as in the case of musical instruments, microphones, or a transmission of audio data from the Network) or internal, coming from the audio files stored in the computer.
The transformation takes place through special electronic components called DAC converters and the result of this processing is then directed towards a specific output, represented by altoparlanti integrated into the computer, or from peripherals (speakers or headphones, for example) connected to the output socket of the card itself.
Before proceeding to the explanation of all the essential steps for a correct installation of the sound card, both at the hardware and software level, it is advisable to make a brief overview of the types of audio interfaces currently available on the market. The distinction, essentially, must be made between sound cards sustainability ed Outdoor.
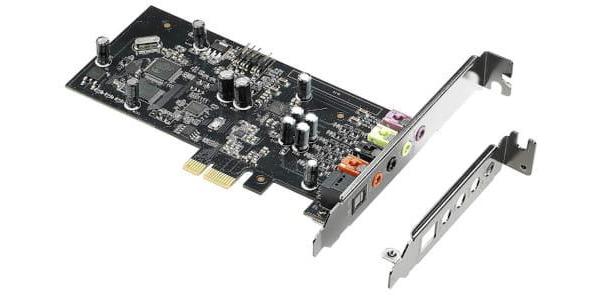
La internal sound card is integrated into the motherboard of the computer, and is connected to it through special slots PCIe (or PCI express). As a rule, it offers essential functionalities in the processing of the audio signal and therefore lends itself to a standard use, more oriented towards listening and reproduction (which can also be of excellent quality), while at the recording level it is not able to guarantee particularly advanced performances. Its installation involves opening the computer case and consequently a more technical manual intervention.
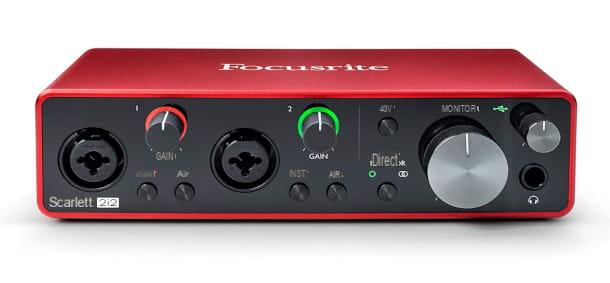
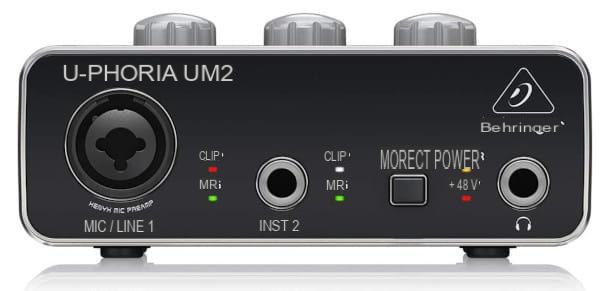
La external sound card instead, it is a stand-alone device that must be connected to the PC via cable USB or, in rarer cases, by means of interfaces Thunderbolt e FireWire. This type of card has become very popular in recent times, thanks in particular to its practicality in installation, its greater versatility and the fact that it guarantees higher level performance than the integrated one. For this reason it lends itself to multiple applications professional and it is suitable for anyone who aspires to a certain audio quality in order, for example, to record music tracks in their home recording studio, or the voice in a podcast to be broadcast on the Net.
This is possible thanks to the presence of audio inputs and outputs compatible with different needs of use: instruments and microphones can be connected to special sockets TRS o XLR, which always keep the signal balanced, while for the interfaces MIDI, such as keyboards or launchpads, there are dedicated inputs.
For the audio output, then, it is possible to take advantage of stereo connectors for playback on external speakers. In addition, many have their own controller, such as buttons and knobs, which allow you to equalize the sound beforehand. The internal circuitry, thanks to a greater availability of space, is more advanced and allows to obtain sampling rates e audio resolutions very high.
How to connect internal sound card to PC
To understand how to connect internal sound card to PC, you need to open the computer case. As for the notebook and Mac, instead, it is advisable to contact the service center authorized by the manufacturer, explaining the reasons for this need (as these are much more complex machines to disassemble and where it is not always possible to act on the internal components).
In any case, if you are having problems related to the integrated sound card on your computer, I suggest you read my dedicated guide, in which there are several suggestions that will allow you to analyze both the hardware operation of the peripherals and the software (drivers and audio settings) and try to identify any problem yourself.
Returning to the fixed PC, therefore, the procedure is quite simple, but still requires a minimum of expertise and familiarity with the hardware. First thing, disconnect the PC from the power supply (for an obvious security issue) and, optionally, from all connected peripherals (for a matter of practicality); then place it on a desk or table so that it is at the right height to operate.
Then remove the viti that block the door (usually the latter is located on the side of the case) and check for the presence of one leads to activate the opening mechanism. If so, use it to open the door or, alternatively, remove it by sliding it to the side.
Now locate the audio card: if the external bezel, in which the audio inputs are present, is locked to the case by means of a screw, you will also have to remove this with the screwdriver. Now, from inside the computer, gradually disconnect the sound card with your hand, without forcing, so as not to damage the PCI slots. Once removed, insert the new sound card, matching the slots with the motherboard inputs. Re-insert the screw to lock the bezel if the relevant provision is present, then close the case with the door and reinsert the relative screws.
Reconnect the PC to the power supply and the various peripherals and start it, then insert the CD with the i driver included in the package, to install them on the operating system. Alternatively, you can search for them on the Internet and download them from the manufacturer's website (avoid external sites, as they may hide malware).
Let's take as an example CREATIVE Sound Blaster Z SE, which I used for this tutorial: to download the drivers, you need to connect to the product page, then scroll to the end and click on the item Download the drivers, under the section Download.
In the newly opened page, click on the button Download in correspondence with the latest version available (compatibility is guaranteed with all Microsoft operating systems starting from Windows 7); accept i terms and terms of use shown in the new browser tab, complete the verification question at the bottom of the page (you must enter the answer in the appropriate field on the side) and click on the button Accept.
The download will start immediately: at the end, you have to start the file SBZ [version] exe obtained and click on the buttons Yes e OK. In the box that appears, click on the box corresponding to the item I accept the terms of the license agreement e premere sul pulsating NEXT for three times. In the last window, click on the button Install, then up end e Yes, reboot your system now, to reboot the system and ensure that the new card is recognized and enabled.
How to connect external sound card to PC
You are opting for one external sound card and you can't wait to test all the features and experience higher quality audio definition. From a mechanical point of view, the connection of these interfaces is really very intuitive, but before proceeding you must know that for many models it is preferable to follow specific installation steps, so that the software recognition takes place in a linear and consistent manner. Let's see, therefore, how to connect external sound card to PC with operating system Windows 10.
Check, first of all, the presence of any accessory software included in the package of the sound card (for example on a dedicated CD), or the indication, usually found in the installation instructions, of a link to the manufacturer's website where to find it. Although most models are recognized when connecting via USB, Thunderbolt or Firewire cable ( plug and play), the correct installation of the appropriate drivers could greatly facilitate the procedure and allow you to access additional dedicated functions.
Let's take one of the most popular sound cards, the Steinberg UR22C. It is a very compact mid-range model that, thanks to well-made internal converters, allows you to get a 32-bit audio resolution it's a 192 kHz sampling rate.
To install it, as a first step, go to the product page, then scroll down to the bottom and locate the section Downloads for UR22C. Therefore, click on the item below Downloads, to access a new page where you can choose the version compatible with your operating system. For Windows 10, for example, you need to click on the link TOOLS for UR-C V1.5.0 and the download will start immediately.
Before starting the installation, it is a good idea to close all running programs and make sure you are logged into Windows with an Administrator account. The archive must then be extracted TOOLS-zip obtained, go to the folder TOOLS [version] Win that you get and launch the setup.
In the first window proposed, you must then click on the button Yes, then on the buttons Next, I accept the agreement, Next twice and Finish, but will conclude the setup.
Once the drivers are installed, you can turn on the interface by flipping the switch Power, on the back of the card, to the left and physically connect it with the USB cable supplied to a USB socket on the PC: recognition will take place automatically and you will see the USB LED on the front of the interface. However, restart the operating system to complete the entire procedure.
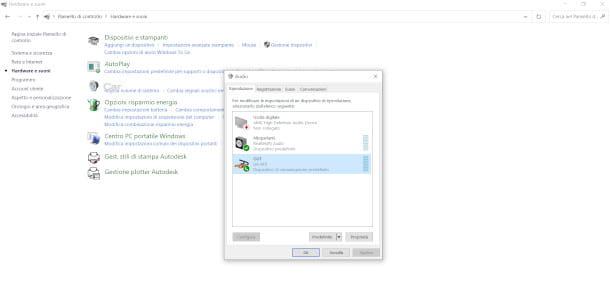
Once the computer has restarted, to confirm that the device has been installed, type the words Control Panel on the search bar of the operating system, at the bottom left, then click on the item Control Panel (App).
In the window that opens, click on the items Hardware and Sound> Audio, or directly on Audio (depends on the type of display set): you should find your device in the list of those available both in the tab Playback in that Registration.
How to connect external sound card to Mac

Let's see below how to connect external sound card to Mac, taking as an example a product of Apogee, one of the most famous companies in this area. Specifically, the choice fell on the model One. As also happens for Windows drivers, you need to connect to the support page of the specific product, then click on the item One Software Installer - [version] for the version of the operating system you have: the download will take place immediately.
Before proceeding with the installation, it is a good idea to turn off any breakage connected to the computer and disconnect the headphones. Then insert the USB cable into the USB port of the sound card and the other USB connector into the appropriate input on the Mac (on the most recent portable Macs it may be necessary to use a USB-C adapter or hub).
Once the connection is established, you need to open the .dmg file of the previously downloaded drivers and start theexecutable to update the device firmware, then click the button Force Update. When the update is complete, you need to close the update utility and launch thesoftware installation executable. In the new screen, you must then always click on Continue, then up Accept to approve the software license, and on Install. It is then necessary to insert the administrator password e premere sul pulsating Install software.
During installation, you are prompted to allow the application access to the feature System Events: you have to click on the button Yes to continue. If the message appears at this stage System Extension Blocked, this is a security feature introduced starting with macOS 10.13 (Sierra), which requires approval before installing certain third-party software. To agree, click on the button OK. You are then redirected to the settings of Privacy and Security operating system, in the tab Generali, where you have to click on the button Allow / Allow.
This must be done within 30 minutes after the message appears, otherwise you will have to restart the installation from scratch. If, on the other hand, the aforementioned button does not appear, you must manually perform this operation at the end of the installation, by going to System Preferences> Security & Privacy, then clicking on the tab Generali and then on the button Allow / Allow.
Once the installation is finished, you need to click on the button OK, then, in the last window, about that Restart to complete the installation process. On the most recent operating systems, again starting from macOS 10.13 (Sierra), it is advisable to run the entire installation procedure again, as the first execution is only necessary to instruct the kernel operating system to run extensions related to the new device.
After reinstalling the software, the next time you restart you will be prompted to choose the newly installed card as default device for input and output in your computer's audio settings. To do this, click on the button Yes and you can finally use the new sound card with your Mac.
You can eventually verify the correct installation also by clicking on the menu Apple, at the top left, and then clicking on System Preferences> Sound.
How to connect sound card to PC


