


How to connect monitor to laptop: connection via cable
Let's start this guide by understanding, together, how to connect monitor to laptop means cable: below you will list the most used types of "wired" communication and, later, how to configure the Windows and macOS operating systems once the connection is established.
Types of cable

The first thing you need to do, regarding the connection between notebook and external display via cable, is to analyze the connection ports available on both devices involved, so that the most suitable connection cable can be identified and used. The most common ports are listed below, along with their respective cables.
- HDMI: it is the most used connection technology, available on almost all the screens present in circulation. Through HDMI it is possible to transmit and receive contents up to a resolution of 7680 x 4320 pixels (8K), with a refresh rate of 60 Hz (and management of audio streams); For content with resolution of 4K or higher, HDMI cables of type 1.4 or higher must be used. On some Windows notebooks, instead of the standard HDMI port, the microHDMI port is available, which can be exploited thanks to a special adapter (microHDMI male to HDMI female), or a cable with both connectors; modern MacBooks, on the other hand, do not have HDMI outputs, so you have to fall back on transmission via USB Type-C. To find out more, read my HDMI cable buying guide.
- DisplayPort, Mini DisplayPort e Thunderbolt: On monitors, it is not uncommon to come across the DisplayPort input, the output of which may be available on notebooks in regular format (DisplayPort), reduced (Mini DisplayPort) or Thunderbolt (present on older generation MacBooks and identical to the Mini DisplayPort). This communication standard, valid in all three cases, allows you to transmit / receive content at a theoretical maximum resolution of 8K at 85 Hz, with audio transmission. Using a suitable cable or adapter, you can also turn your notebook's DisplayPort / Mini DisplayPort output into an HDMI input for use on your external display.
- USB Type-C: This port is present on many high-end notebooks and convertibles, as well as on all modern MacBooks, and allows you to connect to a monitor using various standards. In this case, in fact, a port of the same format (USB Type-C, in fact) can "hide" support for different technologies, such as HDMI, DisplayPort or Thunderbolt. You must inform yourself by carefully consulting the technical data sheet of the laptop in your possession and, therefore, use a compatible monitor and / or adapter. The connection via USB Type-C, depending on the standard supported, can allow you to transmit / receive content up to a resolution of 8K with a refresh rate of 60 Hz (and provides for the management of audio streams).
- DVI: this transmission standard is often available on older Windows notebooks and present on numerous external screens, including new generation ones. It can reach a resolution of 2560 x 1600 pixels (QHD) at 60 Hz. It is possible to transform a DVI input / output into an HDMI input / output by using appropriate cables or adapters.
- VGA: it was the most used standard ever for the connection between notebooks and external screens but, today, it is increasingly rare to find the relative communication port on new generation laptops and monitors. Theoretically, the supported resolution is 1920 x 1080 pixels (Full HD) with 70 Hz refresh rate but, in practice, the rendering of content with quality higher than 1280 x 720 pixels (HD) is anything but appreciable.
Once you have identified the communication system that best suits your needs, it is enough turn on the devices involved (both the notebook and the external monitor) and connect them via the chosen cable / adapter. In most cases, the transmission of the contents will take place immediately and the external screen will automatically position itself on the appropriate source; if not, locate and press the physical button SRC / SOURCE of the latter device, waiting a couple of seconds between each press, until you see the desktop.
Windows configuration

Once the connection between the devices is established, you can use the configuration panels of Windows 10 (or later), to make the appropriate adjustments: so, do it click destroy on an empty spot on the desktop and choose the item Screen resolution from the contextual menu displayed, in order to access the panel dedicated to monitor settings (a section that can also be reached by opening the menu Settings> System> Display of Windows).
Now, click on the secondary monitor preview visible in the box Rearrange the screens (generally identified by the number 2) and take action on the drop-down menus below the item Resizing and layout to define the text size resolution and l 'orientation screen. If you are not sure whether to intervene on the right monitor, click on the button Detect, in order to display the associated number directly on the screen.
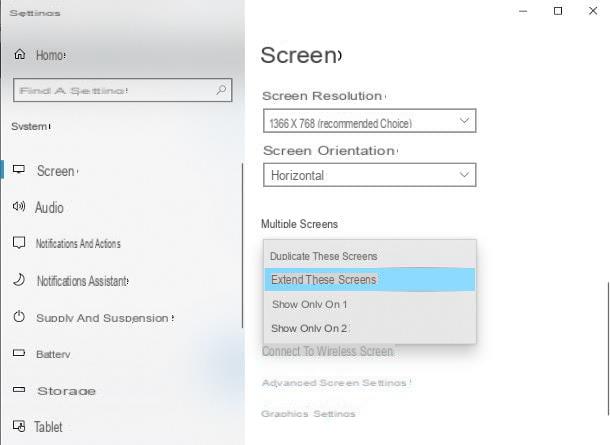
Still from the same panel, you can choose the mode of use to be dedicated to the second monitor (duplication of the screen, extension of the desktop or exclusive use): locate the drop-down menu More screens and select the item Extend these screens, to use the external monitor as an extension of the notebook screen; Duplicate these screens, to mirror the laptop desktop in a mirror image; or Show only on 1 / Show only on 2, to use only the display marked with the number 1, or the one with the number two.
If you have activated the screen extension, you can change the order of the two monitors, according to your preferences: return to the panel again Rearrange the screens, visible at the top and drag the secondary virtual monitor to the position you prefer.
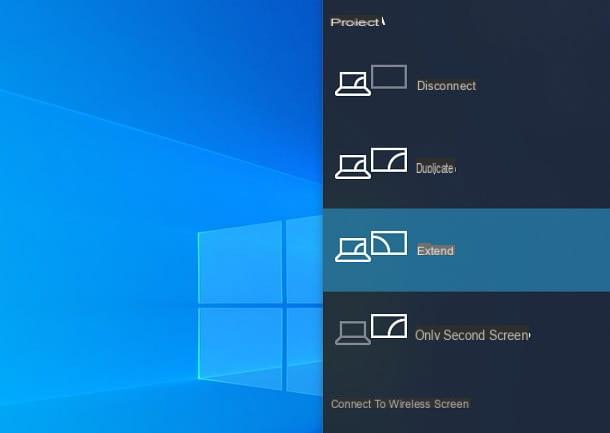
Alternatively, to determine "on the fly" how to transmit content to the secondary screen (duplication / extension of the desktop or exclusive use of one of the monitors), open theWindows notification area by clicking on the comic visible next to the clock, tap on the item Expand located at the bottom (if necessary) and click on the button Project, to access the available options.
Now, click on one of the available items, to set the transmission mode you prefer: Duplicate, to duplicate the main screen; Extend, to use the second monitor as an extension of the notebook desktop; or Second screen only, to turn off the main monitor completely and use only the secondary monitor.
MacOS configuration
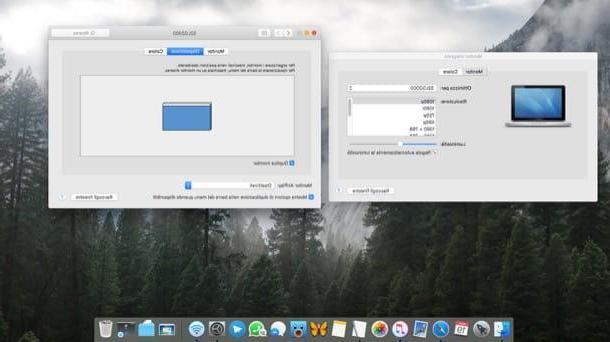
Su MacOS things are not so different, compared to what we saw for Windows: once the MacBook is connected to the external monitor, the latter is used as desk extension. To change this behavior, along with other duplication parameters, click on thegear located in the bar Dock, to open the System preference and then on the icon Monitor, available in the new window that appears.
Now, if you want to rearrange the screens in a different order (because, for example, the physical position is not congruent with the default Mac order), click on the tab Layout and drag the virtual monitors that appear in the center pane to the right or left.
If, on the other hand, you do not want to extend the desk but to duplicate it, put the check mark next to the item Dual monitor, located at the bottom. To adjust the brightness or resolution of one of the screens, click on its preview, then open the tab Monitor and use the drop-down menus and available control bars to modify the parameters as you prefer.
Please note that, if needed, you can quickly access the screen duplication settings by simply clicking on themultifunction icon visible near the MacBook clock: to activate this possibility, go to the section Monitor and apponi il segno di spunta accanto alla voce Show duplicate options in the menu bar when available.
How to connect screen to laptop without using cables
The idea of having cables scattered around the house makes you cringe and would like to opt for the connection wireless? In this case, you have several paths to take, it all depends on the equipment and devices in your possession.
To get started, if you have an animated notebook from Windows 10 (or later) and an external screen with support for the Miracast protocol, you don't have to buy anything, as you can establish communication between the two devices very easily.
If I had never heard of it, Miracast is a transmission standard based on the Wi-Fi direct connection, which can transmit content up to resolution 4K Ultra HD (obviously based on the video card in the computer and the maximum resolution supported by the secondary monitor) a 60 fps. The connection between two Miracast devices is direct and does not require the use of additional network devices (eg routers).
Alternatively, you can easily adapt a "classic" monitor (and not equipped with integrated connectivity) to the use of Miracast technology, using a special adapter, to be connected to the HDMI input of the display and to a power source (also USB).
To establish the connection between the two devices, if you have one screen with Miracast wireless support, turn on the latter and enable the reception of contents (if necessary), using the dedicated menu; if, on the other hand, you have opted to use the Miracast adapter, connect it to the HDMI port of the monitor and to a power source, turn on the screen and set it to HDMI sourceby pressing the physical button several times SOURCE / SRC.
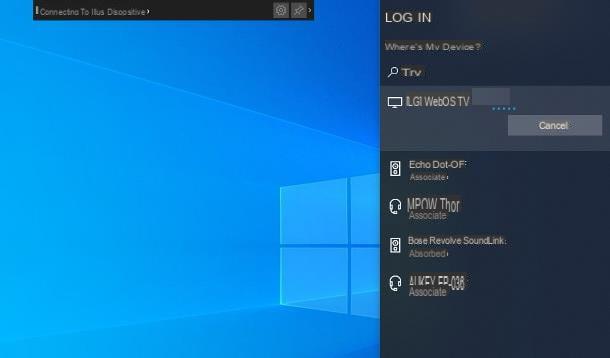
Once the monitor is properly set up, move on to Windows 10, recalls thenotify area operating system by clicking on the comic present near the clock and press the button Connect, visible below; if you don't see it, click on the item first Expand, so that all the quick buttons are displayed.
Now, wait for the name of the Miracast monitor / adapter appears in the list of detected devices and, when this happens, click on it, so as to start the transmission of the screen. To adjust the duplication parameters (mirroring / screen extension, resolution, size and so on), you can follow the same instructions I gave you in the chapter dedicated to cable connection.

And for the MacBook? In this case, you cannot use Miracast technology, as it is not compatible with Apple branded devices. Alternatively, you can take advantage of the chromecast Google, or the box Apple TV by Apple: both devices can be connected to the HDMI port of the external monitor, to transform the latter into a “smart” Wi-Fi device.
chromecast it can be purchased from the Google site, in two versions: the basic one, which costs € 39 and supports Full HD resolution; and the one with Google TV, which costs € 69,99 instead, supports 4K resolution and allows both direct app installation and remote control.
Also Apple TV is available in two different versions: that HD, which allows you to play content at the maximum resolution of 1080p and has 32 GB of internal memory; is that 4K, which increases the resolution of content up to 4K and can be purchased in 32GB and 64GB memory sizes. All versions of Apple's multimedia box have a remote control and integrated App Store.
See offer on AmazonIn addition to the price, the two devices in question also differ in terms of use: by choosing Chromecast, it will be possible to transmit the contents of the macOS desk, in duplication mode only, through the specific functionality integrated in the Google Chrome browser.
Apple TV, on the other hand, is natively compatible with the transmission of content through the system AirPlay of MacBooks (and, in general, of Apple devices), therefore it is possible to duplicate or extend the desktop, change the order and resolution of the screens and, in general, take advantage of all the options available also for the cable connection.
To deepen the subject, I refer you to reading my guide on how to connect the Mac to the TV, equally valid for external monitors (except for the native integration of AirPlay 2 which, on screens, is not available: it is necessarily use Apple TV).
How to connect desktop PC to laptop screen
You are wondering if it is possible to connect a desktop computer to the display of the portatile? The answer is absolutely yes, but only if an updated version of Windows 10 (or later).
The Microsoft operating system, in fact, allows you to transform the screen of the notebook (but also of the desktop PC) into a real one Miracast receiver, which can be enabled if necessary to transform the device into a sort of wireless monitor.
If you intend to take advantage of this possibility, position yourself in front of the laptop computer, right click on the button Home Windows (the windows flag located at the bottom left), select the item Settings from the menu that appears and click on the icon System, visible in the sidebar of the window that opens.
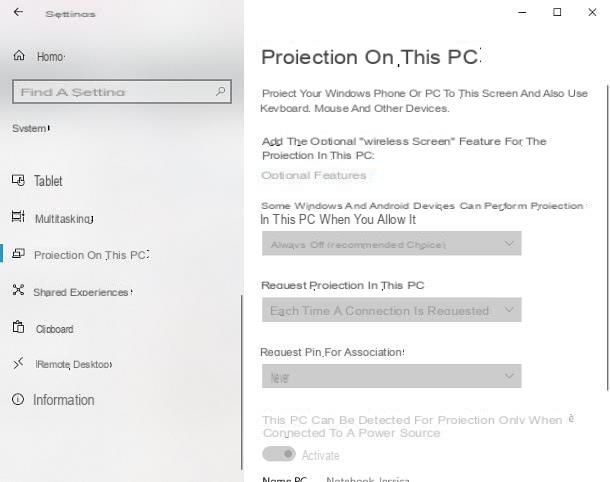
Now, click on the tab Projection on this PC (on the side) and make sure that the drop-down menus that appear in the new panel are enabled and clickable; if not, click on the item Optional features, award-winning [+] Add a feature and type the words wireless screen in the text field visible on the next screen. Once this is done, put the check mark next to the name of the identified functionality and click on the button Install, to add it to Windows.
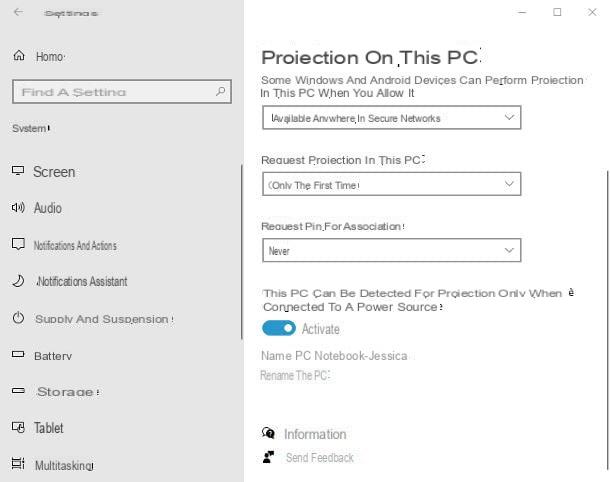
Once the Wireless Screen installation is complete, click on left arrow located at the top, in order to reach the panel dedicated to the Miracast server again, choose the option Available everywhere in secure networks from the top drop-down menu and indicate when request projection on the PC and whether or not to set a PIN for the association or not, by intervening on the dedicated menus.
After this step too, click on the item Launch the Connect app to project on this PC, which should now be visible at the top of the window.
We're almost there: now move to the computer whose screen you want to replicate, make sure it is connected to the same local network of the handset, calls thenotify area Windows 10 (the comic located next to the clock) and press the button Connect, to view connection options. If you don't see it, click on the item first Expand, so that all quick buttons are visible.

Finally, wait a few moments for the Laptop PC appears in the list of available monitors and click on it, to establish the connection: if necessary, authorize the connection between the two devices by answering affirmatively to the warnings that appear on the notebook (and typing, if requested, the PIN connection on the computer to be projected) and that's it.
You can choose the screen mirroring mode in a similar way to what I explained to you in one of the previous sections of this guide.
If you decide to leave the options related to the wireless display on your notebook unchanged, you will not have to access the projection settings, for the next connections: just start the application Connect available in the Start menu, to enable the receiver.
Note: you can, at any time, call up the “proprietary” Start menu of the notebook on which you are projecting the screen, simply by positioning the mouse cursor on the lower edge of the display.
How to connect monitor to laptop


