


- Introduction
- Principle of operation
- First method: the USB key
- Second method: the external module
- Third method: the tuner card
- Some other possibilities
- Compress, store, edit
- Conclusion
Introduction
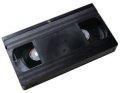 It's a proven fact that VHS, S-VHS, or other HI-8 tapes are endangered species. DVD players have long since taken the place of VCRs in our living rooms, and our videotapes have been at best stored in a cupboard, at worst simply thrown in the trash. However, there is a solution to give these antiques a second youth: digitization.
This term, used in many sauces, is used here to describe the conversion of an analog signal into data which can be interpreted by a computer. In practice, you will therefore be able to use your old cassettes to create video files that can be read on a computer, or on a DVD player for example.
Of course, if your tape is badly used, do not expect to restore it completely, even if some software will be capable of many feats. But if the magnetic tape of your cassette has not suffered too much from the ravages of time, then it will be quite possible for you to offer your videos a more durable medium and less sensitive to the passage of time and to the numerous readings.
We will therefore first discuss the principle of digitization, and the different sources from which it is possible to work. Of course, this operation requires a video recorder, but also other hardware elements and an adequate software processing: we will therefore be interested in the various possible solutions, by evoking some programs which can accompany the user in the process of digitization. Finally, we will deal with more advanced possibilities of the process, such as the issue of compressing, storing and processing the resulting videos.
Principle of operation
So we want to present to you as easy as possible way to convert your tapes to make videos playable on your computer, DVD player or any device capable of playing such files. To do this, let's start by talking about the sources compatible with this type of operation.The sources
 To know what types of videos are likely to be digitized, we should not ask ourselves the question in terms of format, but in terms of material. Indeed, it is enough that your video can be read by a device having audio and video outputs to be digitizable. If this excludes Super-8 for example, it means that all formats such as VHS and its derivatives, Hi-8, Betamax, Betacam and its extensions, Video8, Digital8, VCR or V2000, which can be read by devices having at least one SCART socket, are therefore, in principle, candidates for digitization.
While almost all media can be digitized, there is a limitation regarding the standards used and the compatibility of the peripherals used. Indeed, there are 3 television standards: PAL, SECAM and NTSC. Without going into details, know that all the devices that will allow us to carry out a digitization are not necessarily compatible with these 3 standards, and that it is therefore imperative to check that the signal of your video can be correctly interpreted by the device that will convert it. For example, if you try to play a PAL encoded movie with a SECAM compatible device (or vice versa), your video will appear in black and white. However, there are transcoders which allow a video signal to be transcribed from one standard to another. Finally, note that in Spain, the SECAM_L standard still prevails.
The converter
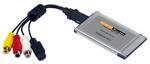 To digitize an analog signal, it is necessary to use a capture device whose electronics contain an analog-to-digital converter, in this case a chip, capable of converting the analog signal into a digital signal understandable by the computer. Current acquisition cards take the form of a USB key, a PCMCIA card, an external module interfaced with USB or FireWire or even an internal PCI card, or even a tuner card.
Typical connections
To perform the digitization operation, you must first connect your source (which can therefore be any device with audio and video outputs) to the converter device. To do this, nothing very complicated:- for audio, it all depends on your device; if it has two sockets (one red, the other white), an RCA cable (this is its name) will allow you to make the connection. If your device does not have red and white inputs, but rather a jack (like the one on a player for example), there are cables with two RCA tips at one end, and a jack plug at the end. other.
- for video, you can use the composite (yellow connector) or S-Video outputs to connect your source to the converter device. Note that there are many adapters in case the connections of your devices do not match. Note that the use of the S-Video connector is preferable if you have the choice, because it offers better performance than the composite cable.
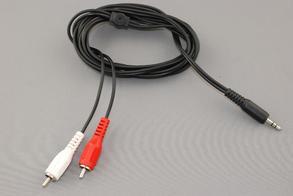
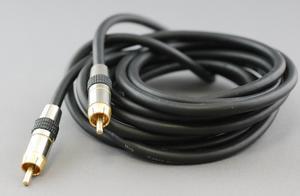
RCA-Jack adapter and composite cable will be good allies to convert your video
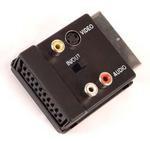
- finally, if your source does not have this type of output (RCA, composite or S-Video), you can quite use the scart output of your device, since there are adapters connecting via scart to your device and offering RCA, composite and S-Video outputs.
Software capture
Let's recap: to digitize one of your video cassettes, you need a device capable of reading it (a VCR will do perfectly well for VHS) and sending the signal to an acquisition unit that can convert it. There remains the question of the storage, or even the processing of the captured video. This is where the computer can intervene, once it has retrieved the data stream leaving the capture card, via the USB interface or Firewire, or even directly via the PCI bus in the case of an internal device. You will therefore need software for these operations.There are a variety of great programs for capturing and processing video. The only problem: these are often not free! We therefore had the concern of looking for free and efficient solutions that could compensate for a Studio or a Magix. Unfortunately, they are not plethora. Indeed, there are not many programs designed for this purpose, one of the reasons that may be that owners of camcorders (who are the main interested in video acquisition) always receive with their hardware dedicated software.
However, we can already cite Windows Movie Maker supplied with Windows XP or Vista, or iMovie for Mac, supplied with the iLife suite. In addition, we have experimented with some software on Windows, namely ABC VideoRoll, Virtual VCR, CaptureFlux and VirtualDub. Only the first did not prove worthy of interest, ABC VideoRoll not being at all ergonomic and requiring much more than intuition to make it work.
 CaptureFlux, one of the good surprises of this article
Prerequisites for the acquisition
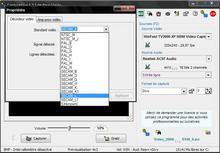
When using the software, you will be faced with options regarding the resolution of the video or the range of colors to adopt. Here are some keys to making the right choice.Image definition For the capture itself, you can choose the resolution of the digitized video. This quantity is represented by the combination of two figures: the number of columns and the number of rows. For example, the resolution of a VHS is 352x288, or 288 rows and 352 columns (or 101376 pixels). The larger these numbers, the better the image quality will be. But wanting to go from this definition to a more important one (an upscale or scaling to a video in 720x576 for example) can generate "dropped frames", that is to say the loss of certain images, in particular for cassettes with somewhat deteriorated tape. In addition to a perceptible jerk in the video, this phenomenon implies, if it occurs too often, a desynchronization which can be significant between the soundtrack and the video. In addition, the number of lost images is indicated on some of the software that we will present to you, which provides initial information on the quality of the video created. If this  number is low, you can afford to keep the resolution high, if not, try a lower resolution.
Color domain
When you have to choose the various parameters which will allow you to capture a video, you will have to define the color domain of your source, that is to say specify which will be the accessible shades, which will be those which will not be. The RGB (Red-Green-Blue) will be offered to you with different precisions (16 or 24 bits), and you can also opt for the YUV color code (2 or 9). This model is the one whose color space is closest to that of a SECAM source, the one you will therefore encounter most often.First method: the USB key
 A first method to acquire your video: the USB key. It's hard to believe that a small utensil like the Terratec Cinergy T USB XS is capable of as much as an external module like the Pinnacle Studio 700 USB, and yet!
The connection
The principle is as follows: you connect, via a composite or S-Video cable (with an adapter if necessary), the video output of the VCR to the input of the USB module, here of composite type. For sound, a cord is supplied, allowing you to connect the RCA outputs of your VCR to the key (you will also need to use an RCA-Jack adapter). Alternative to these connections as regards the audio signal: connect the outputs of your source to the line input (blue) of the sound card of your computer.The software that goes well
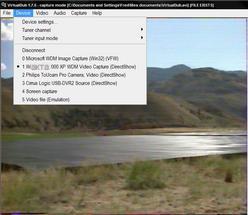
First of all, rest assured, the speeds of USB 2.0 are largely sufficient to allow the transfer between your source and your computer without loss of images. In reality, the main difficulty encountered with these components connected via USB is not the transfer speed, but rather the recognition by the software of these elements as an audio capture source. Virtual VCR has also shown itself capable of considering Terratec's key as being able to transfer sound, where Windows Movie Maker failed. It is therefore Virtual VCR that we will detail here.An interface of the most minimalist (and in English), a rather complex use, parameters which are not saved from one use to another ... this table could make believe that this software is good to throw away. Nay, because it showed a good capacity to accommodate the different devices tested, even being able to consider the Terratec USB key as an audio and video source, where the Pinnacle external module was not seen by the same software as a video source. This software also allows you to perform encoding on the fly via the codecs that are present in your computer and that it recognizes automatically. It is even able to detect those installed after its own installation at the cost of a simple restart.
The main window could not be more uncluttered, as evidenced by the 8 small buttons which cover all the possibilities of this software. Remember: the first button (which allows you to launch the configuration module that we will discuss shortly after), the record button (recognizable by its round shape and its red color) and the preview button (the sixth in the occurrence) are the only ones of real interest.
 Virtual VCR and its control panel: not really sexy ...
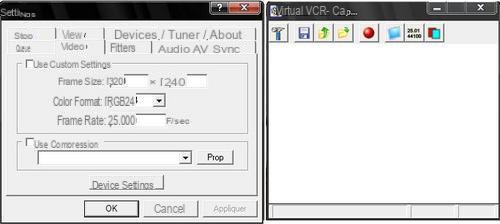
To make a good capture, you need good settings: the first button in the main window directs you to the configuration module, of which the only "Video" menu will be useful. Indeed, we find here all the properties of the capture to come:
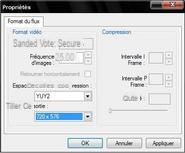
- "Frame size": the definition of the video to be created. Choose 720x576 (which is the definition of a standard DVD), unless you have problems with dropped frames at the time of acquisition.
- “Color format”: this is the definition of the color space. Opt here for the YUV2, which is close to what the SECAM standard uses.
- “Frame rate”: the number of frames per second. In Spain, the standard is 25 frames per second, so choose this value.
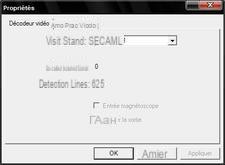
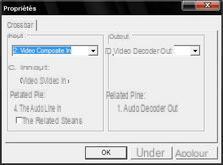
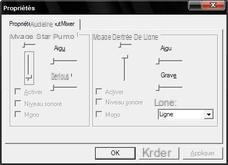
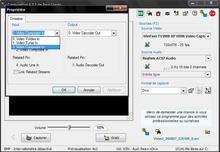
The acquisition properties are displayed via the “Device Settings” button in the previous window
In these different windows, you must successively choose the video standard used in your "source" video (the SECAM_L is the choice to be made), the type of input through which the signal passes (here a composite input, S-Video being a wiser choice if you have the possibility to do so) and the setting of the audio source (bass, treble and capture volume).
 The "Devices" tab, another possibility to adjust the source, input and sound settings
One of the important characteristics of software of this type is the possibility of offering a preview to the user. To do this, go to the "View" tab of the configuration module, and check the "Use smart tee filter for preview" box. This will allow you to be able to view your video, even if you have opted to scale to a size larger than the video's native size. It is in this same tab that you can choose to display information about the capture at the end of it, to check for example if you have not lost too many images (Dropped and Dropped 2).
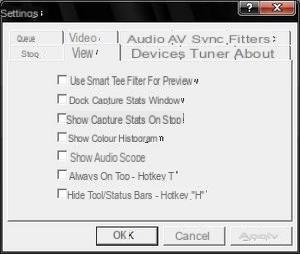
Check the box "Show capture stats on stop" if you want to control the quality of your acquisition
Finally, there is the problem of language (only English is available), that of the configuration (not obvious for a novice) and especially that of the preview, which will only appear at the cost of good some efforts. Finally, the information on the acquisition or the file obtained is less clearly shown than by Movie Maker or Captureflux.
In practice
Let's be clear: there are software limitations, obvious, but also those of the hardware used. This is what interests us here. Starting at a relatively low price compared to other more complete acquisition modules, can this type of USB stick claim to match the performance of specialized components like the Pinnacle Studio 700 USB? You will see in the conclusion that the answer is not obvious, this key having indeed reserved some surprises for us.Second method: the external module
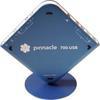 Pinnacle is one of the most recognized companies when it comes to multimedia solutions. How does a module like the Pinnacle Studio 700 USB behave? Is it easy to perform this operation with such a device? Some tracks...
The connection
To implement this solution, you can just as easily use a composite cable or an S-Video cable, the sound passing through the classic RCA connector. Take care to connect the plugs correctly in the part of the edge of the device reserved for the signal input, since the Studio 700 USB also offers video outputs. The module can be connected via a USB cable (in 2.0), which ensures sufficient throughput.Regarding sound, you can also connect the outputs of your source to the line input (blue) of your computer's sound card, especially if your favorite software cannot recognize the external module as a potential source. input for the audio signal.
The software that goes well
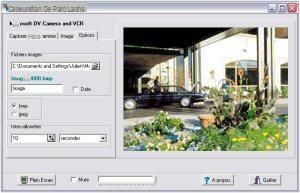
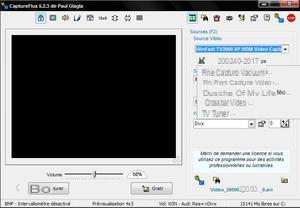
We are going to present to you some quite surprising software for a free program. Indeed, CaptureFlux, by Paul Glagla (!), Really surprised us with its functionalities, its ergonomics (it is in Spanish), and for its great compatibility with the three types of peripherals that we used. CaptureFlux dealt with all the situations, recognizing the Pinnacle module as an audio-video source (where Movie Maker failed), and even allowing itself to encode the videos we offered on the fly in XviD. The only downside is that it did not work with the Terratec USB key. This is why we are going to present this software to you to support the overview of the Pinnacle module.Offered in Spanish, Paul Glagla's software (I never tire of it ...) could seem much easier to configure than Virtual VCR for example. In reality, if the whole has a much nicer presentation, the settings windows will remain the same as for the previous software. Indeed, both Virtual VCR and CaptureFlux (or Movie Maker and VirtualDub) are only interfaces which will use the device drivers for the various settings. Under the drop-down menu allowing you to choose the acquisition device, you will therefore find a small square which will display a menu specific to each device, depending on the possibilities it offers or not.
 The drop-down menu will offer various settings depending on the possibilities of the device
In terms of capture settings, nothing differs from those recommended on the previous page, the YUV2 color domain, the SECAM_L standard, the composite input, the 25 images per second and the definition of 720 columns for 576 lines still being bet. To enter these different values, know that the "video capture filter" designates the standard, the "video capture pin" offers the choice of color space, definition and frame rate, and the "Video crossbar" is the menu that will allow you to choose the type of connection used in your editing.
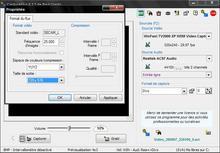
The settings windows are identical to those mentioned with Virtual VCR
As for the sound capture, settings regarding the sound signal sampling are also available, but the default values are quite appropriate. Note that you can also choose the type of audio source, namely the device used if the software recognizes it as a sound source, or the sound card if not (it's up to you to make the connections accordingly).
Some other features of interest:
- To check that the audio capture is going correctly, you can click on the “speaker” button at the top of the window.
- Note the presence of the "Grab" button, which allows you to print a screen in the format of your choice (bmp or jpg).
- The small module for adjusting the soundtrack to the video that you find at the bottom left of the window.
- Finally, the volume bar, located under the display screen, allows you to adjust the capture volume; leave the slider at 50%, increasing it risking saturated sound in your video.
To end the capture, click on “Stop capture”. The video will then be saved in a directory that you can define in the options (icons at the top right of the window), the default being the “My Videos” folder in Windows XP.
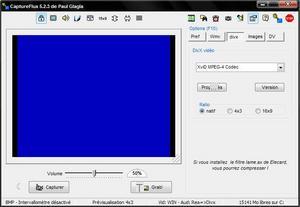
You can also choose the type of compression applied to the video: DivX, wmv, dv ... these formats correspond to settings that you can make using the F10 key. Different options are also present:
- possibility of embedding the date and time in the format of our choice and the alignment and the font that we like to apply;
- presence of default profiles: High, medium, Low, Internet for the "wmv" type which will correspond to a more or less important compression rate;
- possibility of encoding via the codec of our choice: DivX, XVid or other for the “divx” format of the main window;
- possibility of adjusting the quality of the acquisition without compression (frequency, standard, ratio, etc.).
In practice
Without showing an interface overloaded with too many and unsuitable options, CaptureFlux offers varied and complete possibilities for a relatively simple operation, with completely satisfactory results. Two caveats to this idyllic picture:- the Terratec USB key did not want to function correctly during capture even though it was correctly recognized as both an audio and video source;
- using the XViD codec causes the application to crash at the end of the capture, without however corrupting the resulting file. The software may not be the cause, however, as the codec is probably the source of the problem.
Third method: the tuner card
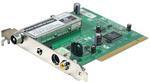 This is probably the cheapest solution if you don't have any of the above items. An acquisition card, this can be a graphics card with a video input, less and less numerous, or a tuner card with such a connection, like the Leadtek Winfast TV2000 XP, which not only allows you to watch TV on your PC, but also to take convincing captures.
The connection
The principle of handling remains close to what we have described to you so far: you must connect the video output of the VCR (composite or S-Video) to the corresponding input on the card. For sound acquisition, you will need to connect the RCA outputs of the video recorder (red and white) to the auxiliary input of your sound card (blue) via an RCA-Jack converter. One note, however, is that capturing video through one device and capturing audio through a second could cause the two signals to become out of sync. This is why software like Captureflux offers a readjustment function.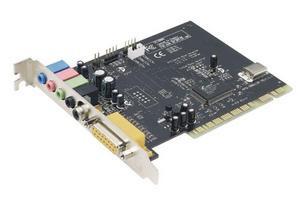 Connect the audio outputs of your video recorder to the line input (blue socket) of your sound card.
The software that goes well
VirtualDub is probably one of the most complete software around: capturing, converting, processing videos using relatively powerful filters, and all for free ... this program is a must and it is the one we decided to use. 'use to illustrate capture with the tuner card.If the version used is in English, be aware that VirtualDubMod, software derived from it, is available in Spanish. The menus offered by VirtualDub are not the clearest, and its ergonomics is certainly not the sharpest weapon of this program. However, this software was the only one to automatically find the appropriate settings to immediately display a preview of our source, without any intervention on our part. Verification made (during which we found the same menus as for the other software), all the settings were indeed correct: video standard, image per second, composite input, definition ... this can be explained as follows: when from previous use of the card with other software, we changed the capture settings and VirtualDub is able to restore them, which other software we tested seemed unable to do. A huge advantage given the number of settings that are quite large to adjust for each use.
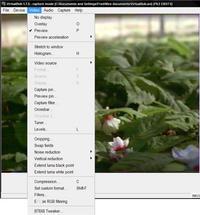
The fairly dense menus of VirtualDub do not make it a model of ergonomics, but what efficiency!
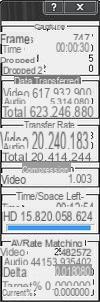
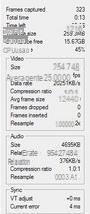
In terms of functionality, VirtualDub is the software that offers the greatest room for maneuver in terms of video processing. Another advantage: it offers good visibility on the characteristics of the capture in real time, since part of the window (on the right) is entirely devoted to the display of various values which make it possible to verify that the acquisition is going normally. . We were thus able to verify that the preview did not in any way interfere with the smooth running of the capture.
In practice
The tuner card is an interesting solution ... for those who already have one! Indeed, even if it is probably the most compatible solution with the various software used (this being largely due to the use of the sound card for the acquisition of the audio signal), it is not the one which gives the best results. However, there are better quality tuner cards, equipped in particular with hardware compression in MPEG-2 format, which will prove to be more efficient.Some other possibilities
Another software: Windows Movie Maker
Windows Movie Maker probably has the most successful ergonomics compared to the other free software mentioned here, it is in Spanish and quite easy to use. The steps are well described, and capturing a video with this program is not at all an exploit, far from it, since it suffices to click on "Capture from video device" to start the capture procedure. . The problems then arise. Indeed, Movie Maker does not recognize all possible peripherals, especially in terms of audio source. For example, know that it worked perfectly with the tuner card / sound card pair, the two sources being perfectly recognized, but with the Pinnacle external module, it was not able to consider it as being able to provide an audible signal. Worse, it didn't work at all with Terratec's key, despite all our attempts.In terms of functionality, Movie Maker does not allow much leeway on the processing of the resulting file, particularly with regard to compression. Indeed, if the proposed possibilities remain quite numerous (the software even proposes to adjust the quality of the recorded video to a size defined by the user), there are no fine adjustments on the codecs used for compression, as with DivX or other XviD. That being said, the videos obtained from our VHS are of a very similar quality to those made from the codecs mentioned just before. The information about the file size, the bitrate used and or the location in the computer of the created video is also clearly present. The software also offers some tips at the bottom of the left column, which will be useful for the most novices among you. Last note: unlike the two software presented below, Movie Maker consumes absolutely nothing in processor resources during a simple acquisition (without compression).
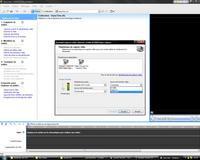
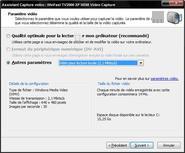
Some screenshots of Windows Movie Maker: the configuration windows are already known ...
The home DVD burner
 It is the least restrictive solution, the simplest, the one which requires the least time and the least effort. It is also the one you should use if you want to digitize a large number of videos. But it is also a solution which does not offer the same flexibility as if you were using a computer, in particular at the level of the processing of the scanned file, its cleaning or its compression.
The implementation is simple if you have a DVD burner and a VCR, since it suffices to connect the audio-video outputs of the latter to the probable auxiliary inputs of the home DVD burner and you're done. There may be variations (use of an S-Video cable, of a scart adapter), but the manipulation only consists of making the correct connections and starting the playback of your VHS at the same time as the recording. on your DVD burner .... which can just as easily be a digital hard disk recorder, if you do not want to burn the video obtained, or not immediately (to add other videos to the DVD by example).
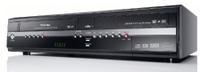
Even simpler, there are hybrid home DVD recorders, equipped with both a recorder and a VCR, which makes it very easy to copy content from one to the other. No connection to make, you just have to read the user manual of your equipment carefully!
The PCMCIA card, for laptops
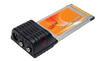 While a USB module may be fine if you have a laptop, you can also use a PCMCIA card to capture your videos. This solution, comparable to the use of an internal capture card for a desktop computer, will allow you to use a fast transfer mode (via the PCI bus of the motherboard of your laptop), ensuring a little more flexibility during use (possibility of viewing during capture, even compression on the fly ...).
The plug-in with MPEG-2 compression
This solution can be extremely useful for people who have a lot of videos to digitize and who don't care about compression, wanting to back up old tapes to DVD. The chip present in this type of device will be able to digitize and compress the incoming stream to involve the computer only in a storage role, which leaves the field free for simultaneous use of your machine, the transfer via USB or Firewire ports requiring very few resources.The camcorder with analog inputs
 Finally, here is the most exotic solution, which consists in using a camcorder as an analog-to-digital converter. For this, it must have analog inputs to connect the outputs of the video recorder. You then have the possibility of recording “what comes out” of the VCR on the hard disk, DVD, or cassette of your camcorder (by starting the recording when you put your VHS back into play), then connect your camcorder to your computer to retrieve the content (usually via a Firewire socket). The camcorder then takes care of the analog-to-digital conversion, while the connection between the camcorder and the computer is only used for data transfer. Your computer is hardly used by this operation, and can be devoted to the compression of this video for example.
Compress, store, edit
As we have seen, all the software - free or not - presented in the previous pages offer to compress the video stream in various and varied formats. But when should you compress a video, what are the cases in which it is interesting? And what about the quality obtained? The problem of support also comes into play. Here are some ways to answer these few questions.What compression and in what case?
The principle of compression is to transform a file into a second which has a reduced size. By doing this, you also assign a format to the created video, such as MPEG-4 (with DivX or XViD codecs) or MPEG-2. All these choices are not trivial and will imply others in terms of storage or reading compatibility with certain devices. Indeed, if you want to transform your old VHS into a brand new DVD, there is no point in performing MPEG-4 compression, since the format used on this medium is MPEG-2. On the contrary, if you prefer to accumulate the videos on a DVD to play them on your living room DivX player, then you will have a lot of compression work to do, and the search for the right codec for the MPEG-4 format will then be necessary. There are many, each with its own strengths and weaknesses, the most widely used probably being DivX and XViD. Renowned software such as Magix Video Deluxe, Adobe Premiere Elements or Pinnacle Studio add certain codecs to your computer during installation, while the free software presented above will use those that you have installed on your own, as we do. have seen previously.
We have talked a lot about video compression, by far the most important step, but we must also say a word about audio compression, which is possible with all the software presented. Obviously, encoding to mp3 will give you greater compatibility than ogg compression, and obviously such an option will be of no use if you want to play your videos on DVD. For those who wish to work on the audio stream, a bitrate of 128 kbps is a minimum, a value of 196 or even 256 ensuring you a better sound quality, but this will increase the weight of the soundtrack in the size of the final file.
A few tips
 CaptureFlux, Virtual VCR, VirtualDub or Movie Maker are able to compress on the fly the videos in acquisition, ie during the passage from the source to the storage. This possibility is also present for paid software. However, if this function sounds very interesting, it should be used sparingly:
- Be careful not to be too demanding for on-the-fly encoding (lower the quality of the compression), so as not to corrupt the acquisition by excessive demand on the processor;
- We even advise you (and especially for the most modest configurations) to capture your video without compressing it, then to keep this file and to make a copy of it before working on it. This allows you to have an intact backup of the hard-won file.
- Another tip: acquire a small video sequence and carry out tests on it (codecs used, compression rate, possible cleaning, etc.); this will prevent you from waiting for long minutes (or even hours) to process a large video to end up with a disappointing result. Experimenting with a footage of a reasonable size will allow you to get quick results and apply the adjustments to the video you want to acquire with confidence in the quality obtained.
- Do not be afraid if you see a black screen while playing your video, and try several players like VLC or Windows Media Player, as it may be due to a codec problem.
- Finally, be aware that the greater the number of codecs installed on your computer, the greater the (bad) chance that some of them will conflict and generate problems when capturing a video.
Retouching
Why use paid software if a program of just 1,5MB (which doesn't even require installation for CaptureFlux) can meet almost all capture needs? The interest of paid programs is their ability to process the captured video by complex effects which the small software presented in the previous pages are incapable of. Cleaning, signal enhancement, signal stabilization are not functions available to software like Virtual VCR, and are only available in suites like Magix Video Deluxe, Adobe Premiere Elements or Pinnacle Studio.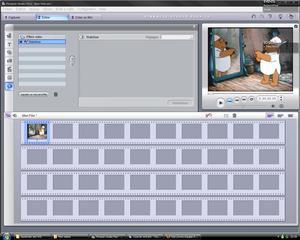
These three programs just mentioned are among the most efficient in terms of video processing, and their skills range from capture obviously (in which they are not more efficient than CaptureFlux) to extensive processing on videos, compression included. Thus, the improvement of the video obtained could take the form of cleaning up a few artifacts erased by the effect of complex filters, or via the stabilization of the video, an operation often very practical for the acquisition of VHS whose tapes will have suffered the ravages of time and whose images will have an unfortunate tendency to make small leaps. However, note that these operations (that of stabilization, for example) are not trivial, and the resources required by such treatment are quite substantial. This remark is of course accentuated for a video whose size is relatively large, the processing time becoming even more substantial.
Conclusion
Digitizing your video cassettes is not a trivial task, it is true. This manipulation requires patience, because the acquisition will take the duration of the film to be captured, and a little know-how, in order to use the right settings among all those offered, even in free software.These are doing quite well in terms of capture, since we have always managed to capture our video (and the corresponding soundtrack), regardless of the device used, and without desynchronization. no loss of images. As such, CaptureFlux seems to us to be a good solution for its ergonomics (an important criterion for this type of application), while the most seasoned will undoubtedly use VirtualDub for its power.
As for the peripherals used, not all gave the same results. To illustrate these differences, we captured a small sequence (in 720x576) with each of these devices (the Pinnacle module, the Terratec key and the Leadtek tuner card) and isolated an image. The results are displayed here, with from left to right, that of the external module, that of the USB stick and that of the tuner card.

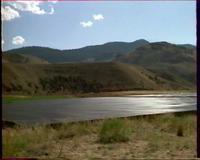

From left to right, the result of the external module, the USB stick and the tuner card
Being somewhat surprised with the result of the Pinnacle plug-in, we performed the same manipulation no longer with CaptureFlux, but with Virtual VCR, which was used to obtain the result with the Terratec key. The conclusion is clear: CaptureFlux was absolutely not involved, as the following images show. Moreover, if you compare the first image of the previous row (captured by CaptureFlux with the Pinnacle module) with the second image of the second row (captured with the same module but thanks to Virtual VCR), the result is quite similar.


On the left, the result from the USB key, on the right that from the external module. Virtual VCR was used in both cases
This difference in result is explained by the quality of the converter, that is to say by the ability to sample and quantize the signal more or less well. Above all, this shows that the software does not matter in terms of capture, and that your choice as to which solution to adopt should be more about the hardware to use.
In view of the different experiments carried out, we can conclude by saying that overall, if the implementation is a manipulation that is acquired quite quickly, the results obtained are not really fantastic and probably require some processing operations than free software ( except maybe VirtualDub) will not be able to bring. In addition, this kind of work requires more experience than that necessary for a simple capture.
So, if you are not satisfied with the quality obtained without too much effort and the use of a more complete software like Studio puts you off, you can always fall back on professionals of the genre, the VideoForever site for example can probably meet your needs.
- Come and discuss this article on the forum


