


Preliminary information
To understand how to proceed, it is important to first understand the basic operation of one Ethernet switch. In essence, it is a tool that has the task of connecting other devices equipped with a compatible network card, sorting (the English word switch, in fact, in In your languagen can be translated with the terms divert / sort) the flow of network traffic in order to improve its efficiency and safety.
When we talk about Ethernet, on the other hand, we mean a protocol (i.e. a set of rules) that defines the technical specifications with which the physical connections between multiple devices within a network which, in most cases, is local (LAN - Local Area Network), limited, that is, to a defined area, such as a house, a school or a small company.
Special devices are used to carry out the aforementioned interconnection of the various devices coaxial cables, equipped at their ends with commonly defined connectors RJ45, in which they converge 8 contacts (called pins). If you want to know more about how to wire a LAN, I suggest you read the guide I just linked to you.
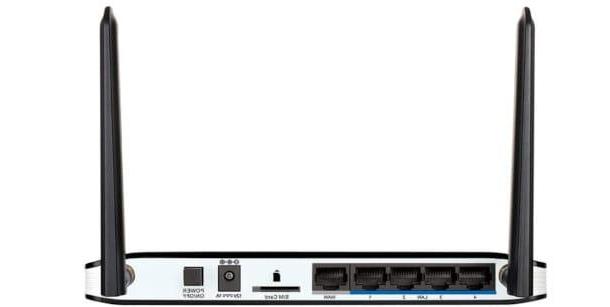
Your Fiber or ADSL router, with which you have probably made the connection to the Internet, is already a switch in itself. You will notice, in fact, the presence in its rear part of a series of slots (usually 4 or 5) for the insertion of the RJ45 connectors, usually grouped right under the heading LAN: These allow you to directly connect other devices by simply inserting one of the connectors of the Ethernet cable into one of the available ports on the router and the other end into the Ethernet input of the computer (or other device with this port).
Sometimes the limited availability of inputs on the router is not able to meet greater connection needs: in essence, if you want to connect more devices via cable than the ports provided by the router, you will necessarily have to integrate a switch. The latter can be of type Unmanaged (or not managed), and is the easiest type to put into operation as there is no need to engage in any configuration, or Managed (managed) which, on the other hand, provides a series of customizable settings through a special one software interface.
Another very important data to consider if you have yet to proceed with the purchase of the switch is the processing speed expected: many devices implement modern technology Gigabit, which increases the standard one from 10/100 MB per second to 1000 MB per second: in this way the exchange of files, video, audio, happens in a much faster way.
Finally, you can also consider the possible availability of the technology Power over Ethernet (PoE), which allows you to power the other devices connected to it using the same Ethernet cable that connects them to the local network (provided that they are of the Twisted Pair, i.e. made up of four pairs of matched twisted pairs).
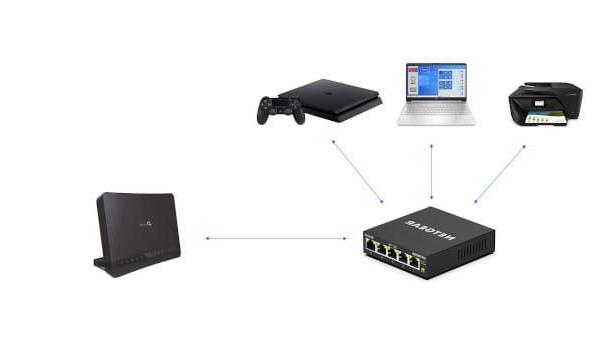
The switch, therefore, once connected to the router will expand your LAN with various devices equipped with a network card with Ethernet input. They can be, for example, game console, printers, network hard drive o media center, just to name a few, but also another switch which, in turn, will allow the entry of further devices. In the next paragraphs, in fact, I will expose you both the connecting a switch to the router, be the connection of two switches in cascade.
How to connect an Ethernet switch to the router
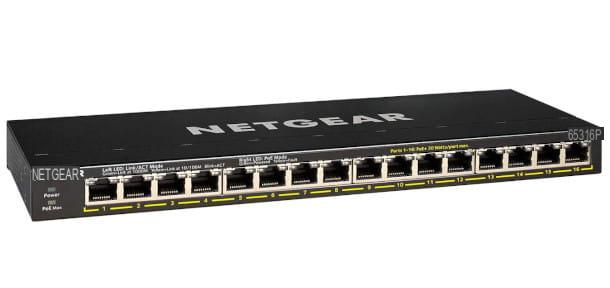
Let's see first, therefore, how to connect an Ethernet switch to the router. From a physical point of view, the connection is extremely simple and is substantially identical for all models (however, check the installation instructions of the device, for safety). In principle, it is necessary to follow some essential steps to ensure that the device is recognized correctly. Let's take the managed switch as an example for this tutorial NETGEAR Gigabit Ethernet GS305E.
First, make sure it's placed in one place sufficiently spacious, so that the heat produced is regularly dissipated: therefore, do not close it inside a piece of furniture, but on a flat and exposed surface. Then insert the plug of the power supply into its socket, then insert the plug into the electricity socket: i LED of the device will turn on and flash momentarily in an initial reset phase.
Now is the time to make the connection with the router, to make sure that too the Internet connection is shared with devices connected to the switch. Use a Ethernet cable and enter one of the two connectors in one of the free doors of the Switch. The other connector will be inserted, instead, in one of the LAN ports available on the router.
Here, however, it is necessary to open a parenthesis precisely on the ports: many models have one dedicated to the connection of other network devices, often called Link o Uplink, characterized by cross pinout (essential feature to allow this type of connection). In others (such as the one considered for this tutorial) a particular technology has been implemented, which can be called Auto uplink and trade, Auto-sensing o MDI / MDIX, which automatically activates an internal crossing on the doors when necessary.
Ultimately, if none of the above possibilities are present, you will probably be dealing with an older model, and you will need to equip yourself with a crossed cable o crossed: the latter will have the inverted pinout necessary to connect the two network devices.
Subsequently, connect the devices you intend to manage with it to the switch: take an Ethernet cable and insert the first RJ-45 connector into the Ethernet port of the device and the other end into any of the switch ports: you will notice that the LEDs will start flashing, showing that the packet exchange is taking place correctly. Do the same for all the devices you intend to connect to the switch.
We come now to the switch configuration, which is only possible in managed models. It is very important to find theIP address (i.e. the numerical code used to identify a device on the network) which is usually assigned by the server DHCP (typically built into the router) by default. You will need this to access the appropriate interface through which it is possible to define the various settings and configure the functions.
In the case in question, that is, relative to the model NETGEAR GS305E, it is possible to proceed in various ways: one of the most convenient is the one created by the manufacturer himself with the development of the app Netgear Insight, available for Android devices (also on alternative stores for devices without Google services) and iPhone / iPad. Once installed (just tap on the wording Installa / Ottieni from the links indicated above and, if requested, proceed to verify your identity), start it and tap the button Create New Account, then type all the information requested in the form that is proposed to you and press on the item Continue.
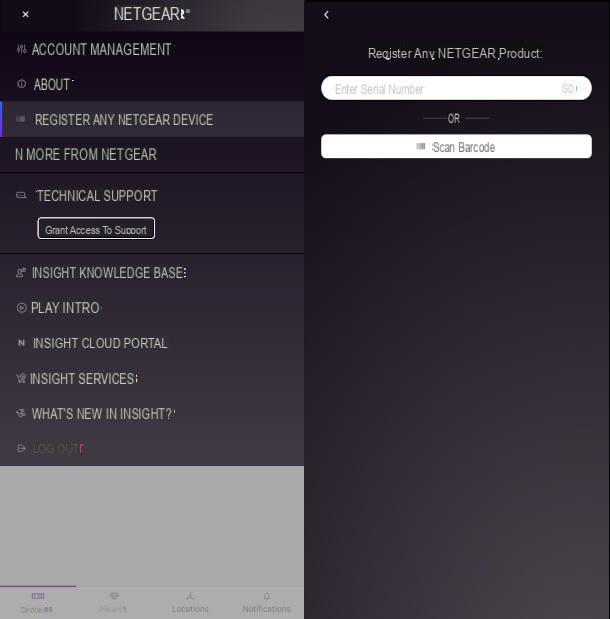
On the main screen of the app, then press the ☰ button located at the top left, then press on the item Register any Netgear Device. This will take you to a new screen where two options will be available: you can type the serial number of the device in the field Enter Serial Number e premere sul pulsating Go or, alternatively, you can tap the button Scan Barcode. The latter will launch the camera of the device, with which you will have to frame the barcode (keep in mind that both information are present on a special label at the base of the device).
One last consideration: to allow the app to detect the IP address after registering the device, your mobile device must necessarily be connected to the same network as the switch.
Alternatively, you can always connect to the interface of your router where there is a special section dedicated to information on the connected devices. Assuming that DHCP has been disabled on your router, the NETGEAR Gigabit Ethernet GS305E will use the default address 192.168.0.239.
Once you have the IP address associated with your switch, you will need to type it in address bar of your browser and press Submit on your PC keyboard. You will be shown an authentication screen where you can enter the Password, which at the first access is proper Password (I suggest you change it as soon as possible in the switch settings by selecting the items Maintenance> Change Password)
One of the more advanced features you can take advantage of with a managed-type switch is setting one VLAN (Virtual Local Area Network), easily accessible from the menu item of the same name, which consists of one dummy network of devices belonging to a main local network. This allows you to divide the connected devices according to certain characteristics. For example, you could create a VLAN dedicated to devices that do not need to access the Internet, or for a subset of computers logically connected in a specific work area, assigning them a part of the available ports.
Another very useful configuration, for example, is the one provided in the section QoS (Quality of Service), which allows you to prioritize the transmission of network packets to certain ports, to which computers are connected that perform a very important job in your LAN.
The settings you can perform on this switch model are really many: for example the access control to the switch interface (via the System> Maintenance> Access Control), or the enabling of Port Mirroring (just click on the menu items System> Monitoring> Mirroring to access it), a detail security system which allows the traffic of some ports to be routed to another predefined port subject to a more accurate tracking. For more details I suggest you consult the product support page.
However, you can find similar settings on other switch models as well - mine was just a practical example based on the device I know.
How to connect two Ethernet switches
You may need, as part of your activities, to increase the number of available ports even more, to allow the connection of a greater number of devices. Your research, therefore, focuses on how to connect two Ethernet switches. There are several ways to do this, which you can determine based on your specific needs and the topology of your network.
One is that of also connect the second switch to the router, using the latter as Gateway o command center of the network. In this case the operations to be followed are the same as described in the previous chapter.
Another widely used solution is that of connect the switches in cascade. The models of modern conception, as already explained, may have a specific port called Link or Uplink, which has a cross-pinning, and is dedicated precisely to the combined connection of other network devices.
Alternatively, check on the specifications of your switch if a modern technology has been implemented, called Auto uplink and trade, Auto-sensing o MDI / MDIX (varies according to the manufacturer) which automatically activates the necessary intersection.
In these cases, simply use another standard Ethernet cable, inserting one of the RJ45 connectors into one of the ports on the back of the secondary switch, then connect the other RJ45 connector to one of the ports on the back (or Link / Uplink) of the primary switch.
Then you will need to enter thepower adapter supplied with the secondary switch in the electrical outlet and, subsequently, carry out the same operation for the main one. If the aforementioned ports are not present, you will also need to equip yourself with a crossover Ethernet cable (also called crossed).
How to connect an Ethernet switch


