


But it can contain a whole host of much more complex options and features, revolving around overclocking or configuring a RAID array, and more. That is why we have decided to put together this guide which will allow you to learn a little more about this part of your computer.
Summary:
- System Information
- Peripherals
- Processor and memory
- Some other commands
Before carrying out any modification, remember to proceed step by step: test your machine after each modification, and if you encounter a problem, return the problematic option to its initial state.
One article for several BIOS
 There are three main manufacturers, American Megatrends, Award and Phoenix, although the latter is less present on your motherboards than the first two. Free projects are also in the works like Coreboot and we are not talking about the two historical BIOS for PowerPC which are PREP and CHRP. In addition, each motherboard manufacturer can also modify this BIOS to its liking. Finally, some options strongly depend on the hardware used, and more particularly on the processor and RAM. All of this implies that there are a lot of different versions, so we couldn't go into them all. This is why you may find functions in this guide that will not always apply to your motherboard. This is also the reason that prompted us to opt for a classification by theme which will also allow you to quickly find the information you are looking for.
Navigate in a BIOS
The ways to get to BIOS differ depending on your motherboard manufacturer. So you will most often need to use the F2 or Delete key. At Gigabyte, there has recently been talk of an “advanced” BIOS, in fact a way of hiding the most delicate options, which can be activated via the shortcut CRTL + F1. Likewise, some manufacturers provide a dedicated key combination for a BIOS update utility, but that is beyond our scope.Navigation in the BIOS is much more homogeneous, the commands being practically all the same from one manufacturer to another, from one motherboard to another.
- To modify an option: + / -
- Help access: F1
- Move in the menus: directional arrows


 To save the configuration and restart: F10
- To load the settings without fail: F8 (Fail-Safe Defaults)
- To choose the optimized parameters: F6 (Optimized Defaults)
- Finally to exit BIOS, a menu or a submenu: ESC
Some precautions
 Whether it is for the most learned among you or the most novices, it is always possible to find yourself one day confronted with a computer which does not start any more, following a manipulation in the BIOS. Indeed, insofar as a fine configuration of the BIOS makes it possible to modify the hardware parameters, it can happen that the system becomes unstable, or even does not restart any more. Here are some precautions to take in case of a small problem.
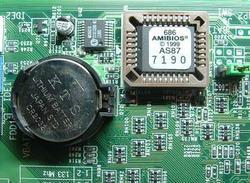
The first tip is to simply restore your BIOS to factory settings. To do this, you can remove the battery from your motherboard for a few moments in order to restore the default settings. Some recent motherboards are also equipped with a dedicated button, accessible on the motherboard or at the back of it, next to the connectors. For the oldest cards, there is also the possibility of playing with the positioning of a jumper. You will find this indication in the manual of your motherboard. Note that it is obviously strongly recommended to carry out these operations having previously turned off the computer.
Another possibility is to use the functions provided for this purpose within your BIOS. On those of the Phoenix type, you must use the F9 key to restore the manufacturer's default parameters. On Award-type BIOSes, pressing the F5 key restores the previous parameters, pressing F6 restores the default values and the F7 key restores the default parameters provided by the motherboard manufacturer.
Machine Info
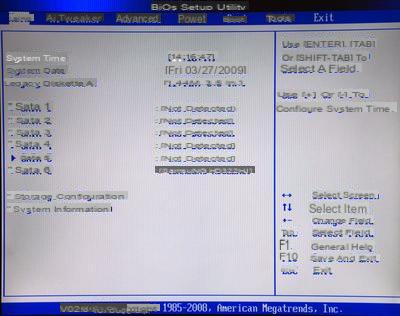
The following entries are often found in the Standard CMOS Features menu. They relate to several pieces of information specific to your machine, and more particularly revolve around its "health".- Date ou System Date : Neither more nor less than the date your operating system will use. A BIOS that is not on the right date can be the cause of many problems, such as an antivirus that refuses to update, for example.
- Time or System Time : After the date, the system time. You can modify the values using the + and - keys.
- IDE Channel (Access Mode, CHS, LBA, Large, Auto): This is the operating mode of an IDE hard drive; leave it on Auto most of the time, but the disks are detected each time the computer is started, which lengthens this step accordingly. Then it all depends on how you formatted your drive. These modes specify how the cylinders and sectors of the disk are used.
- Drive A ou Legacy Diskette A (None, 360K, 5,25 '' - 1,2M, 5,25 '' - 720K, 3,5 '' - 1,44M, 3,5 '' - 2,88M, 3,5 ''): This is the format of your floppy disk drive. For people who still have them, the option to choose will probably be “1,44M, 3,5” ”.
- Floppy 3 Mode Support (Disabled, Drive A): Keep Disabled, this option is only relevant if you live in Japan.
- Halt on (All, But Keyboard - All, But Disk / Key - All, But Diskette - No Errors - All Errors): Allows to choose after which type (s) of error (s) the boot should fail. The "All, but Keyboard" option allows you to have control, even in the event of a problem.
- System Information : This screen delivers all kinds of useful information, such as the BIOS version, the model of processor you are using, its frequency, the amount of on-board RAM ...
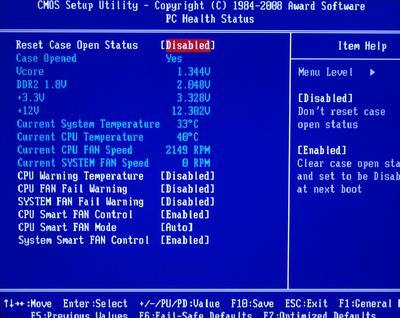
- CPU Monitor (value, Ignored): When set to "Temp", activates the probe which controls the temperature of your processor. Indispensable if you want to have a view of this data in your operating system, or if you want to benefit from automatic regulation when the motherboard allows it.
- MB Temperature (value, Ignored): Same remark as for the processor.
- CPU Warning Temperature (Disabled, 60, 70, 80, 90 ° C): Defines from what temperature your computer will warn you of its overheating.
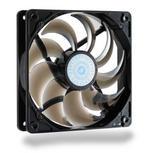 CPU Fan Speed (value, Ignored): Display the speed of the fans connected to the motherboard in order to check if one of them is defective. Keeping an eye on this value also helps you know when a good cleaning is needed, as you will then observe a steady drop in your fan performance due to the dust that accumulates.
- CPU Fan Fail Warning (Enable / Disabled): On Enable, warns you that the processor fan is not spinning, or not running fast enough. It's a good idea to leave this option enabled, unless you have a fan that purposely idles.
- CPU Smart Fan Control (Enable / Disabled): On motherboards that allow it, this option allows, if enabled, to modulate the speed of the processor fan according to the temperature of the latter.
- Current System Fan Speed (value, Ignored): Specifies the speed of the fan connected to the "System Fan" connector of your motherboard.
- System Fan Fail Warning (Enable / Disabled): As for the CPU, allows to warn in case of too low or no rotations of the system fan.
- System Smart Fan Control ou Q-Fan Control (Enable / Disabled): Enable this option to have the motherboard automatically modulate the speed of the system fan based on temperature.
- Power Fan Speed (Ignored, N / A, value): Gives the fan speed of the PSU when the PSU and the motherboard are compatible.
- Chassis Fan 1 Speed (Ignored, RPM, N / A): Gives the speed of the fan connected to a connector on the motherboard other than CPU or System.
- Chassis Q-Fan Control (Enabled, Disabled, value): Allows regulation of the box fans, if they are connected to a compatible motherboard.
- CPU Smart Fan Mode (Auto, voltage, PWM): Controls how the processor fan is regulated. For PWM mode, your fan connector must be 4 pins. This more flexible regulation mode enables the best results in terms of operating silence to be obtained.
- CPU Voltage ou VCore (Ignored, value): Gives the value of the voltage of the electric current supplied to the processor.
- DDR (Ignored, value): Provides an indication of the voltage value at the RAM locations.
- 3,3 V Voltage (Ignored, value): The 3,3 V "rail" is used to power the USB ports on your motherboard. If you have problems with these, check this value.
- 5V Voltage (Ignored, value): Controls the output voltage of your power supply on the 5V rail that is used for hard drives and optical drives.
- 12V Voltage (Ignored, value): The 12V rail is used to power the processor. The stability of this tension is very important, especially for those who push their machine to its limits.
Peripherals
There are many options related to the different peripherals connected to the motherboard, such as storage units (hard disk or other), audio controller, PCI-Express bus or even USB ports. Let's start with the settings that affect storage drives and optical drives. Type (Not Installed, Auto, CDROM, ARMD): Defines the type of device connected to the port in question. ARMD stands for ATAPI Removable Media Device. Choose this setting for a ZIP drive for example.
- LBA / Large Mode (Auto, Disabled): Logical (or Large) Block Addressing. It is a method of addressing the clusters of a hard drive. No reason not to activate it if your hardware supports this technology.
- Block (Multi-Sector Transfer) (Auto, Disabled): Enable this option if your hardware supports it. In this case, the data transfers will be carried out using several sectors of the hard drive at the same time.
- PIO Mode (Auto, 0, 1, 2, 3, 4): Input / output control mode of a reader. It uses more CPU than DMA for lower performance.
- DMA mode (Auto): Direct Memory Access. Unlike in PIO mode, data passes directly from read-only memory to RAM without going through the processor box. Keep the automatic selection.
- 32 bit Data Transfer (Disabled, Enabled): if this mode encountered some compatibility problems with Windows NT, it is fortunately no longer the case. Enable this option to slightly increase the performance of your disk.
- SATA Configuration (Enhanced, Compatible, Disabled): If you have SATA devices, the best setting will be Enhanced (for extended), which will give you more freedom than Compatible mode.
- OnChip SATA Type (Native IDE, RAID, AHCI): Native IDE mode allows you to "trick" operating systems that require a driver to run a SATA disk. The RAID mode is used, as the name suggests, to create a RAID array, while the AHCI (for Advanced Host Controller Interface) mode offers additional options compared to a simple SATA port, including hot plugging. This mode is supported by Windows Vista and GNU / Linux since kernel 2.6.19.
- Hard Disk Write Protect (Enabled, Disabled): Disk write protection. It might sound silly, but if you want to be sure to protect the data on a drive, this is a great way to do it.
- IDE Dectect Time Out (Sec) (0, 5, ...., 30, 35): Time lapse after which the system stops trying to recognize a storage medium connected in IDE.
- OnChip IDE Channel (Enable / Disabled): Enables or disables the management of the IDE. If you only have SATA disks or optical drives, you can disable this option.
- Smart monitoring (Auto, Disabled, Enabled): Performs checks on the health of your hard drives.
- Memory Remap Feature (Enabled, Disabled): Enable this option for your BIOS to recognize the 4 GB (or more) that are installed on your platform.
- Initiate graphic adapter (IGD or Onboard, PCI, PEG): Determines the type of card that will be responsible for the display, IGD for Internal Graphic Card, PCI for very old cards, PEG for PCI-Express Graphic, i.e. the choice you will need to make most of the time.
- IGD Graphics Mode Select (Enabled, 32 MB, Enabled, 64 MB, Enabled, 128 MB): Assigns the amount of RAM to an on-board graphics card.
- PAVP Function (Disabled, LiteMode, Paranoid): Protect Audio Video Path. Intel technology which consists in "protecting" an audio or video stream from a cut by reserving part of the memory. Paranoid mode disables Aero under Vista.
- DVMT Memory (128 MB, 256 MB, Maximum DVMT): Dynamic Video Memory Technology. Option available on cards with an integrated graphics chip. Allocates a certain amount of memory to the latter.
- UMA Frame Buffer Size (Auto, 128, 256, 512 MB): Unified Memory Architecture. Technology older than DVMT, but with the same functions.
- Surround View (Enable / Disabled): Allows you to use both an on-board card and a dedicated GPU.
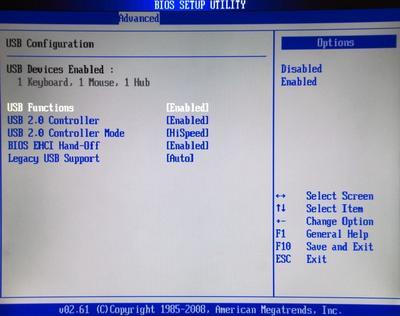
 USB Devices Enabled : List the USB devices connected to the computer.
- USB Functions (Enabled, Disabled): Must be activated otherwise your USB ports will not work.
- USB 2.0 controller (Enabled, Disabled): The vast majority of peripherals are now compatible with the USB 2.0 standard. To activate therefore.
- USB 2.0 Controller Mode (HiSpeed, FullSpeed): To benefit from the full potential of your devices, opt for HiSpeed mode.
- USB EHCI Controller (Enabled, Disabled): Enhanced Host Controller Interface. Activate this option so that the peripherals and the machine can "communicate" in a finer way (the peripheral sends information concerning its make and model, for example).
- USB Keyboard Support (Enabled, Disabled): To be enabled if you have a USB keyboard.
- USB Mouse Support (Enabled, Disabled): As for the keyboard, activate this option if you have a mouse connected via USB.
- Legacy USB Storage Detect (Enabled, Disabled): Enables or disables automatic detection of USB devices.
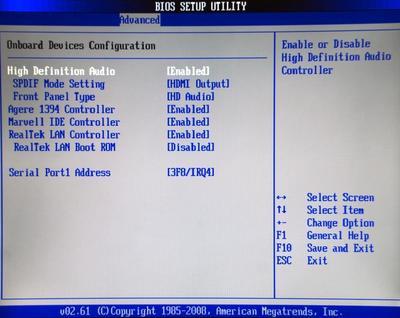
- High Definition Audio (Enabled, Disabled): Enables or disables the high-definition audio chip located on the motherboard.
- Onboard Audio Function (Enabled, Disabled): Same function as the previous one for a “classic” audio chip.
- SPDIF Mode Setting (HDMI Output, SPDIF Output): Redirection of sound to the SPDIF output (for Sony / Philips Digital InterFace) or the HDMI output, if your card has one.
- Front Panel Type (HD Audio, AC97): Activate this option to benefit from the sound on the front output of your box.
- Onboard 1394 Function (Enabled, Disabled): Enables or disables the FireWire output of your motherboard.
- Onboard LAN Controller (Enabled, Disabled): Enables or disables the Ethernet network device on your card.
- Onboard LAN Boot ROM (Enabled, Disabled): Enabled, this option allows the installation of an operating system via the network.
- PCIPnP (Enabled, Disabled) : Active la fonction Plug'n'Play sur les ports PCI.
- Plug And Play O/S (No, Yes): If this function is enabled, the operating system configures the peripherals that are not required at startup. Otherwise, the BIOS takes care of it.
- Onboard Serial Port 1 (Disabled, 3F8 / IRQ4, 2F8 / IRQ3, 3E8 / IRQ4, 2E8 / IRQ3, Auto): Unless you are comfortable with the notion of IRQ port, keep the Auto setting.
- Onboard Parallel Port (Disabled, 378 / IRQ7, 278 / IRQ5, 3BC / IRQ7): These ports are obsolete, parallel devices are very rare. You can disable these ports.
- Parallel Port Mode (SPP, EPP, ECP, ECP + EPP): Selection of the parallel port communication mode. Very little use, again.
- ECP Mode Use DMA (1-3): Menu that appears if you select ECP from the previous menu. This option allows you to specify the direct memory access (DMA) channel when using an ECP unit.
Processor and memory
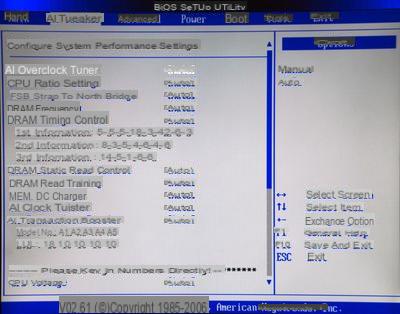
This is probably the most interesting part of configuring a BIOS, the one that allows you to see what your hardware is in the belly or on the contrary to make it as stable as possible. Let's start with the processor-specific settings.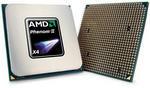 CPU Ratio Setting ou CPU Clock Ratio : Multiplied by the FSB, this number should give you the frequency of your processor. This is not always the case, however, we will see later.
- CPU Frequency : This is the frequency at which your processor operates.
- Intel Turbo Boost Technology (Enabled, Disabled): Available for Intel processors based on the Nehalem architecture, this technology allows the CPU to operate at a higher frequency than that given by the Multiplier X FSB calculation. Note that the frequency reached depends on the number of activated cores.
- CPU Cores Enabled : This option authorizes the activation or deactivation of cores for the latest generation Quad-Core processors such as AMD's Phenom or Intel's Core i7s.
- CPU Multi-Threading (Enabled, Disabled): Option specific to Intel processors. Mutli-Threading is supposed to increase the processing speed of the CPU by playing on the parallelization of instructions. Particularly effective on adapted programs.
- CPU Enhanced Halt ou C1E Support (Enabled, Disabled): Available from Intel Prescots, this mode lowers the processor frequency when it is idle. Requires SP2 for Windows XP.
- C3/C6/C7 State Support (Enabled, Disabled): Support for these consumption modes allows even finer management than option C1E.
- CPU EIST Function (Enabled, Disabled): Technology that allows the multiplication coefficient to be lowered when the processor is not used.
- Bi-directional PROCHOT : Processor protection mechanism that turns off the computer if the processor temperature becomes too high.
- Intel Virtualization Tech (Enabled, Disabled): Allows compartmentalization of the operation of several applications or operating systems so as to prevent their interaction.
- CPU TM Function (Enabled, Disabled): Protection of the processor in case of overheating. The voltage goes down, the frequency goes down so as to let the CPU cool down.
- Execute Disable Bit (Enabled, Disabled): If the option is enabled, the processor distinguishes between codes which should be executed and those which should not. It is protection against worms and other viruses.
- Intel SpeedStep Tech (Enabled, Disabled): Technology that allows the processor to adjust its frequency and the voltage flowing through it according to the user's request.
- AMD K8 Cool&Quiet Control (Enabled, Disabled): The equivalent of the previous technology for AMD.
- QPI Link Speed : QuickPath Interconnect. For Intel processors based on the Nehalem architecture, such as the Core i7. Computer bus developed by Intel to replace the FSB.
- BCLK Frequency : For the latest Intel processors, we no longer speak of FSB, but of Base Clock. This is one of the most important parameters to modify when looking to overclock your processor.
- CPU Clock Skew : Very fine adjustment of RAM ports. There is a complete tutorial at this address if you have the soul of an adventurer.
- MCH Clock Skew : Another particularly fine adjustment linked to the voltage applied to the Northbridge and to the processor.
- CPU Clock Drive : This setting changes the way current flows through the processor. It should only be handled when using high enough voltages by overclockers.
- PCI-E Clock Drive : Same setting as the previous one for the PCI-Express bus.
- HT Link Frequency (Auto, 200, 400, 600, 800, 1000): Hyper Threading bus frequency. This value must be modified in the case of overclocking. Otherwise, use the Auto setting.
- FSB Frequency (depends on the CPU - Value modifiable 1 to 1): The frequency of the FSB directly influences that of the processor. You can modify it to increase it, at your own risk!
- PCIE Frequency (100, modifiable value 1 to 1): Modifies the frequency of the PCI-Express bus. It is not advisable to perform such an operation without knowing exactly what you are doing.
- FSB Strap to North Bridge (Auto, 200, 266, 333, 400 MHz): this setting specific to the Northbridge influences memory access latency times (and not memory latency times). In theory, the more we go up this value, the more we can increase the FSB. But stability issues can quickly arise.
Let us now discuss the settings specific to RAM, the famous RAM which is often the cause of visits to the BIOS.
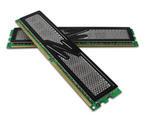 DRAM Frequency : The frequency at which your RAM works. This value cannot be modified here, because this frequency evolves according to the various settings that you will have imposed, on the FSB for example.
- DRAM Timing Control (Auto, Manual): Choose Manual if you wish to have finer control over the latencies of your memory, ie its ability to respond quickly to requests.
- CAS# Latency or tCL : (3 to 11 DRAM Clocks): This parameter controls the delay (measured in clock cycles) that the memory takes to read data once it has received them. The lower this value, the better the performance. This parameter is particularly important in terms of machine stability, especially during overclocking.
- DRAM RAS# to CAS# Delay ou tRCD : (3 to 18 DRAM Clocks): The data stored in the memory is classified in the form of tables made up of rows and columns. This option allows you to reduce the time between the insertion of a row and a column in these same tables. The shorter the delay, the better the performance.
- DRAM RAS# Precharge ou tRP : (3 to 18 DRAM Clocks): This option is used to indicate the number of clock cycles necessary to accumulate information in the columns of “memory tables” before the memory is refreshed.
- DRAM RAS# Activate to Precharge ou tRAS (3 to 18 DRAM Clocks): Number of clock cycles between the activation of a command and the precharge which follows. We can know this value by the following sum: tRAS = tCL + tRCD + 2.
- Row Refresh Cycle Time ou tRFC (Auto, 20, 25 ... 85, 105, 132 DRAM Clocks): The delay between a refresh command and the next command must be greater than or equal to this time. This parameter should not be set too low.
- Write Recovery Time ou tWR (Auto, 1 to 15 DRAM Clocks): Delay existing between the end of a validated command and the preloading of the next. The shorter this delay, the more memory can load the next command, but too little time can cause write errors.
- Read to Precharge Time ou tRTP (Auto, 1 to 15 DRAM Clocks): Number of clock cycles between the reading of one command and the precharging of the next.
- Read to Precharge Time ou tRTP (Auto, 1 to 15 DRAM Clocks): Time interval between the reading of one command and the precharging of the next.
- Read to Write Delay ou tRTW (Auto, 1 to 15 DRAM Clocks): Delay existing between the last read operation and the next write command within the same module.
- Write to Read Delay ou tWTR (Auto, 1 to 15 DRAM Clocks): Number of clock cycles between the last validated write operation and the next read command within the same module.
- Read to Read Delay ou tRTR (Auto, 1 to 15 DRAM Clocks): Time lapse between two read operations.
- Write to Write Delay ou tWTW (Auto, 1 to 15 DRAM Clocks): Delay existing between two read commands within the same module.
- Pre to Pre Delay (Auto, 1, 2, 3 DRAM Clocks): Time interval between two preloads on the same memory module.
- All Pre to Act Delay (Auto, 1 to 15 DRAM Clocks): Time that elapses between the precharging of a command and its effective activation.
- DRAM Static Read Control (Auto, Disabled, Enabled): Used to slightly increase the performance of the RAM, but significantly strain the modules. Its effects are felt more at frequencies that are not very high.
- DRAM Read/Write Training (Auto, Disabled, Enabled): Option allowing to dynamically compensate for any desynchronizations during data transfers within the RAM.
- Extreme Memory Profile : Technology developed by Intel to facilitate overclocking. Predefined profiles recognized by the motherboard allow the operation to be carried out by avoiding test operations.
Tensions :
- CPU Voltage (Auto, from Min to Max in 0,00625 V increments): Voltage applied to the processor. Too high a value can severely damage the latter, too low a value will prevent it from functioning correctly. Only touch this value for the purpose of overclocking.
- CPU PLL Voltage (from 1,5 to 2,2 V, in increments of 0,02 V): The increase of this voltage has the effect of a certain stabilization of an overclocking by increasing the reliability of the multiplier.
- FSB Termination Voltage (from 1,2 (1,1 for 45nm CPU) to 1,7V in 0,02V increments): Again, a value higher than the original voltage may help you increase the stability of your overclocking. But beware of overheating!
- DRAM Voltage (1,8 to 2,7 V in 0,02 V increments): Voltage applied to the RAM modules. Be careful to follow the manufacturers' instructions or your machine risks significant instabilities.
- QPI / Mountain Bike Voltage : The QPI bus is very sensitive to voltage increases. Doing this can improve the performance of your machine, but can quickly make your machine unstable.
- NB Voltage (1,1 to 1,7 V in 0,02 V increments): Voltage received by the Northbridge. Increasing this value can once again improve the stability of an overclocking, especially if the latter directly affects the FSB.
- Load-Line Calibration (Auto, Enabled, Disabled): This option stabilizes the voltage delivered to the processor and can potentially significantly stabilize any overclocking.
- CPU GTL Reference (Auto, 0.65x, 0.63x, 0.61x): GTL for Gunning Transceiver Logic. Quite complex processor power supply parameter which allows greater stability if the coefficient is increased. The higher the FSB, the greater the influence.
- CPU Spread Spectrum (Auto, Disabled): When this option is enabled, it slightly oscillates the frequency of the current flowing through the processor to avoid sending and receiving electromagnetic disturbances.
- PCIE Spread Spectrum (Auto, Disabled): Same explanation as the previous one for the PCI-Express bus.
Startup, power and other controls
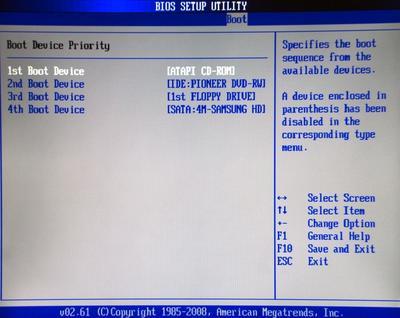
All of your computer's boot options can be found here, and more particularly in the Boot menu or in the advanced options of your BIOS.- 1st boot device (Disabled, ...): Allows you to choose the first element on which the machine will look for a boot sector. This can range from a removable device (a USB key ...) to a hard drive, including the DVD player. You can also choose the second and third boot devices.
- Quick Boot (Enabled, Disabled): Activate this option to prevent certain messages from appearing at startup and to pass certain usual checks.
- Full Screen Logo (Enabled, Disabled): Some manufacturers do not hesitate to display a large logo on your screen each time you start your computer; deactivate this option to no longer display it.
- AddOn ROM Display Mode (Force BIOS, Keep Current): Allows (Force BIOS) or not to display the boot information of the array.
- Bootup Num-Lock (On, Off): Enable this option to take advantage of locked keypad startup.
- Wait For 'F1' If Error (Enabled, Disabled): If the system detects an error during startup, it displays or not, depending on whether this option is enabled or not, to wait for a confirmation from you via the F1 key.
- Hit 'DEL' Message Display (Enabled, Disabled): Allows or not to display the message indicating that the BIOS is accessible via the DEL key.
- Change Supervisor Password : Change or add a password for the system administrator.
- User Access Level (No Access, View Only, Limited, Full Access): Defines the rights of the user other than the supervisor vis-à-vis the BIOS.
- Change User Password : Option to define or change the user's password.
- Clear User Password : Resets this password to zero.
- Password Check (Setup, Always): Defines the times at which you will be asked for your password: when entering the BIOS or at each boot.
Power Options
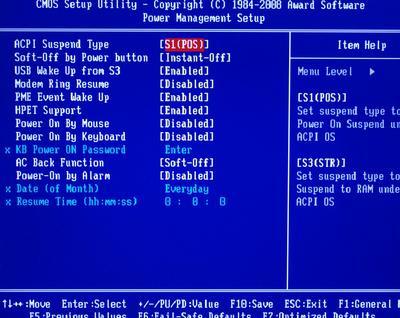
The following options are not among the most used, but can be useful to the most geeks among you! Suspend Mode (Auto, S1 (POS) Only, S3 Only): Energy management during standby. In S1 mode, the processor is stopped, the memory is refreshed, the machine is in a standby state. In S3 mode, the processor is stopped, and the memory is refreshed as little as possible.
- ACPI 2.0 Support (Enabled, Disabled): This option must be enabled to benefit from the latest energy saving technologies (AMD Cool n'Quiet, Intel SpeedStep).
- ACPI APIC Support (Enabled, Disabled): Also enable this older power management option.
- APM Configuration : Another power management that is rarely used today.
- Restore on AC Power Loss ou AC Back Function (Power Off, Power On, Last State): Choose the behavior of your BIOS in the event of a significant voltage drop.
- Power On By RTC Alarm (Enabled, Disabled): Possibility to turn on your computer at a defined time (RTC for Real Time Clock).
- Power On By External Modems (Enabled, Disabled): Activate this option to have the possibility of turning on your computer remotely via your modem and the sending of the famous "magic packet".
- Power On By PCI Devices (Enabled, Disabled): PC startup via one of the PCI cards.
- Power On By PCIE Devices (Enabled, Disabled): Likewise, with PCI-Express expansion.
- Power On By PS/2 Keyboard (Disabled, Space Bar, Ctrl-Esc, Power Key): Turn on your machine by simply pressing the space bar or another shortcut on your keyboard.
- USB Wake Up from S3 (Enable / Disabled): Waking up a computer from sleep type S3 via a USB device.
- Modem Ring Resume (Enable / Disabled): PC wake-up via modem signal.
- HPET Support (Enable / Disabled): High Precision Event Timer. It is a function similar to RTC, but that only the most recent operating systems (Windows Vista and not XP, for example).
- Power On By Mouse (Disabled / Double click): Turn on your computer by double clicking your mouse.
Other options
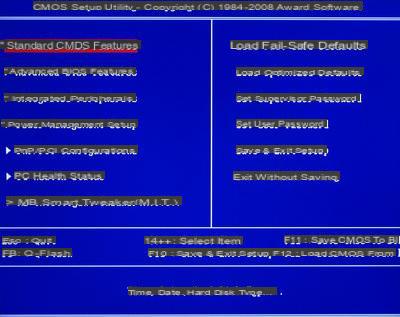
Here are the few menus and sub-menus which did not fit into any category and which mainly concern saving BIOS settings or loading existing settings.- Load Fail-Safe Defaults : Loads the default settings that ensure maximum stability, at the expense of performance.
- Load Setup Defaults : Loads BIOS default settings. Necessary when you are not sure of the stability of your machine.
- Load Optimized Defaults : Loads the optimized settings for your hardware. The risk of instability is minimal, but performance can still be improved.
- Save & Exit Setup ou Exit & Save Changes : Saves your settings and restarts the computer.
- Exit Without Saving ou Exit & Discard Changes : Ignore your changes and restart the machine.
- Discard Changes : Clears the changes made after the last backup of your BIOS.
Our roundup of various BIOS entries is drawing to a close, although this list is certainly not exhaustive. If one of your BIOS options is not in this article, feel free to ask your questions in the "target = _blank> BIOS section of our forum.
- Come discuss this article in the forum!
- Some articles that may interest you:
- Build and configure a new generation PC
- Decrease the temperature of your processor
- Report: impact of memory on performance


