Duplicate yourself on Google Photos
Finding duplicates in Google Photos is not a trivial thing, especially if you have stored a lot of images. However, the presence of many double photos is a problem because on the one hand it creates disorder and on the other hand takes up precious space. The same is also true if you have duplicate photos on your PC and need to remove. Fortunately, there is a way to delete duplicate photos from Google Photos and in the following paragraphs we will describe it in detail.
Some causes of duplicate photos
The main cause of duplicate photos is that the user has uploaded them twice. This often happens because you don't always realize that the image was already loaded. You can also accidentally create copies when you edit a photo, and depending on the changes, the new file can be nearly identical to the original.
Bugs and glitches can also create duplicate photos in your Google Drive account. Sometimes when you add a new device to Google Photos or enable the “backup and sync” feature, it will upload a file that is already in the cloud because the two images have slightly different metadata. Now that you also know the main causes of the problem let's see how it is solved, that is how these double photos are found and deleted.
1. Use Google Photos double photo detection function
Google tries to prevent duplicates with a "identical file detection" feature. This feature scans the content and metadata of any image uploaded to the cloud and verifies that it is not already there.
It is really easy to use this feature as it is automatically enabled and will delete duplicates without any user intervention. However, it has limitations on what it will eliminate and there are some steps you need to follow to improve the effectiveness of this feature.
A) Use Google Photos, not Google Drive
You can upload photos to your main Google Drive or to Google Photos. However, you should only use the latter, as duplicate detection cannot be compared between different apps in Google Workspace, and Google Photos can also detect identical images with different names.
2. Use third party apps to remove duplicate photos on Google Photos
Since Google's duplicate detection isn't very effective, there are solutions free third-party that can help you find and cache duplicates from your cloud storage. You can find many programs on the web that can do this, such as "Photo Video Duplicate Remover", "Duplicate File Finder", "Cleaner for Drive" or "Duplicate Photo Cleaner". These tools all follow a similar process.
Before you download and use any of these programs you will need to do these simple steps:
A) Make sure your computer is synced with your Google Drive.
To do this, you need to have the Google Drive app (now called Backup and Sync) installed on your computer and have an active internet connection. You can download Backup & Sync from this official page
B) Log in to your account and enable backup and synchronization
After installing the Drive app, log into your account. This will create a “Google Drive” folder on your computer where you will find all the files and folders from your Drive account. For more details on how to install and activate this synchronization read this guide.
Now that you have access to your photos also from your computer (PC or Mac) you can use software that can find and remove duplicate photos.
Step 1. Download the program
Regardless of which app you choose, the first step is to download and install it. Make sure you get it from a trusted source and have a good antivirus to protect your computer. We have tried Foto Video Duplicate remover that you can download on your Windows PC from the following button:

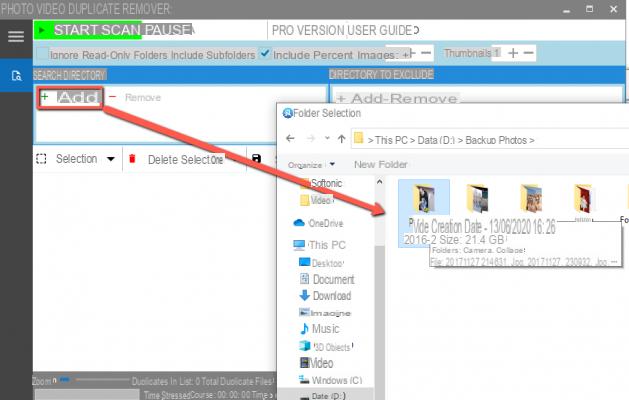
Step 2. Give access to your photos
Depending on the program you are using, give it access to your photos by selecting the Google Photos folder in the app. Click on ADD and select the Google Photos folder containing all the photos to be scanned.
3. Start Scan
Click START SCAN at the top and the program should provide you with a list of all identical images it finds, but you may need to reduce the similarity threshold to eliminate all similar photos. The scan time obviously depends on the amount of data to be analyzed, it could take a few minutes or even hours.
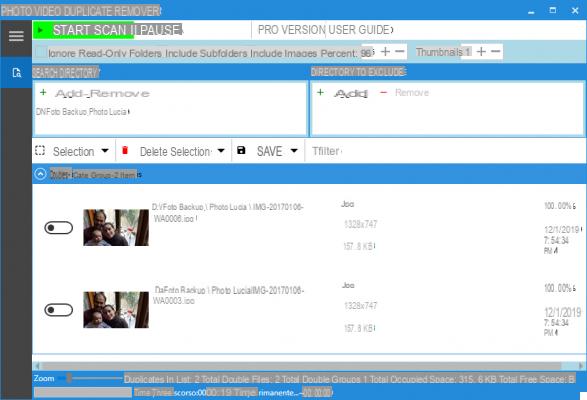
4. Remove duplicate photos
To prevent the program from accidentally deleting the images you want to keep, it will ask you to delete any duplicates it finds. Be sure to check them all to avoid accidentally deleting an image that is not a duplicate.
3. “Manual” removal of duplicate photos
If you find that neither built-in software nor third-party apps are capable of removing all of your duplicates, the best option is to simply review and delete them Manually. This will take some time, but you just need to do it once in a while.
1. Find duplicate images
Go through all your photos and look for an identical couple. Since Google sorts them by date, it is very likely that they are next to each other and you shouldn't need to move back and forth much.
2. Open the photo and find the trash can icon
You can click on the image to see it in more detail and get various options. In the upper right corner, there will be a trash can icon, which you need to select to delete the image.
3. Delete duplicate photos
Click the "move to trash" button to delete the image. The photo will remain in the trash folder for 60 days in case the wrong one is removed, but after this time it will be unrecoverable.
How to avoid duplicates on Google Photos
The quickest, easiest and most reliable way to avoid duplicates is to prevent them from being created, of course! The best way to do this is to keep all your photos on one single Google account or connect them via MultCloud, which increases the chances of the built-in detection eliminating your duplicates.
You should also make sure to remove the original file if you have edited it. Making regular copies while editing is a great way to avoid a mistake that could delete your photo, but it will also fill up your storage quickly.
Another option is to disable functions like "backup and synchronization”And manually upload the photos to your Google account instead. This will allow you to control the images that are moved from your hard drive to your cloud storage and you can protect them while they are on your computer with any good online backup provider.
However, if you just want to reclaim the space on Google Photos, you could set the photo to be saved in "high quality" and no longer "original" quality. This will give you access to a photo memory Unlimited with a decrease in quality to 16 MP for your photos (which is still a high resolution).
How to Find and Remove Double Photos on Google Photos? -


![[Solved] Windows 10 Insufficient Memory (RAM) Problem -](/images/posts/aabafb64e368ee47c956532867079e57-0.jpg)